Get the most Optimized Sections for your designs, in a single click.
The SkyCiv Member Design Designer saves users time, by adding checking every possible section in a given database and choosing the shape with the lowest cross sectional area and best utility ratio. Currently, the Designer supports all SkyCiv Design Codes (AISC, NDS, AISI, AS, CSA, BS, Eurocode and more…). There are a few criteria for the Designer to work correctly:
- The Section must be loaded from a library in the Section Builder
- The Member Design Check function must be able to run
The Designer exists on all of our steel, wood and cold formed member design software via SkyCiv Structural 3D, SkyCiv Beam and our Standalone Design software. Want a full video walkthrough? Visit our example tutorial on this feature.
Launching the Designer
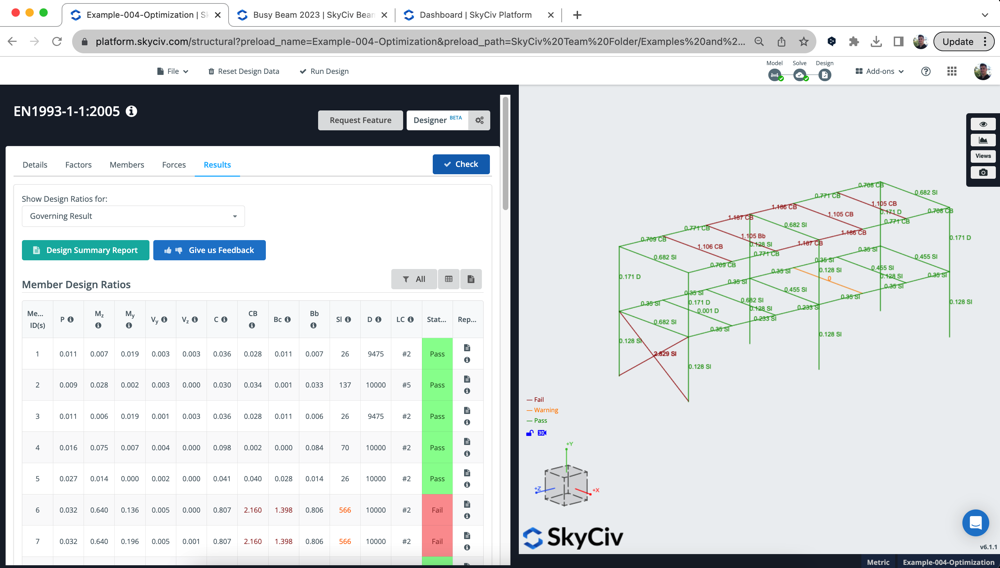
To launch the Member Design Designer, you’ll need to first open up the Member Design module which you are designing your structure to. In this example we are running a Eurocode steel check. Once the module is open, simply click the Designer button in the top right corner of the module. In the below model, we are using a steel model, that clearly has some failing Eurocode members, let’s see if we can get them to pass:
Settings Modal
Users have a number of controls and settings available, including a targeted Utility Ratio, Section Height/Width limits and which sections you wish to design. By clicking the Designer button, the following options will appear:
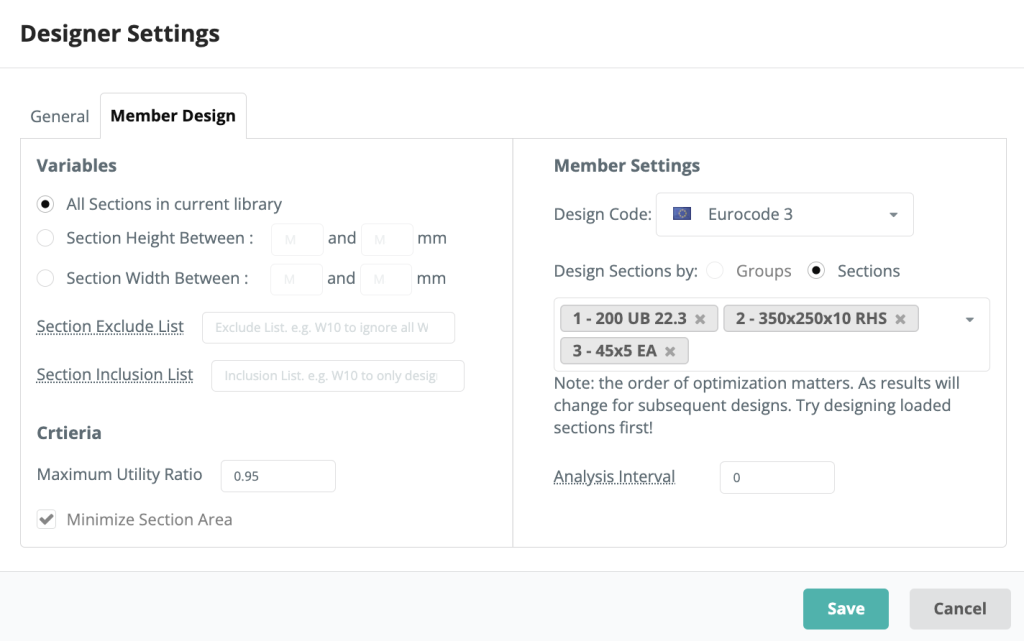
Variables
Users have the option to choose between all the sections from the library, a range of section heights or widths. These options will govern what sections, the Designer looks at when selecting the most optimized section
Criteria
Users can input their own maximum utility ratio for the Designer, this would mean that any result with a higher UR than specified will not be considered a valid choice.
Member settings
In this area of the settings modal, users can select their design code as they normally would in the Member Design module. The modal will also import whichever sections are designable in this module, but the user has the control to add/remove which sections they wish to design. The Designer will design a single section at a time.
The analysis interval is an important setting, and will tell the software how often to re-run the FEA solver. By default it is set to 0 – meaning we will use the same internal forces when testing each section. This is usually ok, since the bending moment, shear force and axial results won’t change too much when changing a section. However, deflection results will change and can affect the results – as we use a lighter section, the deflection result will need to be updated as the self weight is reduced.
So users can then increase the frequency at which the solver is run between testing sections. The only caveat here is that it will slow down the process, since the FEA solver has to run between section changes. For instance, if you set the interval as 1, it will re-solve between every single section test.
The Designer’s Process
The Designer runs in the following way:
- Runs an initial analysis/design to ensure model setup is correct and to determine current results
- Starts testing the first section:
- Ranks all the sections in the specified library in order of cross-sectional area
- Changes a section in the model and re-runs the analysis (depending on the analysis interval setting)
- With the new analysis results (bending, deflection etc..) we test the next section in the library
- Store the results and run the next analysis
- For speed and performance, any unnecessary tests will be skipped. These are if (a) the last 5 tests have produced worse results or (b) we have already found the best possible utility ratio (c) we’re failing by some large number, we will skip 5 sections
- Start on the next section, with the updated sections from previous iterations carried through
This is why the order of the sections matters, since we will update the model as we go along if you end up with lighter elements from previous section optimizations, they will affect the results in subsequent section optimizations. If it helps, users can review the log of exactly what the Designer did under View Log when the results come back.
Consider the case where the columns are optimized first. They may pass, but then as you start designing the beams above (perhaps making them thicker/heavier) then when you go back to recheck the columns, they may fail. However, optimizing them in the opposite order, shouldn’t have this issue.
Results
The results of each section will display in a popup, summarizing the selected section, it’s utility ratio and options on committing. In the below example, all 3 sections of the model were optimized:
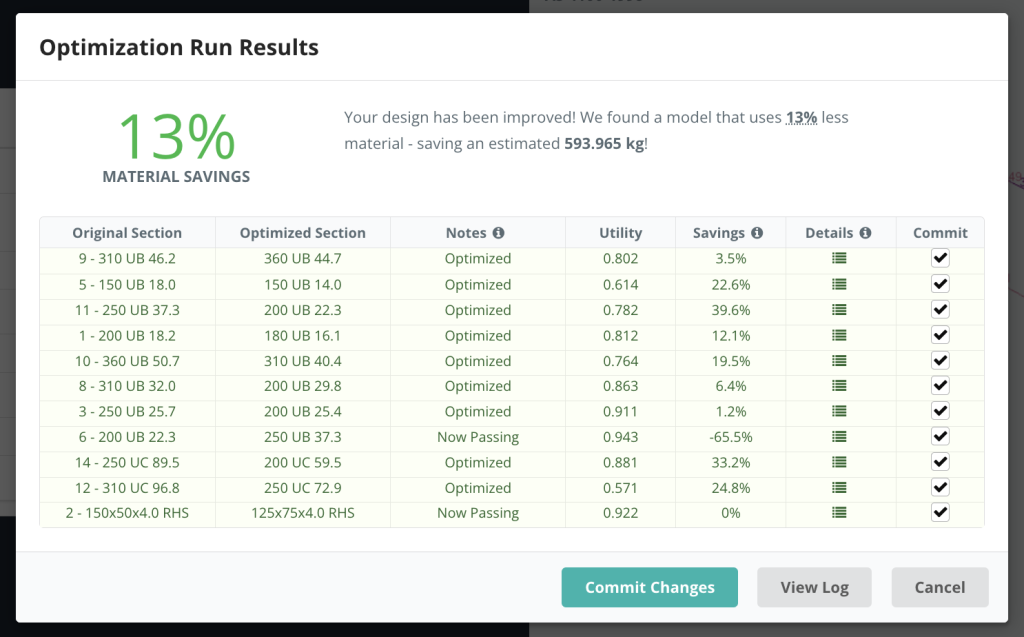
We can take a closer look at all the runs and their results by clicking the icon under Iterations. This will display the following detailed list of runs. For instance, selecting section 2 (RHS) will show the following:
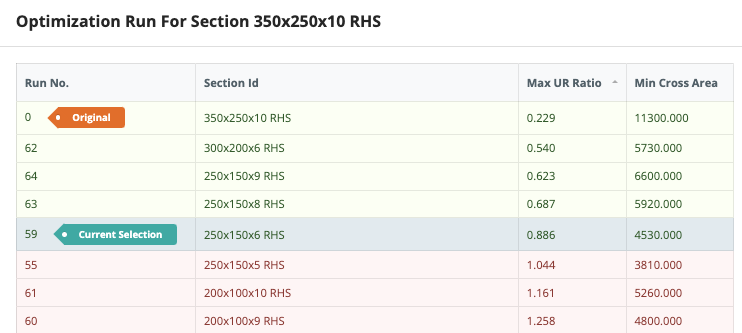
From here we can sort by Max UR, cross area and SFO (a weighted index) which will show the best result based on your predetermined criteria (in settings). This allows users to review the optimization runs to make sure the right section has been selected. In the above example, we set a max Utility Ratio of 0.95 and a desire to minimize the cross section area. It has reduced the area significantly and selected a section that still meets this design criteria.
Committing your Results
Once you’re happy with the results, you can hit Back and click Commit Changes to accept those sections. The software will commit these shapes in both the Design module, and your Structural Model. The software will also re-run your design check to give you the most up to date results. So in our above example, after committing we can see the sections are all working (except for the one section which was over loaded):

Changing your section from the design mode, will mean that your analysis results are out of alignment with your current model. For this reason, we highly recommend going back and resolving your model and re running the design check to ensure your analysis and design results are in sync.
Troubleshooting
If you cannot get the Designer to run, you should check the following:
- Are your sections loaded from the SkyCiv section database? The sections need to be loaded from the Section Builder database, this way the Designer knows which catalog of sections to test
- Can you run a Member Design “Check”? This will confirm that the sections are all designable and your model is setup correctly. Since the Designer iterates through this, it will need to run for your base model in order to function
- Do you have any special elements (tapers, rigid members)? The UI should prevent this, but in certain cases this can still slip through. Please remove those special elements from the settings modal and try run the Designer again
- Check your materials match the design code being tested. Again, this should be blocked by the UI but in some cases this can occur. Go back to your model and check those sections align with the design code you are trying to run. For instance, NDS should have proper NDS materials or AISC should have a steel material assigned to the section.
- Is your model an opposing unit system to the design standard unit system? We recommend running US design codes in Imperial and AS,EN,BS,CSA etc.. standards all in Metric