Excel Add-in for SkyCiv API V3 Structural Analysis Design and Modelling
Introduction
Excel is iconic spreadsheet software used widely in science and engineering. In structural engineering the power of Excel, especially in conjunction with macros, is renowned for its accessibility, flexibility and computing power. SkyCiv for Excel breaks new ground in engineering software integration by providing users with a full suite of structural analysis and design tools from within Microsoft Excel. It’s also worth noting that the plugin is a built-in app, not just a sheet or VBA macro.
This documentation page covers the following aspects of the SkyCiv Excel plugin:
Getting Started
Installation
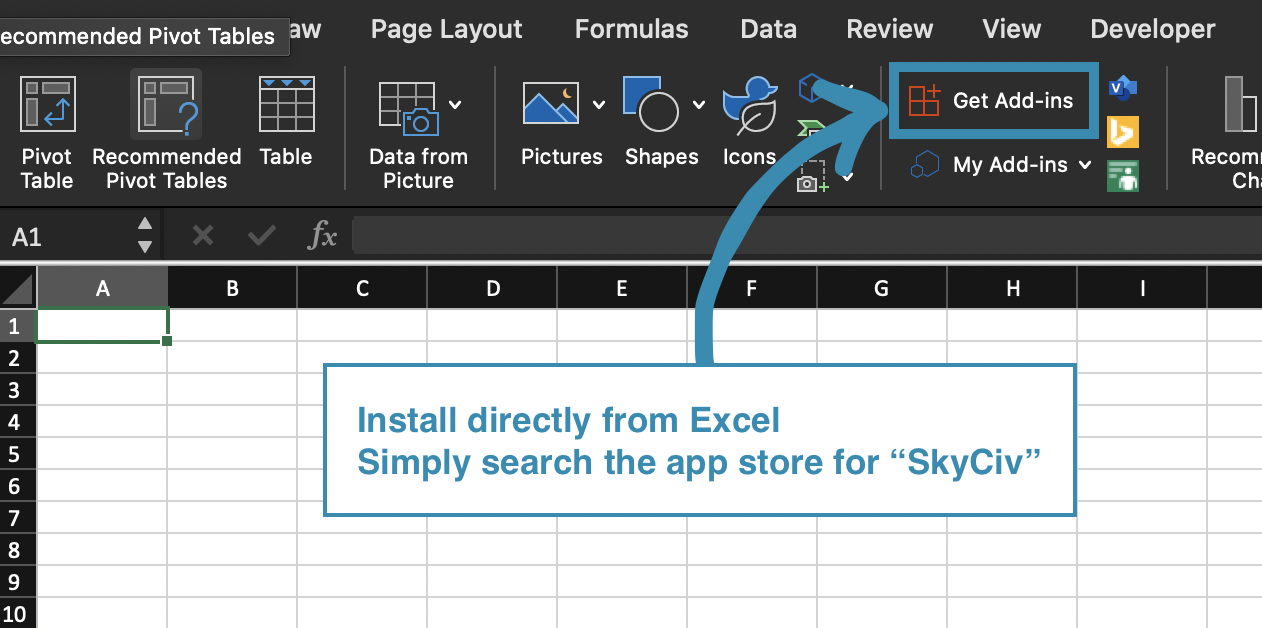
To install SkyCiv for Excel, navigate to this page and click “Get it now”. Follow the install prompts and once installed, you should see the SkyCiv tab in the Excel client. Alternatively, you can install this add-on directly from Excel (just search the AppSource for SkyCiv):
Once installed, click the tab and you will be presented with a new ribbon of tools as seen below.

Available Tools & Functionality
Here is a brief explanation of each button in the ribbon from left to right.
- Auth: This is where you enter your SkyCiv API credentials. These are required to allow you to run analysis, design, access the sections database and open or save models. This is not required to build your model or to view it in the renderer.
- Open: This is where you can access all of your SkyCiv models, even those built on the website. Upon selection, the model will be imported into the workbook. If you have not selected the Setup button prior to selecting a model, this will automatically be done for you to create the tables.
- Save: This is where you can save your model to the SkyCiv platform.
- Open in S3D: This will save your excel model under the name ‘temp-excel’ and then open it in the browser. Allow 10 seconds or so for this action to complete.
- Setup: This will create empty tables enabling you to build a model from scratch.
- Sections: This will present an interface where you can select various member sections and insert them into the sections table.
- Analyze: This is where you can run an analysis on your model. The results will be provided in new sheets.
- Design: This is where you can run a design on your model. The results will be provided in new sheets.
- Render: This will open the SkyCiv renderer inside Excel. You will see your model update live in the renderer as it is edited.
- About: This button will open this page in the default browser.
- Docs: This button will open the SkyCiv API docs in the default browser. This is where you can see what the allowable input is for each column of the SkyCiv worksheet.
Modeling
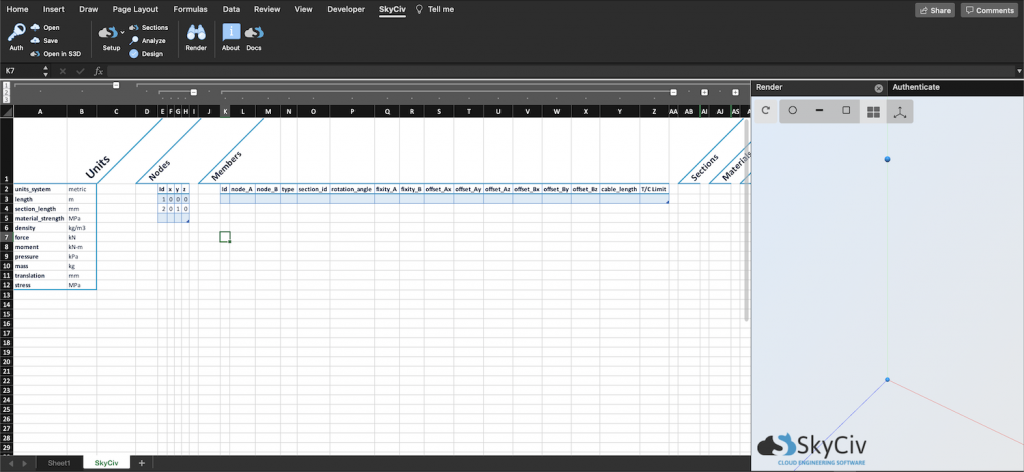
The best way to get started modeling is by clicking the Setup button and then choosing metric or imperial. The SkyCiv worksheet will be created with various tables. Expand the nodes and members sections by clicking the small + buttons above the column labels. Now click the Render button in the SkyCiv ribbon and you will see the Renderer task pane open on the right side of the workbook.
The ‘Id’ column for any table should start at 1 and increase – so enter 1,0,0,0 in the first of the nodes table. This creates a node with an ID of 1 at the x,y,z coordinates 0,0,0. Now in the next row, add another node: 2,0,1,0. This will create a node with an ID of 2 at 0,1,0. The renderer should now show two nodes, one at the origin, and another above it. If you do not see the two nodes, double-check that both rows are inside the nodes table by dragging the tiny arrow at the bottom right of the table to include both rows. This is what you should have so far.
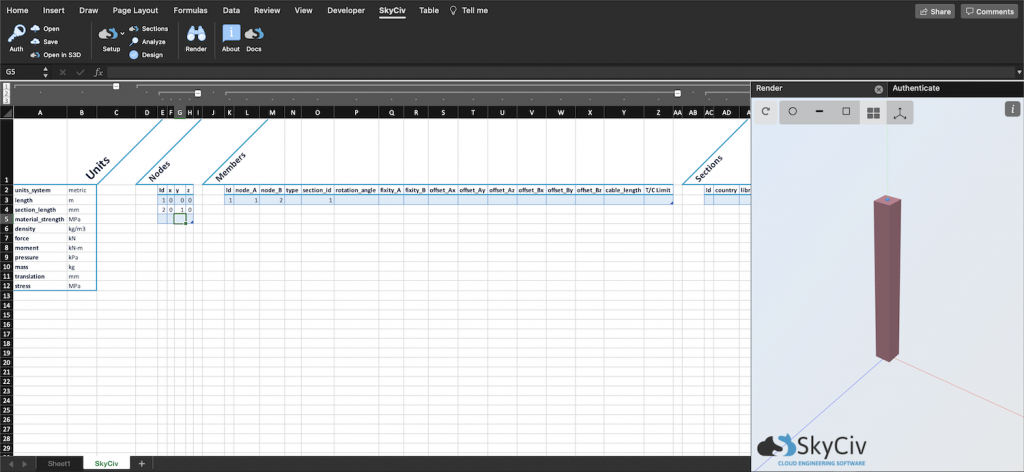
Now let’s add a member. In the members’ table, create a new member by adding ‘1’ for the ID in the first row of the members’ table. Set ‘node_A’ to 1, ‘node_B’ to 2 and give a section ID of ‘1’. The section ID corresponds to the row in the sections table with that ID. Note that at this stage, the renderer will only represent sections as solid squares. Now your tables should look like the following.
Another great way to get familiar with the Add-in is to open a basic model via the Open button and inspecting how the model looks when represented by tables.
Note that the inputs must be exact, for example, if we were to change one of the units such as kg/m3 to g/m^3, the use of the ‘^’ will cause failure. To see allowable inputs for any column, click the Docs button and you will land on the API Documentation page for creating a model. This goes for table headers too, do not change these.
Analysis
Once authenticated using the Auth tab, you can run an Analysis through the Analyze tab. You can choose the type of analysis, and which load cases and combinations to run. Note that including all cases and combinations is a lot of data! To increase speed, only select those that you need.
Once completed, new worksheets will be created with the name of the load case and combination and each sheet will contain all the results data. We have created a Results Lookup section to help you quickly check data across all result sheets.

Design
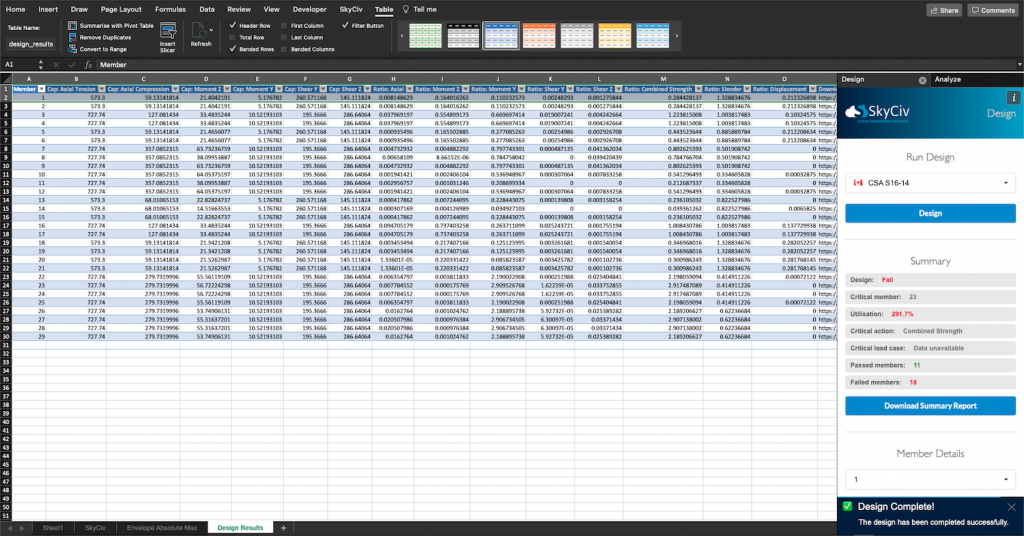
Once authenticated using the Auth tab, you can run design checks through the Design tab. Choose the correct design code for your model and click design. Once completed, the design results will be added to a new sheet named “Design Results”. The Design task pane will provide a summary of the entire design and also a section to quickly inspect any member and even download a design report for the member. Using the model from the above analysis, the following image is the result of the Design. The CSA code was selected as the model was created using Canadian sections and the metric system.
Currently, the Excel plugin supports the following design codes checks:
- AISC 360 2016 ASD & LRFD provisions
- Eurocode 3
- AS 4100
- CSA S16 2014
- BS 5950
- AISI S100
- AS 4600
- IS 800 LSM & WSM
Support
Need help along the way? Feel free to email us at [email protected] or via our Live Chat once you are logged in to the platform. For information on our terms and conditions for this app, visit our Term’s and Conditions page.