Setting up your company, adding team members and collaborating
SkyCiv’s software is all 100% cloud-based, so you can enjoy the many benefits of team collaboration (for instance Sharing Files and Revision Control). To set up your Business Account or to add additional seats to your SkyCiv Professional Account, simply follow the following steps:
Log into your admin account – whether you’re on a single Professional Account or a Business Account this will be the account which your company set up when the account was set up. If you wish to change the admin account holder, please email us at [email protected].
Adding Team Members
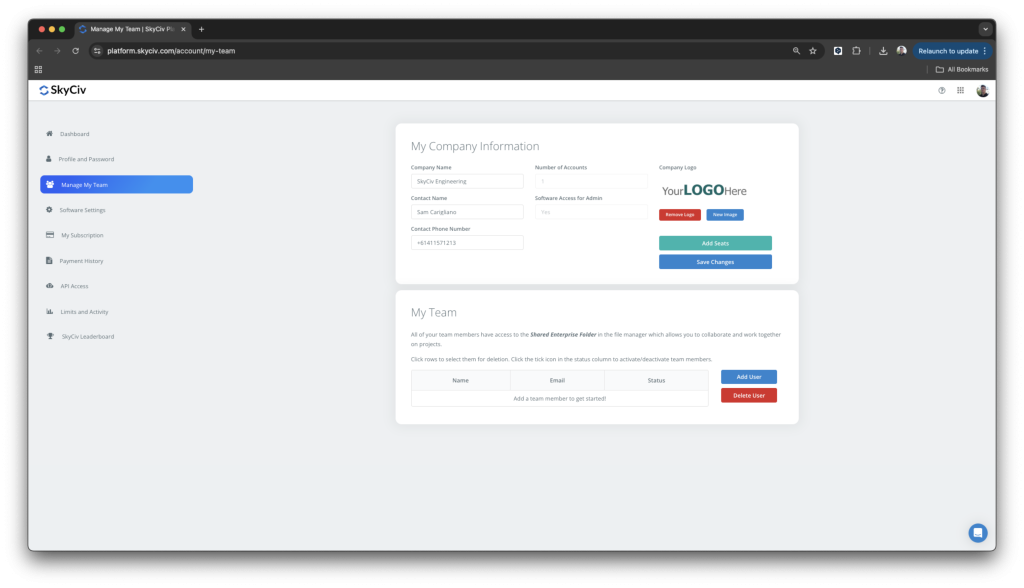
Adding team members is easy. As an admin account holder, you can add and control your team’s access. This is controlled from within the Manage my Team page, which can be accessed at any time from your Account Settings (from the top navigation bar). This should look like this:

Click the blue Add User button to add your team members. A small modal will display for you to enter the team members’ information, including first name, last name, and their email (which will be used as their username). An email will also go out to your team member, notifying them that they now have access.
You can also control access (deactivate and delete) to your team from here. If you need more seats, simply click the green Change Plan button and an email will go out to your Account Manager.
Adding a Company Logo
From here, you can also upload and control your company logo. This logo will display on all PDF reports generated by SkyCiv software. Upload your logo so you can market your company to prospects, clients and other engineers in a clean and professional manner.
Your Team’s Shared Folder
By default, your Business Account will come with a Shared Enterprise Folder which is a shared folder for all your team members. You can create subfolders within this folder to house all your projects so that your whole team can collaborate in real-time. Any files outside of this folder will be private and can only be viewed by the individual account holder only.
Alternatively, you can use our file sharing capabilities to share individual folders and models to work together. All revision controls are automatically applied to any shared file.
Downloading your Receipt
As an admin, you can also download receipts from your account settings. Simply visit Payment History and you can review all the payments made under your subscription. You can also download your PDF tax invoices from this area.


