キャンバス
あ キャンバス SkyCiv CAD プロジェクト内の単一の図面シートです. すべてのプロジェクトには少なくとも 1 つのキャンバスが含まれています, 必要なだけ追加できます – フロアレベルごとに 1 つ, 詳細ごとに 1 つ, または図面シートごとに 1 つ.
キャンバスは次から管理されます。 キャンバス 左側のサイドバーのアコーディオン. 各キャンバスには独自のジオメトリが保存されます, 注釈, データを個別にレイヤー化する.
キャンバスパネル
すべてのキャンバス管理は キャンバス アコーディオン, 左側のサイドバーにあります. クリック キャンバス ヘッダーを展開します. パネルにはプロジェクト内のすべてのキャンバスがリストされ、追加するためのコントロールが提供されます。, 切り替え, 名前を変更する, 並べ替え, コピーする, キャンバスの削除.
現在アクティブなキャンバスがリスト内で強調表示されます。. 一度にアクティブにできるキャンバスは 1 つだけです – すべての描画ツールはアクティブなキャンバス上で動作します.

基本操作
クリック 新しいキャンバスを追加 「キャンバス」パネルの下部にあるボタン. 新しい空のキャンバスが作成され、すぐにアクティブになります。.
段階的に
- 1を開きます キャンバス 左側のサイドバーのアコーディオン.
- 2クリック 新しいキャンバスを追加 パネルの下部にある.
- 3新しいキャンバスがリストに表示され、アクティブなキャンバスになります。.
💡
ヒント: 新しいキャンバスに名前が付けられます キャンバス 2, キャンバス 3, 等. デフォルトでは – プロジェクトを整理しておくために、すぐに名前を変更してください.
「キャンバス」パネルのキャンバス行の任意の場所をクリックしてアクティブにします。. 現在のキャンバスは切り替える前に自動的に保存されます, データが失われることはありません.
💡
ヒント: アクティブなキャンバス行がリスト内で強調表示されます。. 切り替えると、前のキャンバスの選択内容がクリアされます。.
キャンバス行の名前フィールドを直接クリックしてインラインで編集します. 新しい名前を入力して押します 入る またはクリックして確認します. キャンバス名はプロジェクト内で一意である必要があります – 重複は自動的に解決されます.
💡
ヒント: 次のようなわかりやすい名前を使用します。 1階平面図, 屋根の詳細, または セクションA-A マルチキャンバスプロジェクトをナビゲート可能に保つため.
クリック 重複したアイコン (重なり合う2つの正方形) キャンバスの任意の行に. そのキャンバスの完全なコピー – すべてのジオメトリを含む, 注釈, そしてレイヤーの割り当て – リスト内の直後に挿入されます.
💡
ヒント: コピーすると、同じ柱通芯を共有する新しい床レベルを簡単に作成できます。 – 複製, 変更部分のみを変更します.
クリック 赤いゴミ箱アイコン キャンバス行でプロンプトを確認します. 削除は永続的であり、すべてのジオメトリが削除されます, 注釈, そしてそのキャンバス上にデータをレイヤーします. デフォルトでは確認ダイアログが表示されます – 小切手 “二度と聞かないでください” 今後スキップするために.
⚠️
注意: キャンバスが 1 つだけ残っている場合、ゴミ箱アイコンは無効になります – プロジェクトには常に少なくとも 1 つのキャンバスが必要です. 削除は元に戻せません.
使用 アップ そして 下矢印 キャンバスの各行にあるボタンを使用して、リスト内で前後に移動します. 矢印ボタンは、パネルが表示されている場合にのみ表示されます。 階層 注文 – それらは次の場合に隠されます 標高順に並べ替え アクティブです (標高の順序は標高値によって制御されます, 手動位置ではない).
💡
ヒント: 矢印ボタンがない場合, トグル 標高順に並べ替え オフにすると、手動順序付けが可能な階層モードに戻ります。.
昇格と並べ替え順序
プロジェクトが多階建て構造の場合, 各キャンバスには 標高 3D 構造モデルの正しい高さに配置する値 (S3Dエクスポート). キャンバス リストは、これらの標高値によって、またはカスタムの手動順序で並べ替えることができます。.
の 標高順に並べ替える Canvases パネルの下部にあるトグルにより、2 つの表示モードが切り替わります。:
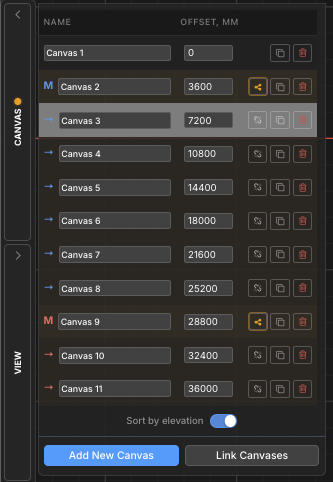
- 標高順に並べ替え (オン): キャンバスは標高の低いものから高いものの順に並べられます. アン オフセット 各キャンバスの標高値を示す列が表示されます. この順序は、S3D 3D モデルのエクスポートでキャンバスがどのようにスタックされるかを反映しています。.
- 階層 (オフ): キャンバスは、上/下矢印ボタンで制御できるカスタム順序で表示されます。. キャンバスグループ (マスター/チャイルド) ここにインデントされた階層を表示します.
💡
ヒント: 標高が割り当てられていないキャンバスは、標高モードではリストの一番下に表示されます。, 内部インデックスでソート.
いつ 標高順に並べ替え オンです, AN オフセット 列が表示されます. 立面図のないキャンバスには、 + ボタン – クリックして割り当てます. 立面図のあるキャンバスには編集可能な数値フィールドが表示されます.
標高の値により、3D 構造エクスポートで各フロアがどのくらいの高さに配置されるかが決まります。. 単位はプロジェクトの長さの単位と一致します (んん, CM, メートル, フィート, に).
段階的に
- 1有効にする 標高順に並べ替え オフセット列を表示するには.
- 2クリック + キャンバスの横にあるボタンをクリックして標高を割り当てます.
- 3標高値を入力して、 を押します。 入る 確認する. リストは自動的に再ソートされます.
💡
ヒント: 標高の割り当て 0 1階のキャンバスへ. 新しいキャンバスの推奨値は自動的に次のように設定されます。 3000 既存の最高標高より mm 上.
キャンバスグループ (マスター / 子)
複数のフロアレベルが同じ構造レイアウトを共有する場合 (例えば. 複数のフロアにわたる同一の柱グリッド), それらをリンクすることができます キャンバスグループ. 1 つのキャンバスになります。 マスター そして他の人たちは 子供達.
マスターに加えられる構造上の変更は、 伝播した ワンクリックですべての子供たちに, ジオメトリを手動でコピーすることなく、リピートフロアの同期を維持します。.
キャンバスリスト内, マスターにはラベルが付いています M そして子供たちはラベル付けされます 右から左に、選択ボックス内に完全に含まれている要素のみが選択されます, どちらも共有グループのアクセントカラーで色付けされています.
クリック リンクキャンバス [キャンバス]パネルの下部にある をクリックして、リンク ウィザードを開きます. どのキャンバスにするかを選択します マスター そしてどのキャンバスがそのものになるのか 子供たち. グループの作成を確認します.
段階的に
- 1を開きます キャンバス パネルをクリックして リンクキャンバス.
- 2を選択してください マスターキャンバス ウィザードから.
- 31 つ以上を選択してください 子キャンバス それにリンクする.
- 4グループの作成を確認します. の M / 右から左に、選択ボックス内に完全に含まれている要素のみが選択されます ラベルとアクセントカラーがリストに表示されます.
💡
ヒント: に 階層 見る, マスター グループは、マスター キャンバス行の横にある三角形のトグルを使用して折りたたんだり展開したりできます。.
マスター キャンバス上の構造ジオメトリが変更された場合, AN アンバーハイライト マスター行とその子に表示され、グループが同期していないことを示します. クリック 伝播ボタン (共有アイコン) マスター行をクリックし、更新された構造データをすべての子キャンバスにプッシュすることを確認します.
⚠️
注意: 伝播により子キャンバスの構造データが上書きされます. この操作は元に戻せません. 子供に関する非構造的なコンテンツ (注釈, 寸法, 雲マーク) 保存されています.
クリック 鎖が切れたアイコン 子キャンバス行でプロンプトを確認します. キャンバスがマスターグループから削除され、独立したキャンバスになります。. 既存のジオメトリは保持されます – マスターから今後伝播される更新の受信を停止するだけです.
💡
ヒント: 子を削除しても、そのコンテンツは削除または変更されません – マスターへのリンクが切断されるだけです. を使用していつでも再リンクできます リンクキャンバス.