SkyCiv Structural 3D と Load Generator の統合により、荷重計算と荷重適用の間のギャップを埋めることができます。. この統合により, ユーザーはLoad Generatorモジュールで負荷を自動的に生成できます, 次に、それらを Structural 3D のモデルに直接適用します。. この機能は Structural 3D に直接統合されています, そのため、事前に別のモジュールに移動する必要はありません. その後, SkyCiv では、Load Generator アプリケーションに取り組む前に、構造のモデリング段階を完了することをお勧めします。, プロセスの全体的な精度が向上するため、.
次のタイプのコード生成荷重は、Structural 3D のモデルに直接適用できます。
- 風荷重
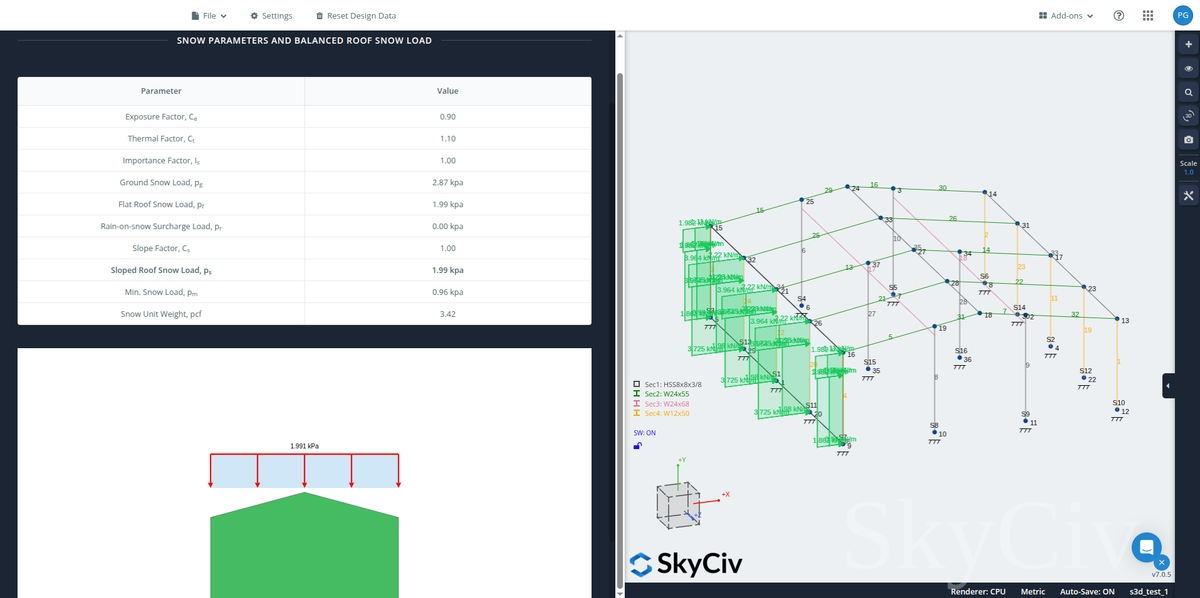
- スノーロード (バランスケース)
- 地震荷重 (スペクトル負荷として)
この記事に入る前に, SkyCiv は、次のソフトウェア ドキュメントに目を通すことを強くお勧めします。 構造 3D でのモデリング, 範囲 & 風荷重, スタンドアロンの使用方法にも精通している必要があります。 負荷ジェネレーター, これらの機能はすべて関連しているため、. このドキュメントでは、Structural 3D での操作中に統合バージョンの Load Generator を使用した荷重の適用に焦点を当てます。. したがって, このドキュメントでは、個々の負荷の計算方法については詳しく説明しません。, 使用しているコードに大きく依存するため、. 述べたように, リンク先からアクセスしてください Load Generator に関するドキュメント そして一般的な建築基準法, この記事を読む前に.
統合されたLoad Generatorを使用するには, 構造のモデリングを終了する, それからに行きます 面積荷重 Structural 3D での操作中に左側の入力タブ. その後, クリックしてください “設計コードから荷重を自動生成…“ボタン.
注意: 構造が単純であればあるほど、, 統合アプリケーションはより簡単になります. モデルが複雑になるほど, 荷重の適用の精度が低くなります.
Load Generator からの風荷重の適用
一目見ただけで、風荷重ジェネレーターの完全なスタンドアロン バージョンが画面の左側の入力側に存在していることがわかります。. ユーザーは、スタンドアロン バージョンと同じ機能を統合バージョンでもすべて利用できます。. 計算の保存、サイトおよび風荷重レポートの印刷などをここで実行できます。. 統合されたLoad Generatorで, 構造 3D モデルは常に画面の右側に表示されます.
![S3D の Load Generator の [サイト データ] タブ](https://skyciv.com/wp-content/uploads/2025/11/integrated-load-generator-with-structural-3d-v2_1-1-jpg.webp)
構造データの入力を進めていくと、, 特に建物の場合, 風向矢印が平行になる風向軸を選択することで、モデルの寸法を自動的に検出するオプションがあります。. このオプションを選択すると、, をクリックできます “建物の寸法を検出する” ボタンをクリックして、モデルから検出された構造の寸法を入力します。. これらの値が正しいことを確認するために、これらの値を再確認する必要があることに注意してください。. オプションとして、モデル間の距離をクリックしてドラッグすることで、モデル内の距離を測定することもできます。 2 ノード.

すべてのロードパラメータが完了したら, クリックしてください 負荷を生成する ボタン. 結果は別のタブに表示されます, 風用, 雪, または地震荷重.
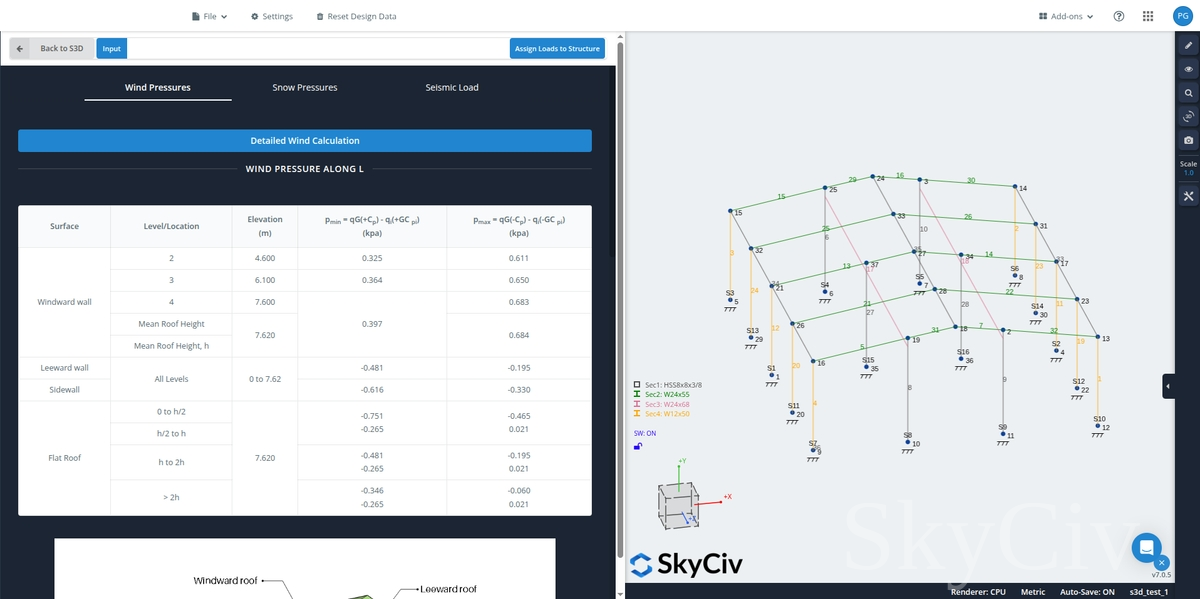

風荷重と雪荷重に荷重を適用するかどうかを尋ねるプロンプトが表示されます。. 地震荷重用, オプションは、生成された設計スペクトルを S3D のスペクトル負荷にコピーすることです。.
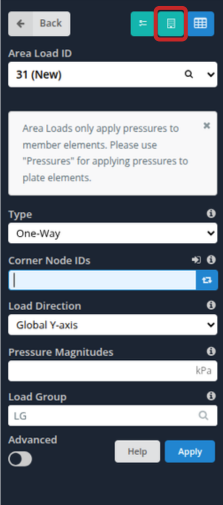
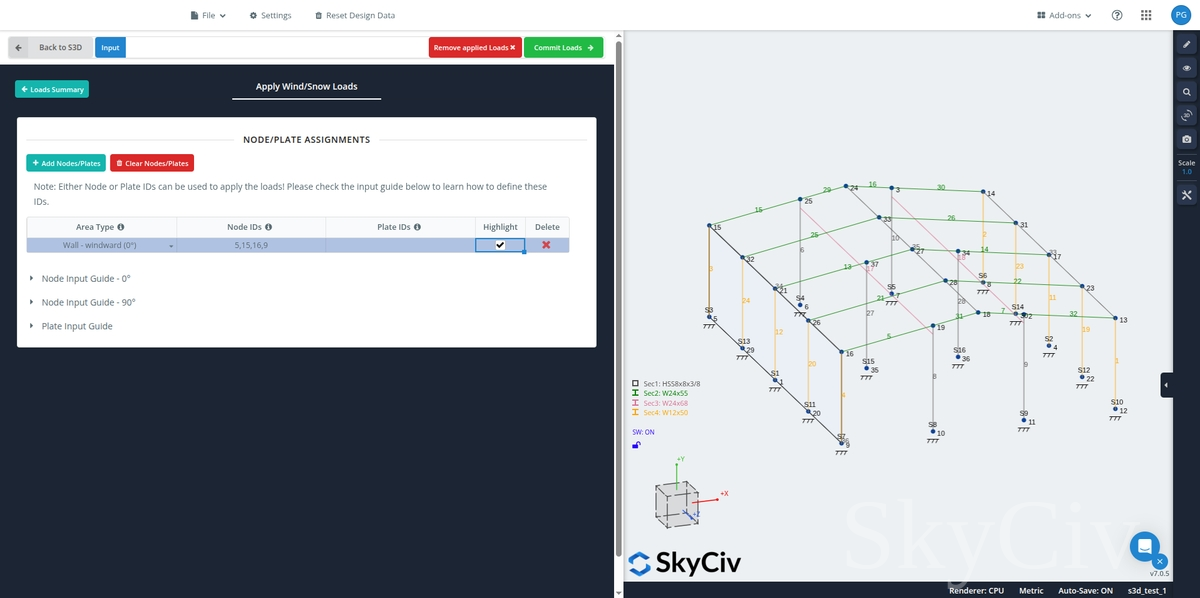
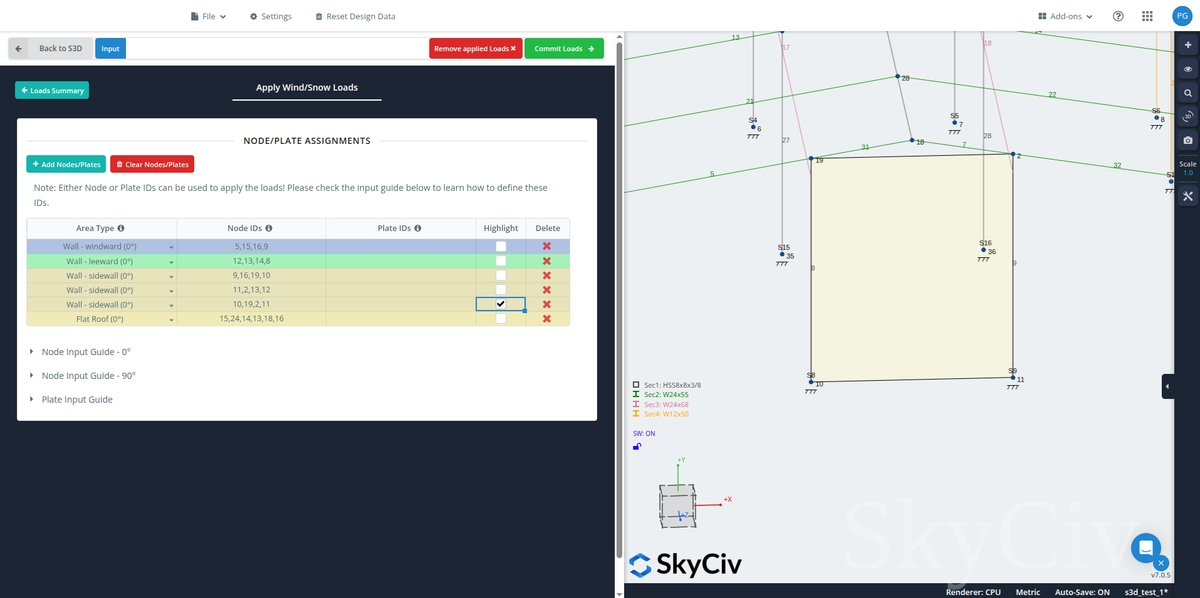
風荷重および積雪荷重の領域荷重を適用する場合, 圧力を正しく適用するには、特定の領域タイプのノード入力ガイドに従う必要があります。. これらのガイドは、ノード エントリ テーブルの下部に表示されます。.
エリアタイプ欄, 壁と屋根の表面にはいくつかのオプションがあります (ために 0 業界に関係のない証明書や賞を入れないようにし、応募する仕事に関連する履歴書を保管してください):
- 風上の壁
- 風下の壁
- 側壁

- 風上/風上屋根
- 風下/風下屋根
- モノスロープ屋根
- 平屋根 (屋根の傾斜角が未満 10 度)

ここでは、「荷重の適用」セクションで定義する必要があるノード領域タイプのほんの一部を示します。. 一般に, ノード ID が四角形の曲面を作成することをお勧めします。. 以下に示すように、総面積の概算を行うことができます。:
バージョンあり 6.1.2, ユーザーは追加できるようになります 5 ノードID (5 辺の多角形で囲まれる). また, ユーザーは、特に面積荷重の差異を修正するためにノード入力の手動編集が必要な場合に、S3D の荷重ジェネレーターから適用された圧力荷重の編集されたノード ID を同期できるようになります。.
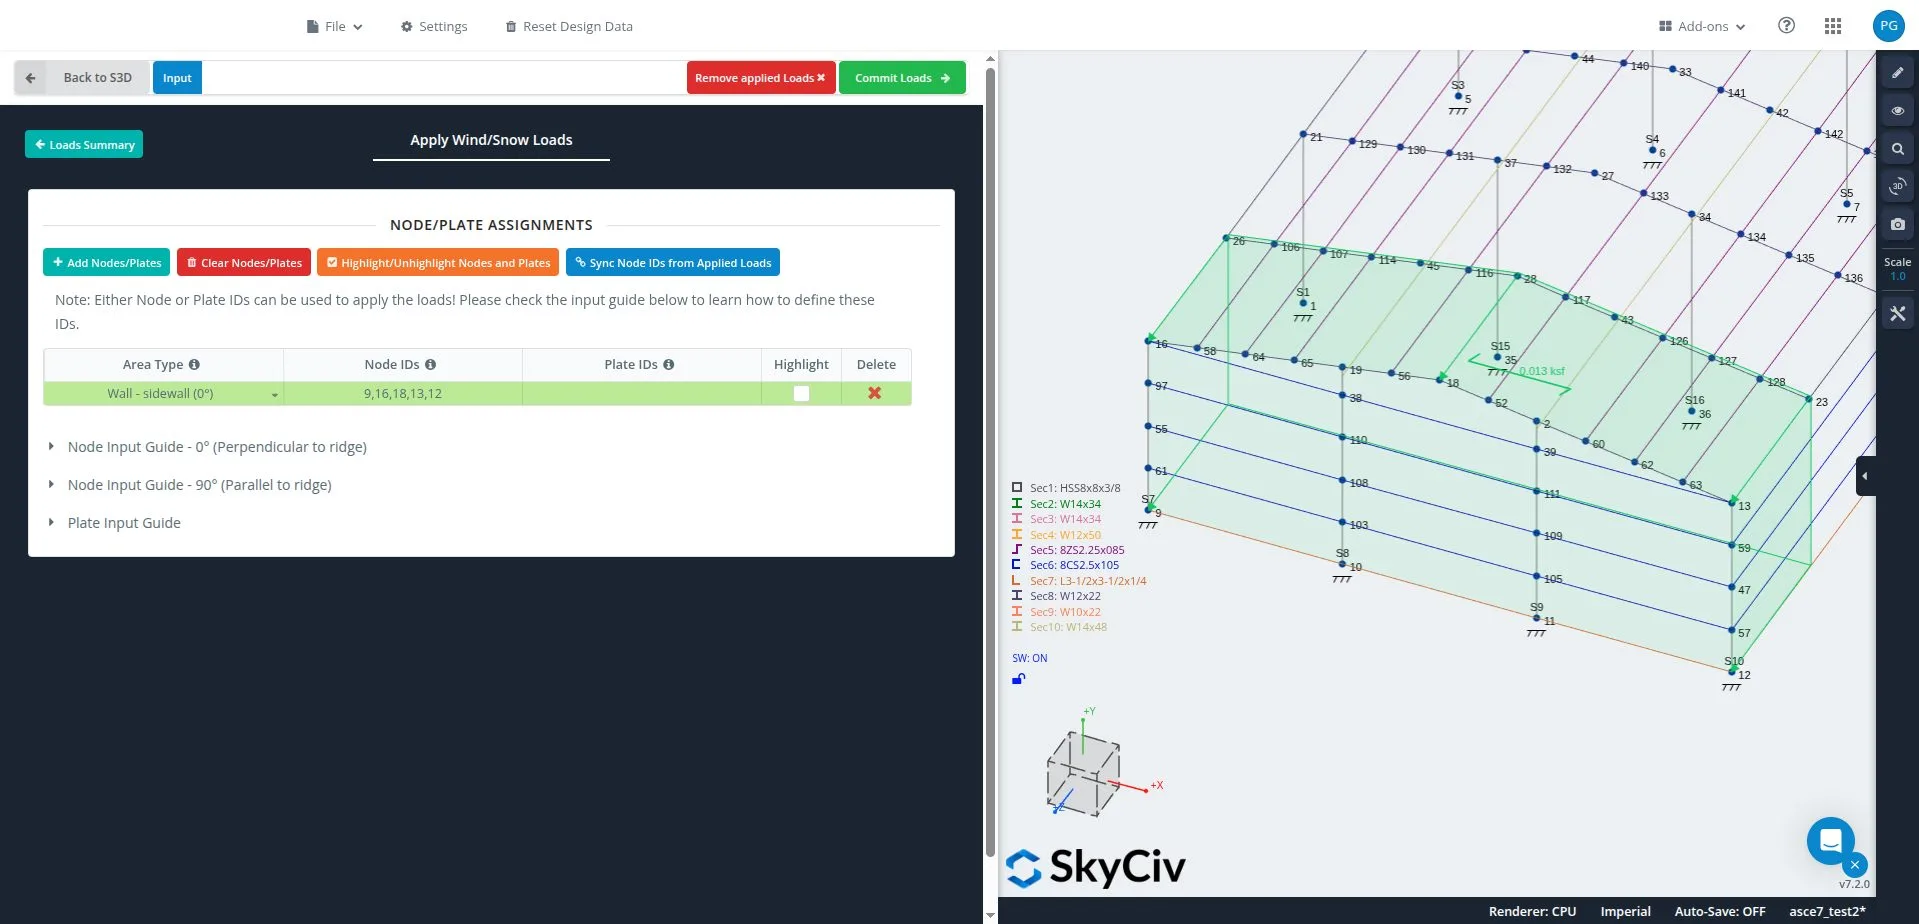
指定された構造に対するノード入力のサンプルと、対応する割り当てられたエリア タイプ/サーフェスを以下に示します。:
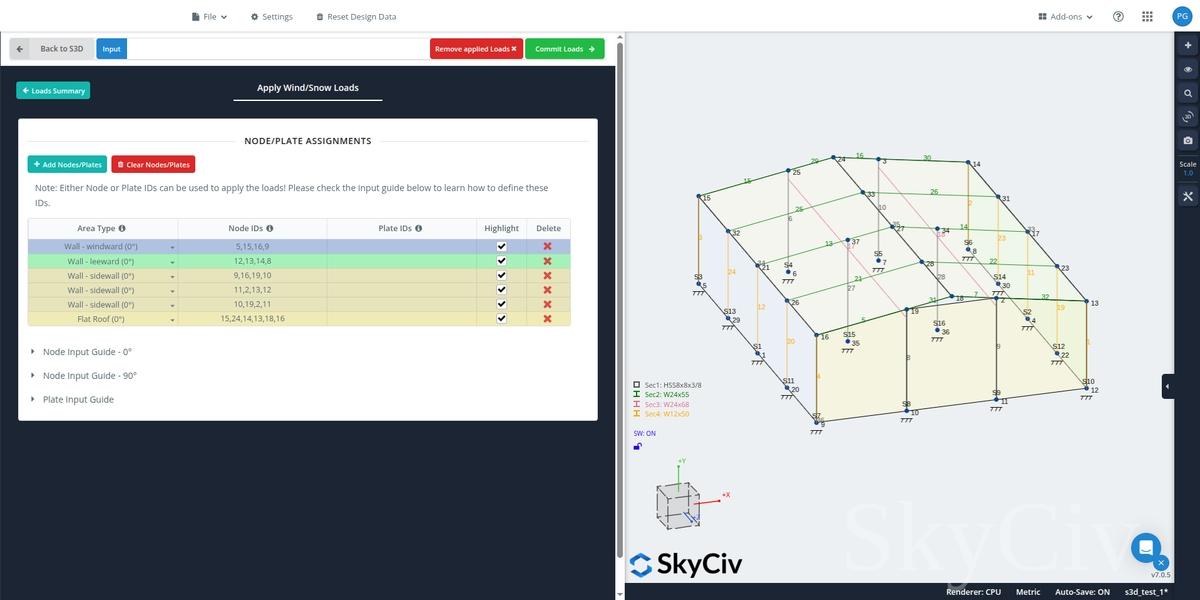
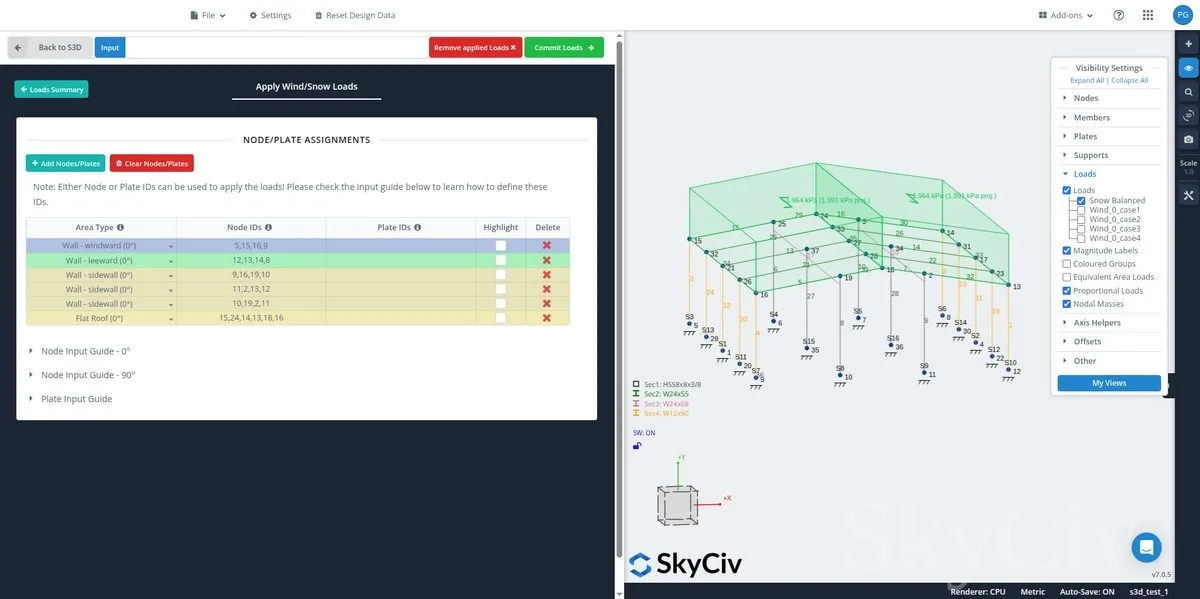
エリアタイプがすべて定義されたら, をクリックすると荷重を適用できるはずです。 “ロードのコミット” ボタン:
生成および適用できた荷重が、モデル上の 3D モデル空間に直接表示されることがわかります。. 各荷重ケースが同時に表示されます, そのため、何が起こっているのかを確認するのは難しいかもしれません. 発電機が開くと同時に, Structural 3D で利用可能な同じ表示設定とツールを使用して、さまざまな荷重ケースのオンとオフを切り替えたり、モデル空間内の部材を非表示または分離したりできます。.
アン 重要な注意点 発生風荷重について:
SkyCiv 非常に 推奨します をチェックアウトする 面積と風荷重 Load Generator から作成された領域のロードに関する詳細情報については、ソフトウェア ドキュメントの記事を参照してください。.
生成された雪荷重の適用
S3D 内で SkyCiv Load Generator を使用する場合, 屋根エリアのタイプがノード エントリ テーブルで定義されている限り、バランス/ドリフトのないケースは、選択した屋根プロファイルに基づいて適用されます。. この荷重は投影荷重として適用されることに注意してください.
発生した地震荷重の適用
地震荷重を加える場合, 推奨される方法は、構造に対して生成された設計スペクトルをスペクトル荷重にエクスポートすることです。. をクリックするだけです “応答スペクトル データをスペクトル負荷にエクスポート” ボタン!
負荷の変更またはリセット
これらの生成された荷重の適用中の任意の時点で、基礎となるパラメータ値を変更したい場合は、, または最初からやり直す, そうすることもできます. 負荷を変更またはリセットするには, に行く 面積荷重 > 負荷ジェネレーター まるで最初から負荷をかけるかのように, このメッセージが表示されるはずです:
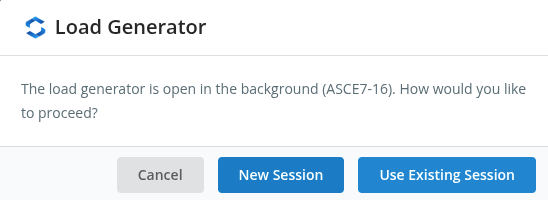
- やり直すには, ヒット 新しいセッション ボタン.
- 以前に計算された荷重の値を調整するには, ヒット 既存のセッションを使用する ボタン.
どちらのオプションを選択しても、統合ロード ジェネレーターのページに戻ります。.