ΕΝΑ Καμβάς είναι ένα ενιαίο φύλλο σχεδίασης σε ένα έργο SkyCiv CAD. Κάθε έργο περιέχει τουλάχιστον έναν καμβά, και μπορείτε να προσθέσετε όσα χρειάζεστε – ένα ανά επίπεδο ορόφου, ένα ανά λεπτομέρεια, ή ένα ανά φύλλο σχεδίασης.
Η διαχείριση των καμβάδων γίνεται από το Καμβάς ακορντεόν στην αριστερή πλαϊνή μπάρα. Κάθε καμβάς αποθηκεύει τη δική του γεωμετρία, σχολιασμοί, και επίπεδο δεδομένων ανεξάρτητα.
Το πάνελ του καμβά
Όλη η διαχείριση καμβά γίνεται από το Καμβάς ακορντεόν, βρέθηκαν στην αριστερή πλαϊνή γραμμή. Κάντε κλικ στο Καμβάς κεφαλίδα για να το επεκτείνετε. Ο πίνακας παραθέτει κάθε καμβά στο έργο και παρέχει στοιχεία ελέγχου για προσθήκη, εναλλαγή, μετονομασία, αναδιάταξη, αντιγραφή, και διαγραφή καμβάδων.
Ο τρέχων ενεργός καμβάς επισημαίνεται στη λίστα. Μόνο ένας καμβάς είναι ενεργός κάθε φορά – όλα τα εργαλεία σχεδίασης λειτουργούν στον ενεργό καμβά.
Βασικές Λειτουργίες
Προσθήκη καμβά
Δημιουργήστε ένα νέο, κενό φύλλο σχεδίασης στο έργο
Κάντε κλικ στο Προσθήκη νέου καμβά κουμπί στο κάτω μέρος του πίνακα Canvases. Δημιουργείται ένας νέος κενός καμβάς και ενεργοποιείται αμέσως.
Βήμα-βήμα
1Ανοίξτε το Καμβάδες ακορντεόν στην αριστερή πλαϊνή μπάρα.
2Κάντε κλικ Προσθήκη νέου καμβά στο κάτω μέρος του πίνακα.
3Ο νέος καμβάς εμφανίζεται στη λίστα και γίνεται ο ενεργός καμβάς.
💡
Υπόδειξη: Νέοι καμβάδες ονομάζονται Καμβάς 2, Καμβάς 3, και τα λοιπά. από προεπιλογή – μετονομάστε τους αμέσως για να διατηρήσετε το έργο οργανωμένο.
Εναλλαγή μεταξύ καμβάδων
Μετακίνηση σε διαφορετικό φύλλο σχεδίασης
Κάντε κλικ οπουδήποτε σε μια σειρά καμβά στον πίνακα Καμβάδες για να την ενεργοποιήσετε. Ο τρέχων καμβάς αποθηκεύεται αυτόματα πριν από την εναλλαγή, οπότε δεν χάνονται δεδομένα.
💡
Υπόδειξη: Η ενεργή σειρά καμβά επισημαίνεται στη λίστα. Οποιαδήποτε επιλογή στον προηγούμενο καμβά διαγράφεται όταν κάνετε εναλλαγή.
Μετονομάστε έναν καμβά
Δώστε σε έναν καμβά ένα ουσιαστικό όνομα για ευκολότερη πλοήγηση
Κάντε κλικ απευθείας στο πεδίο ονόματος σε μια σειρά καμβά για να την επεξεργαστείτε επιγραμμικά. Πληκτρολογήστε το νέο όνομα και πατήστε Επίλεξε το ή κάντε κλικ μακριά για επιβεβαίωση. Τα ονόματα καμβά πρέπει να είναι μοναδικά μέσα στο έργο – τα διπλότυπα επιλύονται αυτόματα.
💡
Υπόδειξη: Χρησιμοποιήστε περιγραφικά ονόματα όπως Κάτοψη ισογείου, Λεπτομέρεια οροφής, ή Ενότητα Α-Α για να διατηρήσετε πλοηγήσιμα έργα σε πολλούς καμβά.
Καταστολή και μετατόπιση της δομής σας Επαναλάβετε (Αντίγραφο) ένας καμβάς
Δημιουργήστε ένα ακριβές αντίγραφο ενός υπάρχοντος καμβά
Κάντε κλικ στο διπλό εικονίδιο (δύο αλληλοκαλυπτόμενα τετράγωνα) σε οποιαδήποτε σειρά καμβά. Ένα πλήρες αντίγραφο αυτού του καμβά – συμπεριλαμβανομένης όλης της γεωμετρίας, σχολιασμοί, και αναθέσεις επιπέδων – εισάγεται αμέσως μετά από αυτό στη λίστα.
💡
Υπόδειξη: Η αντιγραφή είναι ένας γρήγορος τρόπος για να δημιουργήσετε ένα νέο επίπεδο δαπέδου που μοιράζεται το ίδιο πλέγμα στηλών – αντίγραφο, στη συνέχεια τροποποιήστε μόνο ό,τι αλλάζει.
Διαγραφή καμβά
Καταργήστε οριστικά έναν καμβά και όλο το περιεχόμενό του
Κάντε κλικ στο κόκκινο εικονίδιο σκουπιδιών σε μια σειρά καμβά και επιβεβαιώστε την προτροπή. Η διαγραφή είναι μόνιμη και αφαιρεί όλη τη γεωμετρία, σχολιασμοί, και στρώμα δεδομένων σε αυτόν τον καμβά. Ένα παράθυρο διαλόγου επιβεβαίωσης εμφανίζεται από προεπιλογή – έλεγχος “Μην ξαναρωτήσεις” να το παραλείψετε στο μέλλον.
⚠️
Σημείωση: Το εικονίδιο του κάδου απορριμμάτων απενεργοποιείται όταν απομένει μόνο ένας καμβάς – ένα έργο πρέπει πάντα να έχει τουλάχιστον έναν καμβά. Δεν είναι δυνατή η αναίρεση της διαγραφής.
Αναπαραγγελία καμβάδων
Αλλάξτε τη θέση ενός καμβά στη λίστα
Χρησιμοποιήστε το πάνω και κάτω βέλος κουμπιά σε κάθε σειρά καμβά για να τη μετακινήσετε νωρίτερα ή αργότερα στη λίστα. Τα κουμπιά βέλους είναι ορατά μόνο όταν ο πίνακας είναι μέσα Ιεραρχία παραγγελία – κρύβονται όταν Ταξινόμηση κατά υψόμετρο είναι ενεργό (Η σειρά ανύψωσης ελέγχεται από την τιμή ανύψωσης, όχι χειροκίνητη θέση).
💡
Υπόδειξη: Εάν λείπουν τα κουμπιά βέλους, μεταβάλλω Ταξινόμηση κατά υψόμετρο off για να επιστρέψετε σε λειτουργία ιεραρχίας όπου είναι διαθέσιμη η μη αυτόματη παραγγελία.
Σειρά ανύψωσης και ταξινόμησης
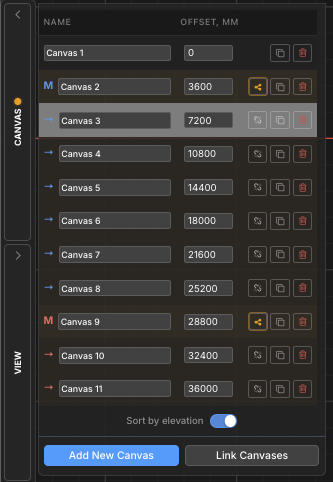
Όταν ένα έργο αντιπροσωπεύει μια πολυώροφη κατασκευή, σε κάθε καμβά μπορεί να ανατεθεί ένα ανύψωση τιμή που το τοποθετεί στο σωστό ύψος στο τρισδιάστατο δομικό μοντέλο (Εξαγωγή S3D). Η λίστα καμβά μπορεί να ταξινομηθεί είτε με βάση αυτές τις υψομετρικές τιμές είτε με προσαρμοσμένη μη αυτόματη σειρά.
Ταξινόμηση κατά υψόμετρο Εναλλαγή
Εναλλαγή μεταξύ σειράς ανύψωσης και προσαρμοσμένης σειράς ιεραρχίας
ο Ταξινόμηση κατά υψόμετρο εναλλαγή στο κάτω μέρος του πίνακα Canvases αλλάζει μεταξύ δύο λειτουργιών προβολής:
Ταξινόμηση κατά υψόμετρο (επί): Οι καμβάδες ταξινομούνται από το χαμηλότερο προς το υψηλότερο υψόμετρο. Ενα Αντισταθμίζεται εμφανίζεται η στήλη που δείχνει την υψομετρική τιμή κάθε καμβά. Αυτή η παραγγελία αντικατοπτρίζει τον τρόπο με τον οποίο θα στοιβάζονται οι καμβάδες στην εξαγωγή μοντέλων S3D 3D.
Ιεραρχία (μακριά από): Οι καμβάδες εμφανίζονται με προσαρμοσμένη σειρά που ελέγχετε με τα κουμπιά βέλους πάνω/κάτω. Ομάδες καμβά (κύριος/παιδί) δείχνουν εδώ την ιεραρχία τους με εσοχή.
💡
Υπόδειξη: Οι καμβάδες χωρίς εκχωρημένο υψόμετρο εμφανίζονται στο κάτω μέρος της λίστας στη λειτουργία ανύψωσης, ταξινομημένα με βάση τον εσωτερικό τους δείκτη.
Ανύψωση καμβά
Εκχωρήστε μια τιμή ύψους που χρησιμοποιείται κατά την εξαγωγή στο τρισδιάστατο δομικό μοντέλο
Πότε Ταξινόμηση κατά υψόμετρο είναι ενεργοποιημένο, ένα Αντισταθμίζεται εμφανίζεται η στήλη. Καμβάδες χωρίς ανύψωση δείχνουν α + κουμπί – κάντε κλικ για να εκχωρήσετε ένα. Οι καμβάδες με ανύψωση εμφανίζουν ένα επεξεργάσιμο πεδίο αριθμών.
Η τιμή ανύψωσης καθορίζει πόσο ψηλά τοποθετείται κάθε όροφος στην τρισδιάστατη δομική εξαγωγή. Η μονάδα ταιριάζει με τη μονάδα μήκους έργου (χιλ, εκ, Μ, πόδια, σε).
Βήμα-βήμα
1Καθιστώ ικανό Ταξινόμηση κατά υψόμετρο για να εμφανίσετε τη στήλη Offset.
2Κάντε κλικ στο + κουμπί δίπλα σε οποιονδήποτε καμβά για να του αντιστοιχίσετε μια ανύψωση.
3Πληκτρολογήστε την τιμή ανύψωσης και πατήστε Επίλεξε το για επιβεβαίωση. Η λίστα ταξινομείται εκ νέου αυτόματα.
💡
Υπόδειξη: Εκχωρήστε υψόμετρο 0 στον καμβά του ισογείου. Οι προτεινόμενες τιμές για νέους καμβάδες ορίζονται αυτόματα σε 3000 mm πάνω από το υψηλότερο υπάρχον υψόμετρο.
Ομάδες καμβά (Κύριος / Γονικό Εξάρτημα)
Όταν πολλά επίπεδα ορόφων μοιράζονται την ίδια δομική διάταξη (π.χ. πανομοιότυπα πλέγματα στηλών σε πολλούς ορόφους), μπορείτε να τα συνδέσετε σε ένα ομάδα καμβά. Ένας καμβάς γίνεται ο Κύριος και οι άλλοι γίνονται Παιδιά.
Οι δομικές αλλαγές που έγιναν στον κύριο μπορεί να είναι διαδόθηκε σε όλα τα παιδιά με ένα κλικ, διατήρηση των επαναλαμβανόμενων ορόφων σε συγχρονισμό χωρίς μη αυτόματη αντιγραφή γεωμετρίας.
Στη λίστα καμβά, ο πλοίαρχος επισημαίνεται Μ και τα παιδιά έχουν ετικέτα →, και τα δύο χρωματισμένα με κοινό χρώμα ομαδικής προφοράς.
Συνδέστε καμβάδες σε μια ομάδα
Ορίστε έναν κύριο καμβά και συνδέστε τους παιδικούς καμβάδες σε αυτόν
Κάντε κλικ Σύνδεση καμβάδων στο κάτω μέρος του πίνακα Καμβάδες για να ανοίξετε τον οδηγό σύνδεσης. Επιλέξτε ποιος καμβάς θα είναι κύριος και ποιοι καμβάδες θα είναι του Το παιδί. Επιβεβαιώστε για τη δημιουργία της ομάδας.
Βήμα-βήμα
1Ανοίξτε το Καμβάδες πίνακα και κάντε κλικ Σύνδεση καμβάδων.
2Επιλέξτε το κύριος καμβάς από τον μάγο.
3Επιλέξτε ένα ή περισσότερα παιδικοί καμβάδες να συνδεθεί με αυτό.
4Επιβεβαιώστε για τη δημιουργία της ομάδας. ο Μ / → οι ετικέτες και το χρώμα τονισμού εμφανίζονται στη λίστα.
💡
Υπόδειξη: Σε Ιεραρχία θέα, Οι κύριες ομάδες μπορούν να συμπτύξουν και να επεκταθούν χρησιμοποιώντας την εναλλαγή τριγώνου δίπλα στην κύρια σειρά καμβά.
Διαδώστε Διαρθρωτικές Αλλαγές
Ωθήστε τις δομικές ενημερώσεις του κύριου καμβά σε όλα τα συνδεδεμένα παιδιά
Όταν η δομική γεωμετρία σε έναν κύριο καμβά αλλάζει, ένα κεχριμπαρένιο highlight εμφανίζεται στην κύρια σειρά και τα παιδιά της για να δηλώνουν ότι η ομάδα δεν είναι συγχρονισμένη. Κάντε κλικ στο κουμπί διάδοσης (εικονίδιο κοινής χρήσης) στην κύρια σειρά και επιβεβαιώστε για να προωθήσετε τα ενημερωμένα δομικά δεδομένα σε όλους τους παιδικούς καμβάδες.
⚠️
Σημείωση: Η διάδοση αντικαθιστά δομικά δεδομένα σε παιδικούς καμβάδες. Αυτή η ενέργεια δεν μπορεί να αναιρεθεί. Μη δομικό περιεχόμενο για παιδιά (σχολιασμοί, διαστάσεις, σύννεφα αναθεώρησης) σώζεται.
Αφαιρέστε ένα παιδί από μια ομάδα
Αποσυνδέστε έναν παιδικό καμβά ώστε να μην λαμβάνει πλέον αναδιπλούμενες ενημερώσεις
Κάντε κλικ στο εικονίδιο σπασμένη αλυσίδα σε μια θυγατρική σειρά καμβά και επιβεβαιώστε την προτροπή. Ο καμβάς αφαιρείται από την κύρια ομάδα και γίνεται ανεξάρτητος καμβάς. Η υπάρχουσα γεωμετρία του διατηρείται – απλά σταματά να λαμβάνει μελλοντικές αναδιπλούμενες ενημερώσεις από τον κύριο.
💡
Υπόδειξη: Η κατάργηση ενός παιδιού δεν διαγράφει ούτε τροποποιεί το περιεχόμενό του – σπάει μόνο τον σύνδεσμο προς τον κύριο. Μπορείτε να το συνδέσετε ξανά ανά πάσα στιγμή χρησιμοποιώντας Σύνδεση καμβάδων.