
ο Δημιουργώ, Κίνηση, και Καταστολή και μετατόπιση της δομής σας Επαναλάβετε toolbar groups contain the core drawing and editing commands for SkyCiv CAD. Activate any tool by clicking its toolbar button or pressing its keyboard shortcut, then interact with the canvas to place or transform geometry.
All create and copy tools respect the active θραύση settings for precision placement.
Δημιουργώ
ο Δημιουργώ toolbar group provides all geometry drawing tools. Activate a tool by clicking its button or pressing its keyboard shortcut, then click on the canvas to place geometry. All create tools respect the active θραύση Ρυθμίσεις.
Create Point
Place individual reference points on the canvas
Π
ο Create Point tool places individual coordinate points on the canvas. Points act as precise anchors that other geometry can snap to, and are useful as reference markers in structural drawings.
[__INSERT_IMAGE__]
Step-by-step
- 1Κάντε κλικ Create Point in the toolbar (or press Π) to activate point-creation mode.
- 2Click anywhere on the canvas to place a point at that location.
- 3Εναλλακτικά, type coordinates in
X,Yμορφή (π.χ.100,200) και πατήστε Επίλεξε το. - 4Continue clicking or typing coordinates to place additional points in the same session.
- 5Τύπος Esc to exit point-creation mode.
Υπόδειξη: Snaps automatically align points to grid intersections, existing endpoints, midpoints, and other geometric features. You can place as many points as needed before pressing Esc.
Create Line
Draw a straight line segment between two points
μεγάλο
ο Create Line tool draws individual straight line segments. Each click-pair defines one line. This is the most fundamental drawing tool in SkyCiv CAD and is used extensively in structural and architectural drawings.
[__INSERT_IMAGE__]
Step-by-step
- 1Κάντε κλικ Create Line (or press μεγάλο) to activate line-creation mode.
- 2Click on the canvas to set the start point.
- 3Move the mouse – a live preview of the line follows the cursor.
- 4Click to set the end point, or type a length value and press Επίλεξε το for a precise distance.
- 5Τύπος Esc to exit.
Υπόδειξη: Τύπος Βάρδια+Αυτί to toggle between Καρτεσιανή (Χ, Y offset) και Πολικός (μήκος, γωνία) input modes for precise dimensional control.
Create Polyline
Draw a chain of connected line segments as a single object
Ctrl+μεγάλο
ο Create Polyline tool draws a continuous chain of line segments stored as a single object. Polylines are ideal for outlines in structural drawings where all segments must remain joined. This tool is in a dropdown group – click the arrow on the toolbar button to reveal the Create Spline variant.
[__INSERT_IMAGE__]
Step-by-step
- 1Κάντε κλικ Create Polyline (or press Ctrl+μεγάλο) to activate polyline mode.
- 2Click on the canvas to set the first vertex.
- 3Continue clicking to add additional connected vertices – each click extends the polyline.
- 4Τύπος Esc να τελειώσω. The polyline is stored as a single continuous shape.
Υπόδειξη: To create a κλειστό polyline, snap the final click onto the first vertex. Snaps align each vertex to grid intersections and existing geometry.
Create Spline
Draw a smooth curved line through a series of control points
SP
ο Create Spline tool draws smooth, continuously curved lines defined by a series of control points. Useful for organic curves, road alignments, or any geometry requiring smooth curvature. Found in the Polyline dropdown group.
[__INSERT_IMAGE__]
Step-by-step
- 1Expand the Polyline dropdown and click Create Spline (or press SP).
- 2Click on the canvas to set the first control point.
- 3Continue clicking to place additional control points – the curve updates live.
- 4Τύπος Esc to finish the spline.
Υπόδειξη: Χρησιμοποιήστε το Σχήματα options panel to control the spline tension and interpolation behavior. Snaps align control points to grid intersections and existing geometry.
Create Arc
Draw a circular arc defined by two base points and a rise height
ΕΝΑ
ο Create Arc tool draws a circular arc defined by two base points and a rise height – the perpendicular distance from the chord midpoint to the arc peak. Commonly used for curved beams, arched openings, and rounded structural elements.
[__INSERT_IMAGE__]
Step-by-step
- 1Κάντε κλικ Create Arc (or press ΕΝΑ) to activate arc mode.
- 2Click on the canvas to set the first base point.
- 3Type a chord length and press Επίλεξε το, or click to set the second base point.
- 4Type the rise height και πατήστε Επίλεξε το, or move the mouse and click to set it visually.
- 5The arc is created with the specified dimensions.
Υπόδειξη: You can freely mix typed values and mouse clicks – type the chord length precisely, then click the rise visually. Χρησιμοποιήστε το Σχήματα panel to adjust arc segment count and other curve properties.
Create Rectangle
Draw an axis-aligned rectangle by defining two opposite corners
Ρ
ο Create Rectangle tool draws an axis-aligned rectangle by defining two diagonally opposite corners. The result is a closed polyline with four right-angle corners – useful for floor plans, plate outlines, and structural cross-sections.
[__INSERT_IMAGE__]
Step-by-step
- 1Κάντε κλικ Create Rectangle (or press Ρ) to activate rectangle mode.
- 2Click on the canvas to set the first corner.
- 3Move the mouse – a live rectangle preview follows the cursor.
- 4Click to set the opposite corner and complete the rectangle.
Υπόδειξη: Snaps align both corners to grid intersections and existing geometry. To enter exact dimensions, type the width and height using coordinate input after setting the first corner.
Create Circle
Draw a circle by placing a center point and setting a radius
ντο
ο Create Circle toolbar button opens a dropdown group with three variants: standard circle, circle by 4 τόξα, και n-polygon. The standard circle places a full 360° circle defined by a center point and radius.
[__INSERT_IMAGE__]
Step-by-step
- 1Κάντε κλικ Create Circle (or press ντο).
- 2Click on the canvas to set the center point.
- 3Move the mouse outward to preview the radius.
- 4Type a radius value and press Επίλεξε το for an exact size, or click to confirm visually.
Υπόδειξη: Χρησιμοποιήστε το Σχήματα panel to set the circle segment count. Snaps align the center to grid intersections and other geometric features.
Create Circle by 4 τόξα
Draw a circle constructed from four connected arc segments
ο Create Circle by 4 τόξα variant constructs a circle from four connected arc segments. Useful when downstream tools need to work with the circle as distinct arc entities rather than a single circular object. Found in the Κύκλος dropdown group.
[__INSERT_IMAGE__]
Step-by-step
- 1Expand the Circle dropdown and click Create Circle by 4 τόξα.
- 2Click on the canvas to set the center point.
- 3Move the mouse to preview the radius.
- 4Type a radius value and press Επίλεξε το, or click to confirm the size.
- 5The resulting circle is composed of four arc segments joined at the cardinal points.
Υπόδειξη: This tool is particularly useful for DXF/DWG export workflows that expect individual arc entities rather than a single circle object. Χρησιμοποιήστε το Σχήματα panel to control arc segment properties.
Create n-Polygon
Draw a regular polygon with a configurable number of sides
ο Create n-Polygon tool draws a regular polygon with any number of sides, placed by center point and circumscribed radius. Found in the Κύκλος dropdown group. The resulting shape is stored as a closed polyline.
[__INSERT_IMAGE__]
Step-by-step
- 1Ανοίξτε το Σχήματα panel and set the desired number of sides (Προκαθορισμένο: 6).
- 2Expand the Circle dropdown and click Create n-Polygon.
- 3Click on the canvas to set the center point.
- 4Move the mouse outward to preview the polygon size.
- 5Type a radius value and press Επίλεξε το, or click to confirm.
Υπόδειξη: Set the number of sides in the Σχήματα πίνακας Ποιες είναι οι συνηθισμένες αστοχίες σε μια δομή boomilever activating the tool – the count cannot be changed mid-placement. Snaps align the center to grid intersections and existing geometry.
Create Hatch
Fill a closed region with a repeating hatch pattern
Η
ο Create Hatch tool fills a closed boundary region with a repeating hatch pattern. Hatches are widely used in structural and architectural drawings to denote material sections – σκυρόδεμα, ατσάλι, earth, κι αλλα.
[__INSERT_IMAGE__]
Step-by-step
- 1Κάντε κλικ Create Hatch (or press Η) to activate hatch mode.
- 2Click inside a closed boundary region στον καμβά – the boundary is detected automatically.
- 3The hatch pattern fills the detected region.
Υπόδειξη: The boundary must be fully closed for automatic detection to work. Χρησιμοποιήστε το Σχήματα panel to select pattern style, κλίμακα, and angle Ποιες είναι οι συνηθισμένες αστοχίες σε μια δομή boomilever placing.
Κίνηση
ο Κίνηση toolbar group repositions selected objects. All move tools require a selection first – Χρησιμοποιήστε το Selection tools to select objects, then activate the desired operation from the Move dropdown.
Relative Move
Translate selected objects by a vector defined by two picked points
Μ
ο Relative Move tool translates selected objects by a displacement vector – pick a base point, then pick or type a destination to shift all selected objects by the same offset. Equivalent to AutoCAD’s MOVE command.
[__INSERT_IMAGE__]
Step-by-step
- 1Select the objects to move.
- 2Κάντε κλικ Relative Move (or press Μ).
- 3Click anywhere on the canvas to set the base point of the move vector.
- 4Move the mouse – a live preview shows the displaced objects.
- 5Click to place, or type an exact distance and press Επίλεξε το.
Υπόδειξη: Τύπος Βάρδια+Αυτί to switch between Καρτεσιανή (Χ, ΚΑΙ) και Πολικός (μήκος, γωνία) input modes for precise displacement control.
Γυρίζω
Rotate selected objects around a center point by a specified angle
Ctrl+Ρ
ο Γυρίζω tool rotates selected objects about a chosen center point. Rotate by dragging interactively or type an exact angle in degrees. Equivalent to AutoCAD’s ROTATE command.
[__INSERT_IMAGE__]
Step-by-step
- 1Select the objects to rotate.
- 2Κάντε κλικ Γυρίζω (or press Ctrl+Ρ).
- 3Click on the canvas to set the rotation center point.
- 4Move the mouse to preview the rotation angle.
- 5Click to confirm, or type an angle in degrees and press Επίλεξε το.
Υπόδειξη: Snaps align the rotation center to grid intersections and key geometry. When you know a specific edge or direction that should align with a new angle, χρήση Relative Rotate instead to avoid manual angle calculation.
Relative Rotate
Rotate objects by aligning a reference direction to a new target direction
Relative Rotate (Reference Rotate) lets you rotate a selection by specifying an existing από direction and a new target κατεύθυνση. Ideal when you know a specific edge or line should align with a target angle or point – no manual angle arithmetic needed.
[__INSERT_IMAGE__]
Step-by-step
- 1Select the objects to rotate.
- 2Κάντε κλικ Relative Rotate in the Move dropdown.
- 3Click to set the rotation center point.
- 4Click a reference point to define the current (από) κατεύθυνση.
- 5Move the mouse – a preview shows the angle without yet rotating the objects.
- 6Κάντε κλικ στο target point to complete the rotation, or type an angle and press Επίλεξε το.
Υπόδειξη: Use Relative Rotate when you know what existing direction should align with a new direction. For simple absolute-angle rotations, χρήση Γυρίζω.
Ευθυγραμμίζω
Move and rotate a selection so two source points match two destination points
ο Ευθυγραμμίζω tool moves και rotates a selection in a single operation by matching two source points on the selection to two destination points on the drawing. Particularly powerful for snapping components into place when you have two known reference locations.
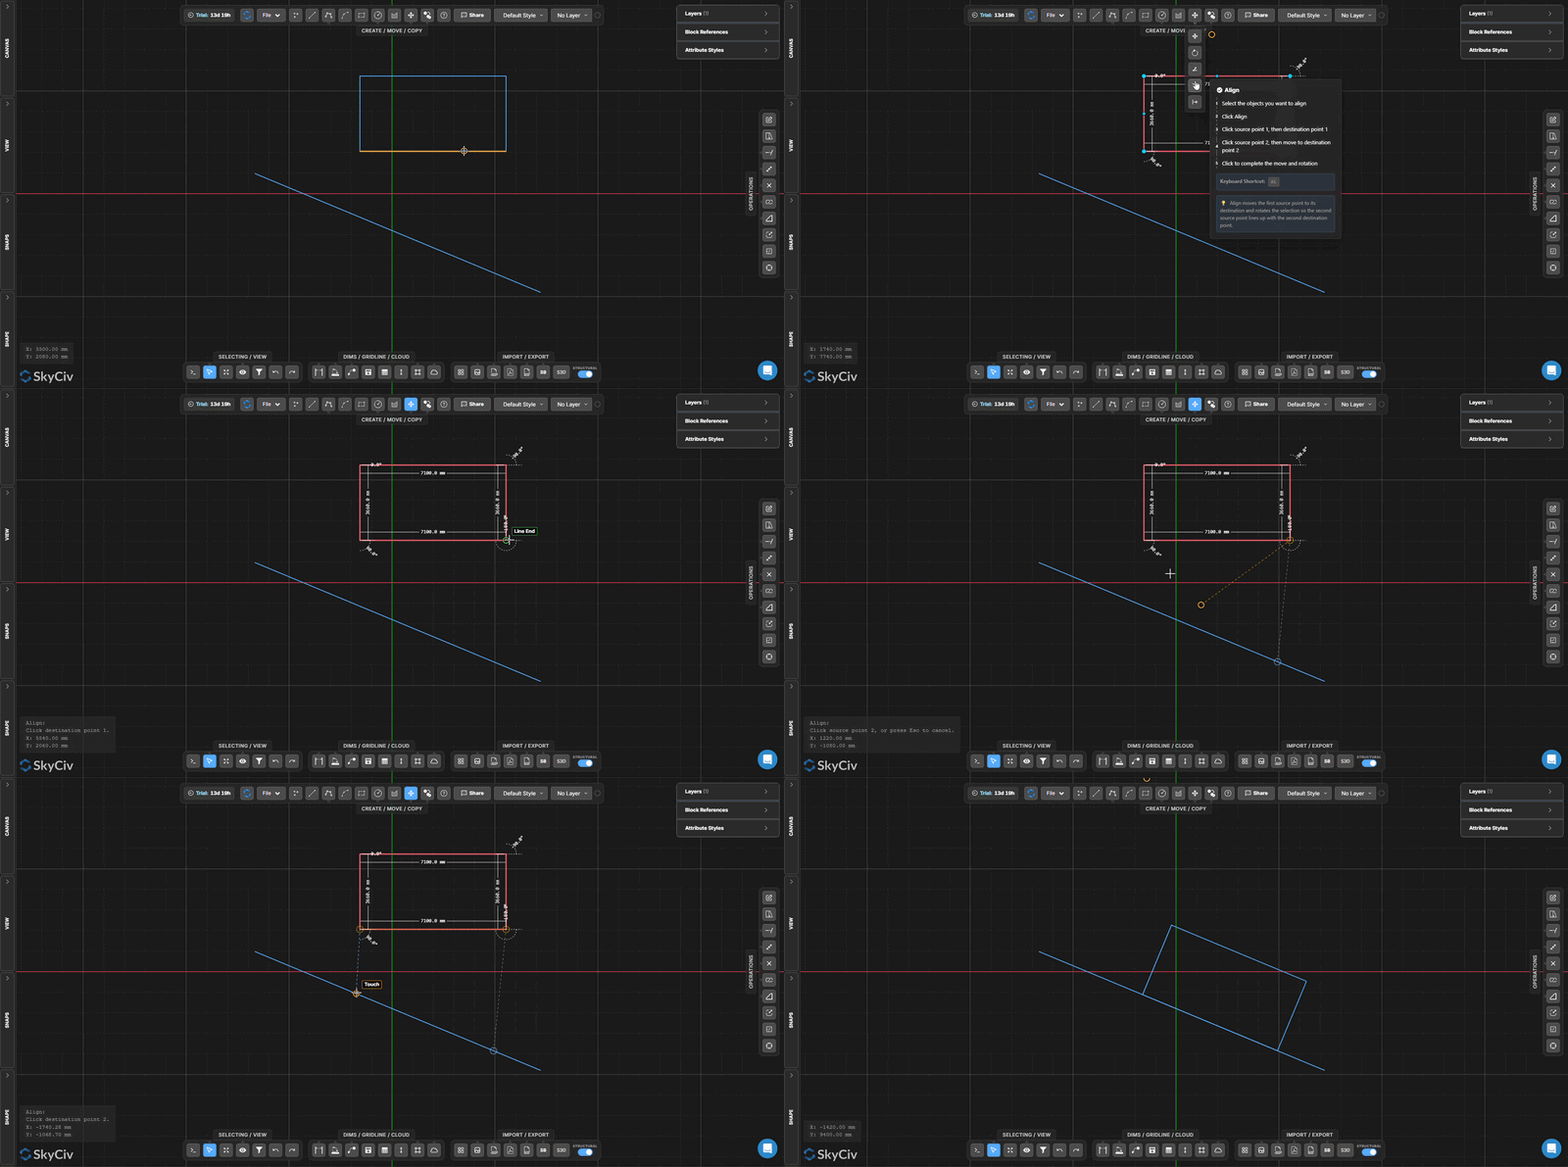
Step-by-step
- 1Select the objects to align.
- 2Κάντε κλικ Ευθυγραμμίζω in the Move dropdown.
- 3Κάντε κλικ source point 1 (on the selection), τότε destination point 1 (στον καμβά).
- 4Κάντε κλικ source point 2 (on the selection), then move to destination point 2.
- 5Click to complete – the selection is simultaneously translated and rotated so both point pairs coincide.
Υπόδειξη: Align moves source point 1 to destination point 1, then rotates the entire selection so source point 2 lines up with destination point 2. Use snaps to pick exact points on existing geometry.
Καταστολή και μετατόπιση της δομής σας Επαναλάβετε
Reflect selected objects across a user-defined mirror line
ΜΙ
ο Καταστολή και μετατόπιση της δομής σας Επαναλάβετε tool reflects selected objects across a mirror axis defined by two points. The original objects are replaced by their mirrored counterparts. To keep the originals, χρήση Mirror Copy αντι αυτου.
[__INSERT_IMAGE__]
Step-by-step
- 1Select the objects to mirror.
- 2Κάντε κλικ Καταστολή και μετατόπιση της δομής σας Επαναλάβετε (or press ΜΙ) in the Move dropdown.
- 3Click to set the start point of the mirror line.
- 4Click to set the end point of the mirror line.
- 5The selection is reflected across the defined axis.
Υπόδειξη: The mirror line can be at any angle. Snap to existing geometry for a precise axis. Χρήση Mirror Copy when you need to keep both the original and the mirrored result.
Καταστολή και μετατόπιση της δομής σας Επαναλάβετε
ο Καταστολή και μετατόπιση της δομής σας Επαναλάβετε toolbar group creates duplicates of selected objects – by displacement, θα αγνοήσουμε επίσης αυτό το σημειακό φορτίο στην ανάλυση, πίνακας, cdot K_a, or rotation. Select objects first, then activate the desired copy operation from the Copy dropdown.
Σχετικό Αντίγραφο
Copy selected objects and displace the copy by a user-defined vector
ο Σχετικό Αντίγραφο tool duplicates selected objects and places the copy at an offset defined by picking a base point and a destination. The workflow is identical to Relative Move – but the originals stay in place.
[__INSERT_IMAGE__]
Step-by-step
- 1Select the objects to copy.
- 2Κάντε κλικ Σχετικό Αντίγραφο in the Copy dropdown.
- 3Click anywhere on the canvas to set the base point.
- 4Move the mouse – a live preview of the copy follows the cursor.
- 5Click to place the copy, or type an exact distance and press Επίλεξε το.
Υπόδειξη: Τύπος Βάρδια+Αυτί to toggle between Καρτεσιανή και Πολικός input modes. You can place multiple copies by continuing to click – Συμπληρώστε τα πεδία Esc to exit.
Mirror Copy
Create a mirrored duplicate while keeping the original objects
ML
Mirror Copy creates a reflected duplicate of selected objects across a user-defined axis, leaving the originals in place. Use this instead of Καταστολή και μετατόπιση της δομής σας Επαναλάβετε when you need both the original and its reflection.
[__INSERT_IMAGE__]
Step-by-step
- 1Select the objects to mirror-copy.
- 2Κάντε κλικ Mirror Copy (or press ML) in the Copy dropdown.
- 3Click to set the start point of the mirror line.
- 4Click to set the end point of the mirror line.
- 5A mirrored copy is created – the originals remain unchanged.
Υπόδειξη: The mirror axis can be at any angle. Snap to existing geometry to define a precise axis. Χρήση Καταστολή και μετατόπιση της δομής σας Επαναλάβετε if you want to replace the originals rather than keep them.
Αντιγραφή πίνακα
Distribute copies of selected objects in a linear array pattern
AR
ο Αντιγραφή πίνακα tool distributes multiple copies of selected objects along a vector direction. The number of copies and total span are configured in the Σχήματα πίνακας, making it ideal for regularly spaced structural elements such as columns, δοκάρια, and bolt groups.
[__INSERT_IMAGE__]
Step-by-step
- 1Select the objects to array.
- 2Ρυθμίστε το copy count και span distance στο Σχήματα πίνακας.
- 3Κάντε κλικ Αντιγραφή πίνακα (or press AR) in the Copy dropdown.
- 4Click to set the base point of the array.
- 5Move the mouse to set the direction, then click to create the copies.
Υπόδειξη: Configure the copy count and span in the Σχήματα panel before activating the tool. For rotational arrays (κυκλικά σχέδια), χρήση Αντιγραφή με περιστροφή αντι αυτου.
Αντιγραφή Offset
Create a parallel copy of lines or polylines at a specified perpendicular distance
Ο
ο Αντιγραφή Offset tool creates a parallel duplicate of selected lines or polylines at a specified perpendicular distance. Equivalent to AutoCAD’s OFFSET command – commonly used for wall thickness, lane markings, and parallel structural members.
[__INSERT_IMAGE__]
Step-by-step
- 1Select the lines or polylines to offset.
- 2Enter the απόσταση μετατόπισης στο Σχήματα πίνακας.
- 3Κάντε κλικ Αντιγραφή Offset (or press Ο) in the Copy dropdown.
- 4The offset copy is created parallel to the original at the specified distance.
Υπόδειξη: Use a θετικός value to offset to one side and a αρνητικός value for the other. The direction is relative to the orientation of the original line.
Αντιγραφή με περιστροφή
Create multiple rotated copies arranged around a center point
ο Αντιγραφή με περιστροφή tool creates multiple copies of selected objects in a circular (polar) pattern around a center point. Useful for radially symmetric structures such as bolt groups on a flange or members in a circular truss.
[__INSERT_IMAGE__]
Step-by-step
- 1Select the objects to copy by rotation.
- 2Ρυθμίστε το copy count και total rotation angle στο Σχήματα πίνακας.
- 3Κάντε κλικ Αντιγραφή με περιστροφή in the Copy dropdown.
- 4Click to set the rotation center point.
- 5Move the mouse to preview, then click to create the copies.
Υπόδειξη: For evenly spaced copies around a full circle, set the angle to 360° and the count to the desired number. Configure both values in Σχήματα before activating the tool.
