Αποκτήστε τις περισσότερες βελτιστοποιημένες ενότητες για τα σχέδιά σας, με ένα μόνο κλικ.
Το SkyCiv Member Designer εξοικονομεί χρόνο στους χρήστες, προσθέτοντας τον έλεγχο κάθε πιθανής ενότητας σε μια δεδομένη βάση δεδομένων και επιλέγοντας το σχήμα με τη χαμηλότερη περιοχή διατομής και την καλύτερη αναλογία χρησιμότητας. Επί του παρόντος, ο Σχεδιαστής υποστηρίζει όλους τους Κώδικες Σχεδίασης SkyCiv (AISC, NDS, AISI, ΟΠΩΣ ΚΑΙ, CSA, BS, Ευρωκώδικας και άλλα…). Υπάρχουν μερικά κριτήρια για να λειτουργεί σωστά ο Σχεδιαστής:
- Η ενότητα πρέπει να φορτωθεί από μια βιβλιοθήκη στο Section Builder
- Ο σχεδιασμός των μελών Ελεγχος η λειτουργία πρέπει να μπορεί να εκτελεστεί
Ο Σχεδιαστής υπάρχει σε όλο το ατσάλι μας, Λογισμικό σχεδιασμού μελών από ξύλο και ψυχρή μορφή μέσω SkyCiv Structural 3D, SkyCiv Beam και το λογισμικό αυτόνομης σχεδίασης. Θέλετε μια πλήρη περιγραφή βίντεο? Επισκεφθείτε μας παράδειγμα φροντιστηρίου σε αυτό το χαρακτηριστικό.
Εκκίνηση του Σχεδιαστή
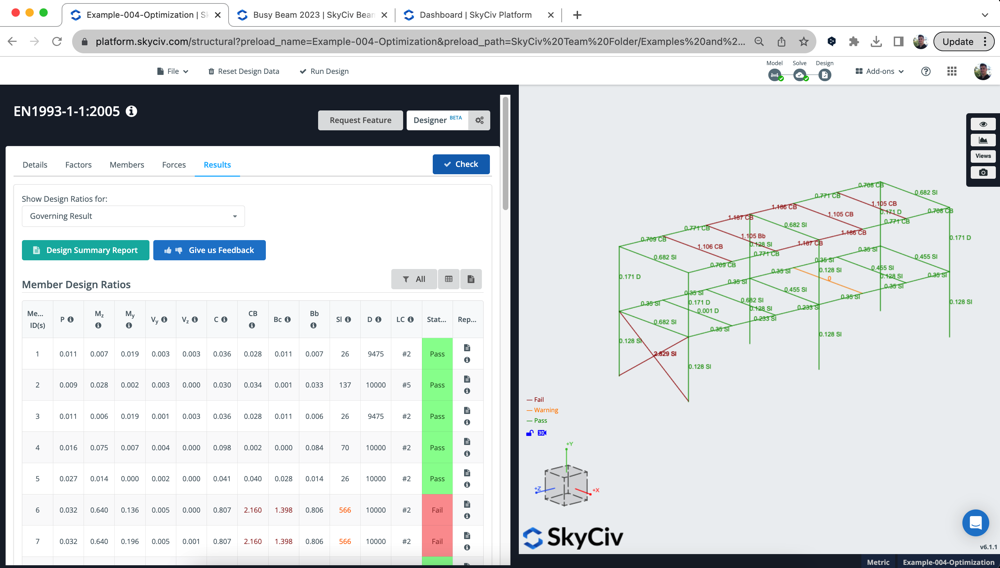
Για την εκκίνηση του Σχεδιασμού Μελών Σχεδιαστής, θα χρειαστεί πρώτα να ανοίξετε την ενότητα Σχεδίαση μελών στην οποία σχεδιάζετε τη δομή σας. Σε αυτό το παράδειγμα εκτελούμε έναν έλεγχο χάλυβα Ευρωκώδικα. Μόλις ανοίξει η ενότητα, απλά κάντε κλικ στο Σχεδιαστής κουμπί στην επάνω δεξιά γωνία της μονάδας. Στο παρακάτω μοντέλο, χρησιμοποιούμε ένα ατσάλινο μοντέλο, που έχει σαφώς κάποια αποτυχημένα μέλη του Ευρωκώδικα, ας δούμε αν μπορούμε να τους πετύχουμε:
Ρυθμίσεις Modal
Οι χρήστες έχουν έναν αριθμό διαθέσιμων στοιχείων ελέγχου και ρυθμίσεων, συμπεριλαμβανομένου ενός στοχευμένου δείκτη χρησιμότητας, Όρια ύψους/πλάτους τομής και ποια τμήματα θέλετε να σχεδιάσετε. Κάνοντας κλικ στο Σχεδιαστής κουμπί, θα εμφανιστούν οι ακόλουθες επιλογές:
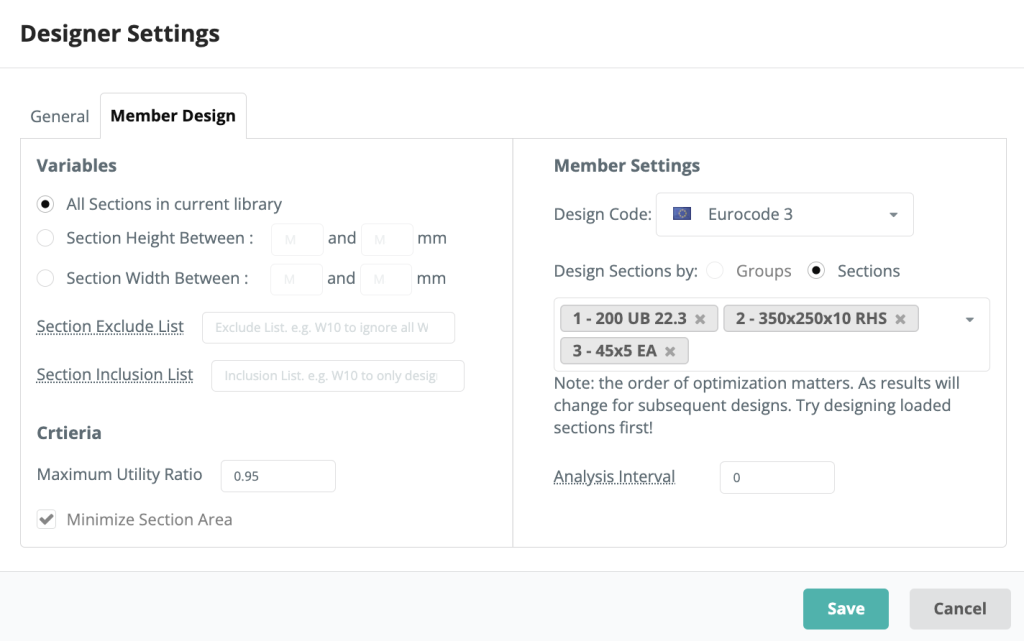
Μεταβλητές
Οι χρήστες έχουν τη δυνατότητα να επιλέξουν μεταξύ όλων των ενοτήτων από τη βιβλιοθήκη, μια σειρά από ύψη ή πλάτη τομών. Αυτές οι επιλογές θα διέπουν ποιες ενότητες, ο Σχεδιαστής εξετάζει όταν επιλέγει την πιο βελτιστοποιημένη ενότητα
Κριτήρια
Οι χρήστες μπορούν να εισάγουν τη δική τους μέγιστη αναλογία χρησιμότητας για τον Σχεδιαστή, Αυτό θα σήμαινε ότι οποιοδήποτε αποτέλεσμα με υψηλότερο UR από το καθορισμένο δεν θα θεωρείται έγκυρη επιλογή.
Ρυθμίσεις μελών
Σε αυτήν την περιοχή των ρυθμίσεων modal, Οι χρήστες μπορούν να επιλέξουν τον κώδικα σχεδίασής τους όπως θα έκαναν συνήθως στην ενότητα Σχεδίαση μέλους. Το modal θα εισάγει επίσης όποιες ενότητες μπορούν να σχεδιαστούν σε αυτήν την ενότητα, αλλά ο χρήστης έχει τον έλεγχο να προσθέσει/αφαιρέσει ποιες ενότητες επιθυμεί να σχεδιάσει. Ο Σχεδιαστής θα σχεδιάσει ένα μόνο τμήμα κάθε φορά.
ο διάστημα ανάλυσης είναι μια σημαντική ρύθμιση, και θα πει στο λογισμικό πόσο συχνά να εκτελεί ξανά το πρόγραμμα επίλυσης FEA. Από προεπιλογή έχει οριστεί σε 0 – που σημαίνει ότι θα χρησιμοποιήσουμε τις ίδιες εσωτερικές δυνάμεις κατά τη δοκιμή κάθε τμήματος. Αυτό είναι συνήθως εντάξει, από τη στιγμή της κάμψης, Η διατμητική δύναμη και τα αξονικά αποτελέσματα δεν θα αλλάξουν πολύ κατά την αλλαγή ενός τμήματος. Ωστόσο, τα αποτελέσματα εκτροπής θα αλλάξουν και μπορούν να επηρεάσουν τα αποτελέσματα – καθώς χρησιμοποιούμε ένα ελαφρύτερο τμήμα, το αποτέλεσμα εκτροπής θα πρέπει να ενημερωθεί καθώς μειώνεται το βάρος του εαυτού.
Έτσι, οι χρήστες μπορούν στη συνέχεια να αυξήσουν τη συχνότητα με την οποία εκτελείται η επίλυση μεταξύ των ενοτήτων δοκιμής. Η μόνη προειδοποίηση εδώ είναι ότι θα επιβραδύνει τη διαδικασία, δεδομένου ότι ο επιλύτης FEA πρέπει να τρέχει μεταξύ των αλλαγών ενότητας. Για παράδειγμα, εάν ορίσετε το διάστημα ως 1, θα επιλύεται εκ νέου μεταξύ κάθε δοκιμής ενότητας.
Η διαδικασία του σχεδιαστή
Ο Σχεδιαστής τρέχει με τον ακόλουθο τρόπο:
- Εκτελεί μια αρχική ανάλυση/σχεδιασμό για να διασφαλίσει ότι η ρύθμιση του μοντέλου είναι σωστή και να προσδιορίσει τα τρέχοντα αποτελέσματα
- Ξεκινά τη δοκιμή της πρώτης ενότητας:
- Κατατάσσει όλες τις ενότητες στην καθορισμένη βιβλιοθήκη με σειρά διατομής
- Αλλάζει μια ενότητα στο μοντέλο και εκτελεί ξανά την ανάλυση (εξαρτάται από διάστημα ανάλυσης σύνθεση)
- Με τα νέα αποτελέσματα της ανάλυσης (κάμψη, εκτροπή κλπ..) δοκιμάζουμε την επόμενη ενότητα στη βιβλιοθήκη
- Αποθηκεύστε τα αποτελέσματα και εκτελέστε την επόμενη ανάλυση
- Για ταχύτητα και απόδοση, τυχόν περιττές δοκιμές θα παραβλεφθούν. Αυτά είναι αν (ένα) το τελευταίο 5 οι δοκιμές έχουν δώσει χειρότερα αποτελέσματα ή (σι) έχουμε ήδη βρει την καλύτερη δυνατή αναλογία χρησιμότητας (ντο) αποτυγχάνουμε σε μεγάλο αριθμό, θα παραλείψουμε 5 τμήματα
- Ξεκινήστε από την επόμενη ενότητα, με τις ενημερωμένες ενότητες από προηγούμενες επαναλήψεις μεταφερθεί
Γι' αυτό έχει σημασία η σειρά των τμημάτων, καθώς θα ενημερώσουμε το μοντέλο καθώς προχωράμε, εάν καταλήξετε με ελαφρύτερα στοιχεία από βελτιστοποιήσεις προηγούμενων ενοτήτων, θα επηρεάσουν τα αποτελέσματα σε επόμενες βελτιστοποιήσεις ενοτήτων. Αν βοηθάει, Οι χρήστες μπορούν να ελέγξουν το αρχείο καταγραφής του τι ακριβώς έκανε ο Σχεδιαστής Προβολή αρχείου καταγραφής όταν επανέλθουν τα αποτελέσματα.
Σκεφτείτε την περίπτωση όπου πρώτα βελτιστοποιούνται οι στήλες. Μπορεί να περάσουν, αλλά μετά καθώς αρχίζετε να σχεδιάζετε τις δοκούς παραπάνω (ίσως τα κάνει πιο χοντρά/βαρύτερα) στη συνέχεια, όταν επιστρέψετε για να ελέγξετε ξανά τις στήλες, μπορεί να αποτύχουν. Ωστόσο, βελτιστοποιώντας τα με την αντίθετη σειρά, δεν πρέπει να έχει αυτό το θέμα.
Αποτελέσματα
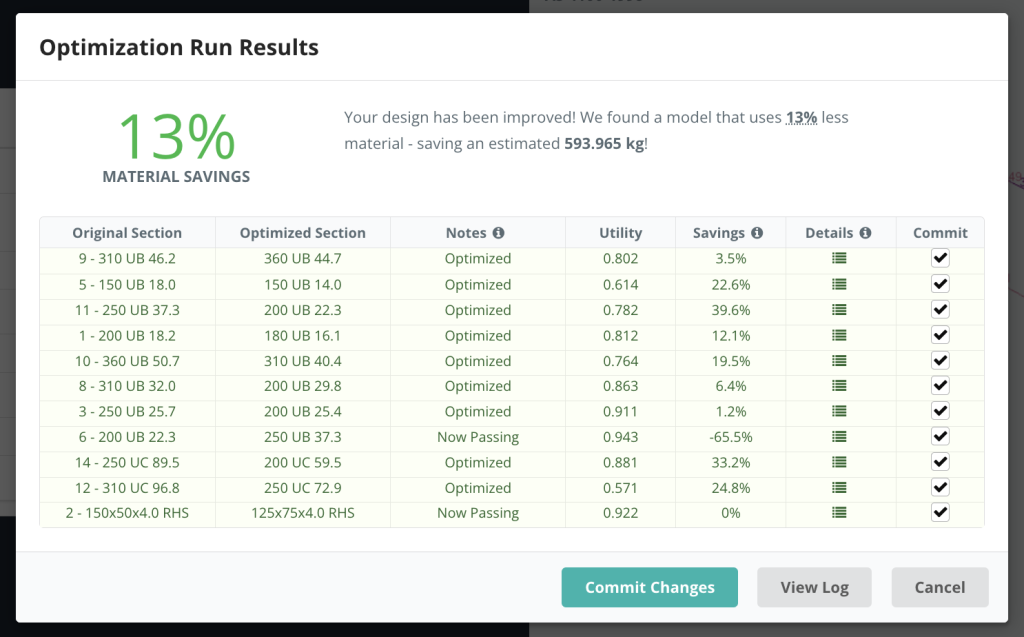
Τα αποτελέσματα κάθε ενότητας θα εμφανίζονται σε ένα αναδυόμενο παράθυρο, συνοψίζοντας την επιλεγμένη ενότητα, είναι η αναλογία χρησιμότητας και οι επιλογές κατά τη δέσμευση. Στο παρακάτω παράδειγμα, όλα 3 τμήματα του μοντέλου βελτιστοποιήθηκαν:
Μπορούμε να ρίξουμε μια πιο προσεκτική ματιά σε όλες τις εκτελέσεις και τα αποτελέσματά τους κάνοντας κλικ στο εικονίδιο κάτω Επαναλήψεις. Αυτό θα εμφανίσει την ακόλουθη λεπτομερή λίστα διαδρομών. Για παράδειγμα, επιλογή ενότητας 2 (RHS) θα δείξει το εξής:
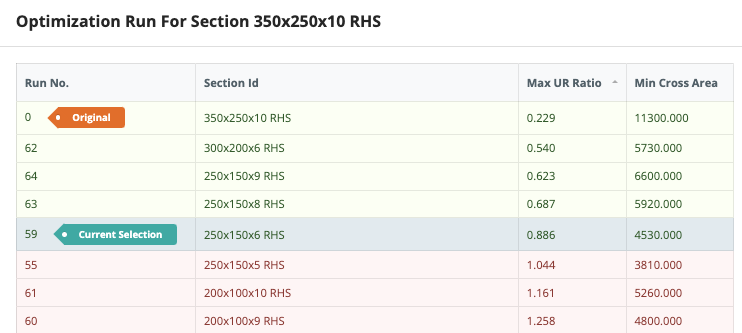
Από εδώ μπορούμε να ταξινομήσουμε κατά Max UR, διασταυρούμενη περιοχή και SFO (ένα σταθμισμένο δείκτη) που θα δείξει το καλύτερο αποτέλεσμα με βάση τα προκαθορισμένα κριτήριά σας (στις ρυθμίσεις). Αυτό επιτρέπει στους χρήστες να επανεξετάσουν τις εργασίες βελτιστοποίησης για να βεβαιωθούν ότι έχει επιλεγεί η σωστή ενότητα. Στο παραπάνω παράδειγμα, ορίζουμε μια μέγιστη αναλογία Utility του 0.95 και την επιθυμία να ελαχιστοποιηθεί η περιοχή διατομής. Έχει μειώσει σημαντικά την περιοχή και επέλεξε ένα τμήμα που εξακολουθεί να πληροί αυτά τα κριτήρια σχεδιασμού.
Δέσμευση των αποτελεσμάτων σας
Μόλις είστε ευχαριστημένοι με τα αποτελέσματα, μπορείς να χτυπήσεις Τώρα συνεχίστε και προσθέστε τους ακόλουθους τέσσερις κόμβους για να ολοκληρώσετε το πλαίσιο του αετώματος και κάντε κλικ Δεσμεύστε Αλλαγές να αποδεχτείτε αυτές τις ενότητες. Το λογισμικό θα δεσμεύσει αυτά τα σχήματα και στην ενότητα Design, και το Δομικό σας Μοντέλο. Το λογισμικό θα εκτελέσει ξανά τον έλεγχο σχεδιασμού για να σας δώσει τα πιο ενημερωμένα αποτελέσματα. Έτσι στο παραπάνω παράδειγμά μας, μετά τη δέσμευση μπορούμε να δούμε ότι όλα τα τμήματα λειτουργούν (εκτός από το ένα τμήμα που ήταν υπερφορτωμένο):

Αλλαγή της ενότητας σας από τη λειτουργία σχεδίασης, σημαίνει ότι τα αποτελέσματα της ανάλυσής σας δεν ευθυγραμμίζονται με το τρέχον μοντέλο σας. Γι 'αυτό το λόγο, συνιστούμε ανεπιφύλακτα να επιστρέψετε και να επιλύσετε το μοντέλο σας και να εκτελέσετε ξανά τον έλεγχο σχεδίασης για να διασφαλίσετε ότι τα αποτελέσματα της ανάλυσης και του σχεδιασμού σας είναι συγχρονισμένα.
Οι ακόλουθες ρυθμίσεις είναι διαθέσιμες κατά την εισαγωγή μιας ενότητας DXF
Εάν δεν μπορείτε να κάνετε το Designer να τρέξει, θα πρέπει να ελέγξετε τα παρακάτω:
- Φορτώνονται οι ενότητες σας από τη βάση δεδομένων ενοτήτων SkyCiv? Οι ενότητες πρέπει να φορτωθούν από τη βάση δεδομένων του Section Builder, Με αυτόν τον τρόπο ο Σχεδιαστής γνωρίζει ποιον κατάλογο τμημάτων να δοκιμάσει
- Μπορείτε να εκτελέσετε ένα σχέδιο μέλους “Ελεγχος”? Αυτό θα επιβεβαιώσει ότι όλα τα τμήματα μπορούν να σχεδιαστούν και ότι το μοντέλο σας έχει ρυθμιστεί σωστά. Αφού ο Σχεδιαστής επαναλαμβάνει μέσω αυτού, θα χρειαστεί να τρέξει για το βασικό μοντέλο σας για να λειτουργήσει
- Έχετε κάποια ιδιαίτερα στοιχεία (ταπεράκια, άκαμπτα μέλη)? Η διεπαφή χρήστη θα πρέπει να το αποτρέψει, αλλά σε ορισμένες περιπτώσεις αυτό μπορεί ακόμα να ξεφύγει. Αφαιρέστε αυτά τα ειδικά στοιχεία από το modal ρυθμίσεων και δοκιμάστε να εκτελέσετε ξανά το Designer
- Ελέγξτε ότι τα υλικά σας ταιριάζουν με τον κώδικα σχεδίασης που δοκιμάζεται. Πάλι, Αυτό θα πρέπει να αποκλειστεί από τη διεπαφή χρήστη, αλλά σε ορισμένες περιπτώσεις αυτό μπορεί να συμβεί. Επιστρέψτε στο μοντέλο σας και ελέγξτε ότι αυτές οι ενότητες ευθυγραμμίζονται με τον κώδικα σχεδίασης που προσπαθείτε να εκτελέσετε. Για παράδειγμα, Το NDS θα πρέπει να έχει κατάλληλα υλικά NDS ή το AISC θα πρέπει να έχει ένα χαλύβδινο υλικό αντιστοιχισμένο στο τμήμα.
- Είναι το μοντέλο σας ένα αντίθετο σύστημα μονάδων με το πρότυπο σύστημα μονάδων σχεδιασμού? Συνιστούμε την εκτέλεση κωδικών σχεδίασης των ΗΠΑ σε Imperial και AS,ΣΕ,BS,CSA κλπ.. πρότυπα όλα στο Metric