Πώς να εισαγάγετε ένα αρχείο DWG σε λογισμικό ανάλυσης δομής
Το DWG είναι πολύ κοινό δυάδικος μορφή αρχείου σχεδίασης από το Autodesk. Είναι μια δύσκολη μορφή αρχείου για επεξεργασία από το λογισμικό ανάλυσης, δεδομένου ότι τα δεδομένα είναι πολύ διαφορετικά. Τα αρχεία DWG περιέχουν πληροφορίες γραμμών, σημεία και κείμενο – ενώ το λογισμικό ανάλυσης χρειάζεται πρωτίστως δομικό μέλος, πληροφορίες τομής και κόμβου προκειμένου να πραγματοποιηθεί μια σωστή ανάλυση πεπερασμένων στοιχείων.
Ωστόσο, πηγαίνοντας από ένα 2D σχέδιο (σε μορφή DWG) σε ένα μοντέλο ανάλυσης είναι μια πολύ κοινή διαδικασία για τους δομικούς μηχανικούς, Έτσι, η SkyCiv έχει δημιουργήσει ορισμένες λειτουργίες για να βοηθήσει τους μηχανικούς να περάσουν από το DWG στην Ανάλυση με μερικά απλά βήματα. Σε αυτόν τον οδηγό, θα σας καθοδηγήσουμε πώς μπορείτε να εισάγετε μοντέλα DWG στο SkyCiv Structural 3D. Σημείωση: θα χρειαστείτε πρόσβαση στο SkyCiv Professional για να χρησιμοποιήσετε αυτήν τη δυνατότητα.
Βήμα 1: Εισαγάγετε το αρχείο DWG
Μπορείτε να το κάνετε αυτό κάνοντας κλικ Αρχείο – Εισαγωγή – DWG ή απλά σύροντας και αποθέτοντας το αρχείο DWG στο λογισμικό:
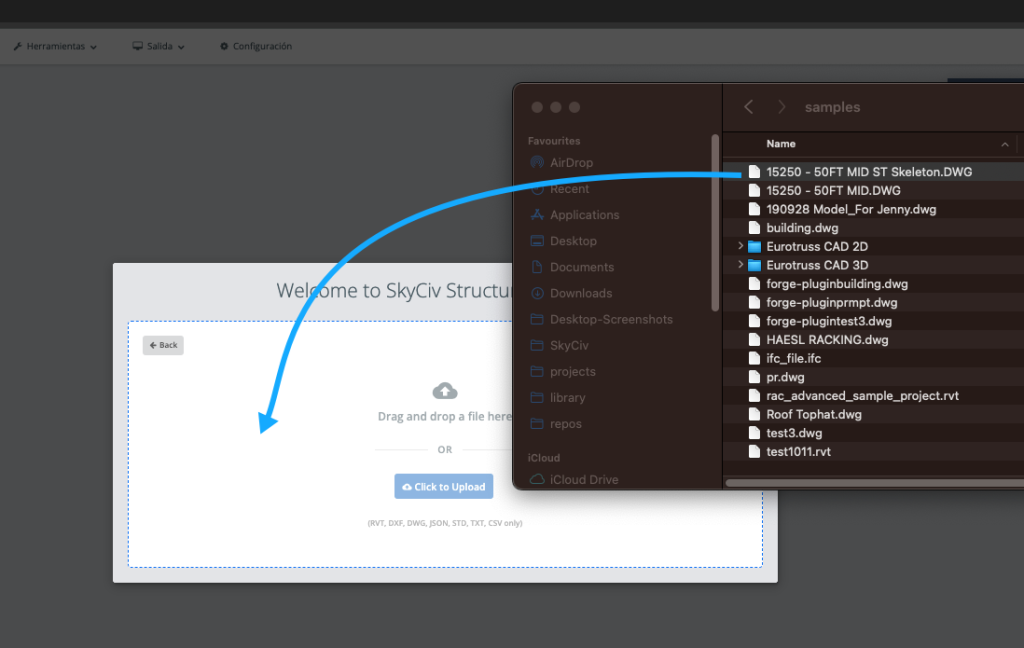
Κατά τη διάρκεια αυτής της διαδικασίας, Το SkyCiv θα ανεβάσει το αρχείο σας και θα το επεξεργαστεί χρησιμοποιώντας το Forge API της Autodesk. Αυτό μπορεί να διαρκέσει ένα λεπτό ενώ διαβάζει και επεξεργάζεται το αρχείο σας για να προετοιμαστεί για το βήμα 2.
Βήμα 2: Εκκινήστε το SkyCiv Tracing Tool
Μόλις εμφανιστεί το DWG σας, θα δείτε επίσης μια κάτω γραμμή εργαλείων που δείχνει το λογότυπο SkyCiv:
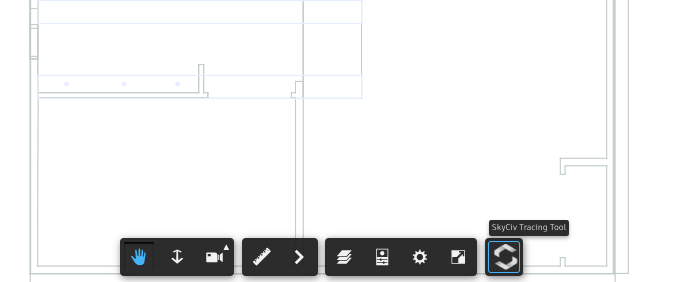
Μόλις κάνετε κλικ σε αυτό, θα δείτε να εμφανίζεται ένα αριστερό πλαίσιο και το εργαλείο δρομέα θα αλλάξει σε εργαλείο σήμανσης. Μπορείτε τώρα να αρχίσετε να επισημαίνετε το μοντέλο σας κουμπώνοντας στις γραμμές:
Είναι χρήσιμο να γνωρίζετε τις ακόλουθες συντομεύσεις:
- Κάντε διπλό κλικ για να τερματίσετε το στοιχείο
- Esc κλειδί θα ακυρώσει το μέλος
- Μόλις προστεθεί ένα μέλος, μπορείτε να κάνετε κλικ για να επιλέξετε και μετά να πατήσετε Διαγράφω για να αφαιρέσετε
- Εάν οι γραμμές σχεδίασης είναι πολύ λεπτές, μπορείτε να αλλάξετε το Μέγεθος εργαλείου για να βοηθήσετε στην οπτικοποίηση των ιχνοστοιχείων σας
- Αλλάξτε τους αριθμούς αναγνωριστικού ενότητας για να προσθέσετε άλλες ενότητες (που θα εμφανιστούν σε διαφορετικά χρώματα)
- Μετακινήστε το ποντίκι σας προς τα μέσα ή προς τα έξω για μεγέθυνση, διευκολύνει τη διαδικασία ανίχνευσης
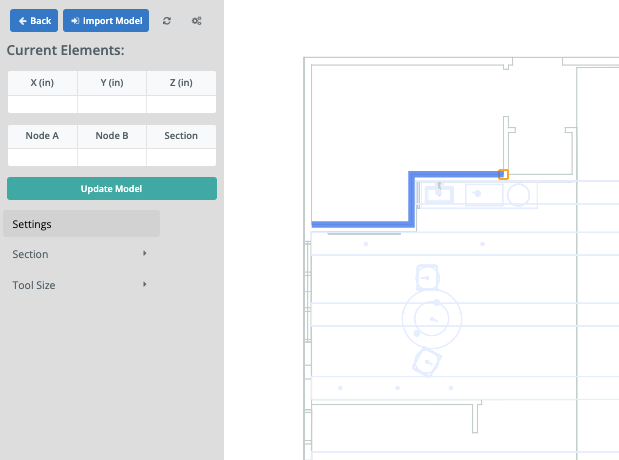
Βήμα 3: Εξαγωγή δεδομένων από το σχέδιο στον πίνακα
Τα τρέχοντα μέλη και οι κόμβοι σας θα εμφανίζονται στους αριστερούς πίνακες κάτω Τρέχοντα στοιχεία. Για να τραβήξετε τις πληροφορίες από το δεξί σας πλαίσιο (το γραφικό περιβάλλον σχεδίασης) σε αυτούς τους πίνακες, απλά κάντε κλικ στο γαλαζοπράσινο Ενημέρωση πινάκων κουμπί. Αυτό θα χειριστεί επίσης διπλότυπους κόμβους εντός ορισμένης ανοχής για να διασφαλίσει ότι εισάγετε ακριβείς πληροφορίες.

Μόλις είστε ευχαριστημένοι με τα δεδομένα που έρχονται στις καρτέλες, κάντε κλικ στο μπλε Εισαγωγή μοντέλου για να φέρει αυτά τα στοιχεία στο Structural 3D:
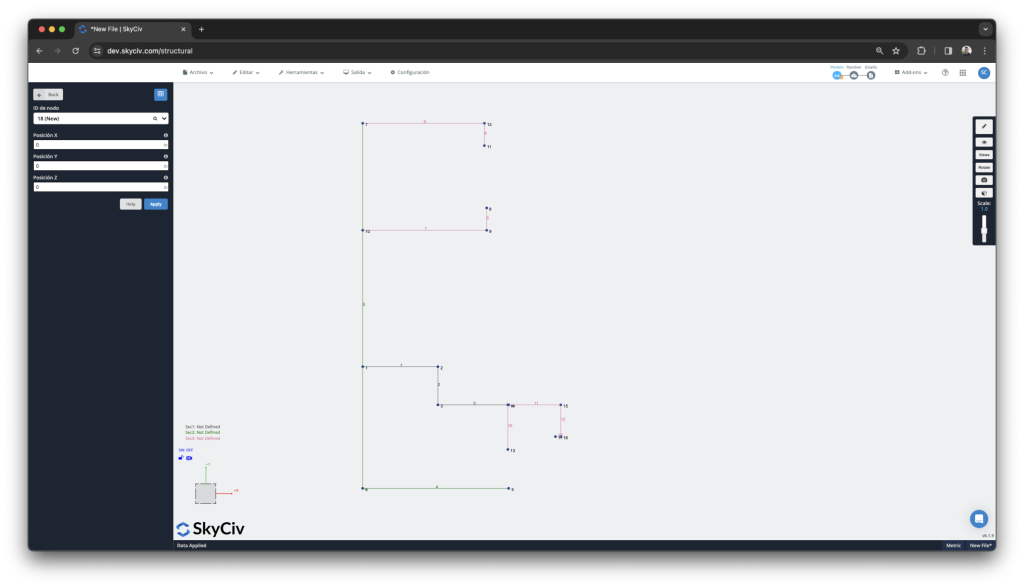
Το μοντέλο σας εισάγεται τώρα με τα καθορισμένα αναγνωριστικά ενότητας. Μπορείτε τώρα να αρχίσετε να ορίζετε τις ιδιότητες διατομής, εφαρμόζοντας φορτία και ορίζοντας οριακές συνθήκες. Συνιστούμε επίσης να τρέξετε γρήγορα Μοντέλο επισκευής για να καταγράψετε τυχόν τυχαία ή εσφαλμένα στοιχεία (για παράδειγμα δύο μέλη που δεν συνδέονται, όταν είναι πραγματικά κοντά).
Μπορείτε επίσης να επιστρέψετε στο σχέδιο κάνοντας κλικ Αρχείο – Εισαγωγή – DWG πάλι, Το μοντέλο και τα στοιχεία γραμμής σας θα βρίσκονται ακριβώς εκεί που τα αφήσατε!
Ελπίζουμε ότι αυτό σας εξοικονομεί χρόνο από το DWG στα μοντέλα ανάλυσης δομής!