Ο τρισδιάστατος χώρος του SkyCiv επιτρέπει στους χρήστες να κάνουν ελιγμούς γύρω από το μοντέλο τους με διάφορους τρόπους για να επιτρέψουν τη βέλτιστη εμπειρία μοντελοποίησης.
Ομαδοποίηση στο SkyCiv Structural 3D (S3D) δίνει στον χρήστη την εξουσία να επισημαίνει και να απομονώνει ομάδες μελών, κόμβοι, και πλάκες για να δίνουν μια ξεκάθαρη εικόνα του τι συμβαίνει στο μοντέλο. Επιπλέον, οι ομάδες διευκολύνουν τον σχεδιασμό μερικών ομάδων μελών αντί για κάθε μεμονωμένο μέλος μέσα στον χώρο του τρισδιάστατου μοντέλου.
Η λειτουργία Απόκρυψη που προσφέρεται μέσω του Structural 3D επιτρέπει στο χρήστη να απομονώσει την άποψή του σε μικρότερο ποσοστό μελών και κόμβων όταν είναι επιθυμητό. Αυτή η λειτουργία είναι ιδιαίτερα χρήσιμη όταν μοντελοποιείται μια ολόκληρη δομή, αλλά ο χρήστης θέλει να δει ένα μεμονωμένο πλαίσιο μέσα στη δομή.
Αυτές οι δύο λειτουργίες σε συνδυασμό διευκολύνουν την αποσυμφόρηση μοντέλων με παρόμοια γραφικά όπως το μοντέλο που φαίνεται παρακάτω:
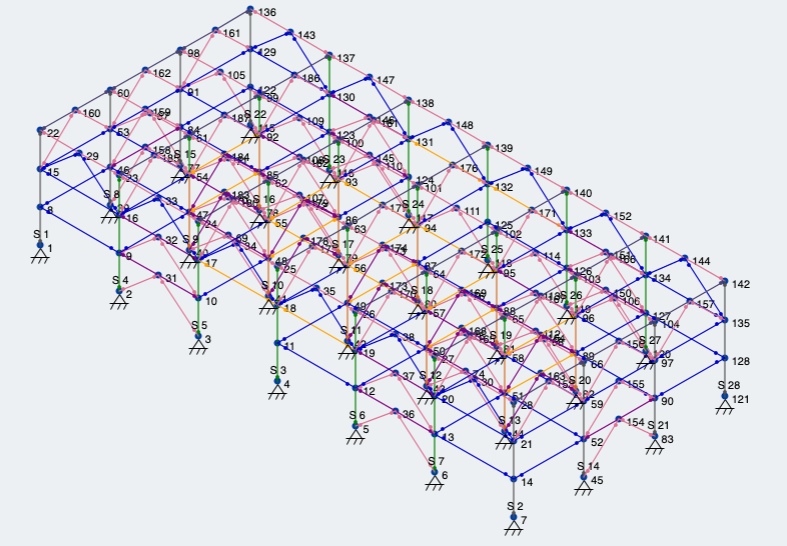
Φιγούρα 1: Πραγματικό έργο που γίνεται μέσω του SkyCiv με πολλαπλές ενότητες και προσανατολισμούς
Ομαδοποίηση
Για πρόσβαση στην καρτέλα Ομάδες μοντέλων, είτε πατήστε CTRL + σολ, ή κάντε κλικ στο Ομάδες σύμφωνα με το Καρτέλα για προχωρημένους.
Προσθήκη νέας ομάδας
Να φτιάξω μια νέα ομάδα, απλά κάντε κλικ στο Προσθήκη ομάδας. Επιλέξτε αυτό που θέλετε να ομαδοποιήσετε: Κόμβοι, Μέλη ή Πλάκες. Τότε, προσδιορίστε αυτόν τον τύπο τρισδιάστατου στοιχείου στο πεδίο του αναγνωριστικού, χωρίζονται με κόμματα. Μπορείτε επίσης να μετονομάσετε την ομάδα για να περιγράψετε καλύτερα τα στοιχεία.
Συγχώνευση Ομάδων
Εάν θέλετε να ενοποιήσετε δύο ή περισσότερες ομάδες σε μία, απλά CTRL + Κάντε κλικ τις ομάδες που θέλετε, και μετά κάντε κλικ στο Συγχώνευση Ομάδων κουμπί. Αυτό είναι ιδιαίτερα χρήσιμο εάν έχετε πολλές ομάδες μελών που θα θέλατε να σχεδιάσετε ως ένα μέγεθος.
Αυτόματη ομαδοποίηση
Ένα από τα πιο χρήσιμα εργαλεία στο S3D είναι το εργαλείο Auto Grouping. Το SkyCiv θα σαρώσει το μοντέλο και τα μέλη της ομάδας σας αυτόματα χρησιμοποιώντας κριτήρια όπως το μήκος, κατευθύνσεις/προσανατολισμούς, και ιδιότητες τομής. Για αυτόματη ομαδοποίηση του μοντέλου σας, απλά πηγαίνετε στο Ομάδες και κάντε κλικ στο Auto Group κουμπί
Παράδειγμα
Ας δούμε το μοντέλο στο σχήμα 1. Πρώτα, Ας χρησιμοποιήσουμε τη δυνατότητα αυτόματης ομαδοποίησης για να αποκτήσουμε ορισμένες ομάδες μελών. Σαν άποτέλεσμα, μας δίνει το εργαλείο SkyCiv 16 διαφορετικές ομάδες μελών, όπως φαίνεται παρακάτω στο Σχήμα 2.
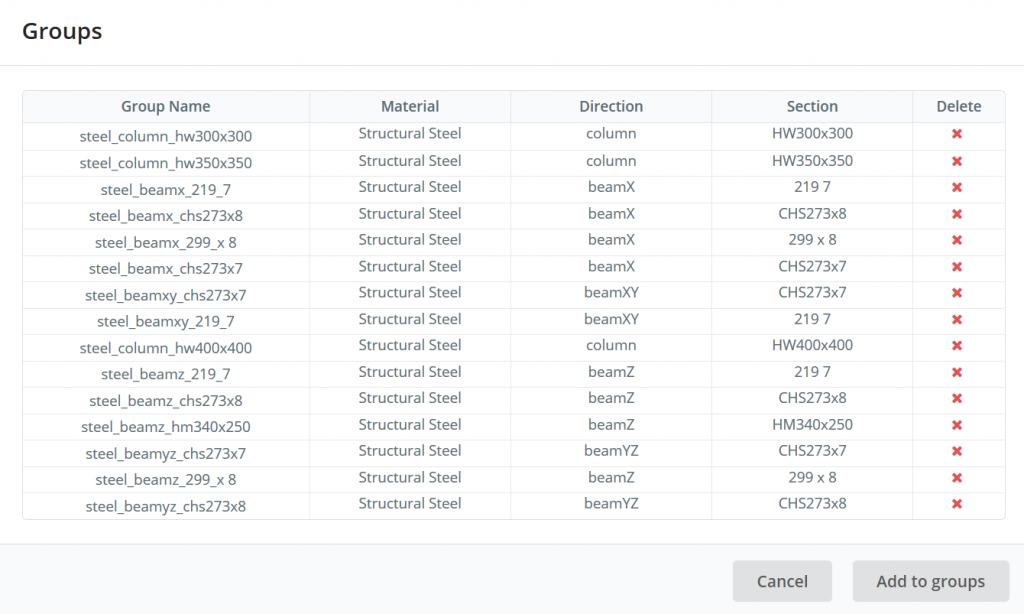
Φιγούρα 2: Αυτόματη ομαδοποίηση όλων των διαφορετικών μελών στο σχήμα 1
Τώρα που έχουμε κάποιες ομάδες μελών, Ας ρίξουμε μια ματιά σε αυτά στο χώρο του μοντέλου. Απλώς κάντε κλικ σε μια ομάδα στον πίνακα και αυτά τα μέλη θα επισημανθούν και η υπόλοιπη δομή θα είναι αχνή. Απενεργοποιήστε τις ετικέτες μέλους και κόμβου για να έχετε μια ακόμη πιο ξεκάθαρη εικόνα. Αυτό φαίνεται στο Σχήμα 3 παρακάτω:
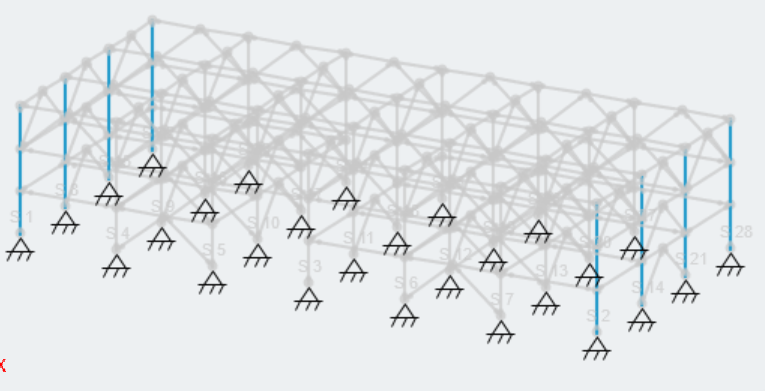
Φιγούρα 3: Μια ομάδα στηλών που επισημαίνονται στο χώρο του μοντέλου χρησιμοποιώντας το Ομάδες εργαλείο
Επόμενο, επιτρέπει να ενοποιήσουμε όλες τις ομάδες στηλών για να δημιουργήσουμε μία ομάδα. CTRL και κάντε κλικ στις ομάδες με το πρόθεμα στήλης στο όνομά τους, μετά πατήστε Συγχώνευση Ομάδων. Σημείωση, όταν ενοποιείτε ομάδες, οι ιδιότητες της ενότητας να μην συγχωνεύονται. Ωστόσο, γιατί μπορούν εύκολα να επιλεγούν ταυτόχρονα, μπορείτε να αλλάξετε την ενότητα για ολόκληρη την ομάδα. Το αποτέλεσμά μας όπως φαίνεται στο σχήμα 4:
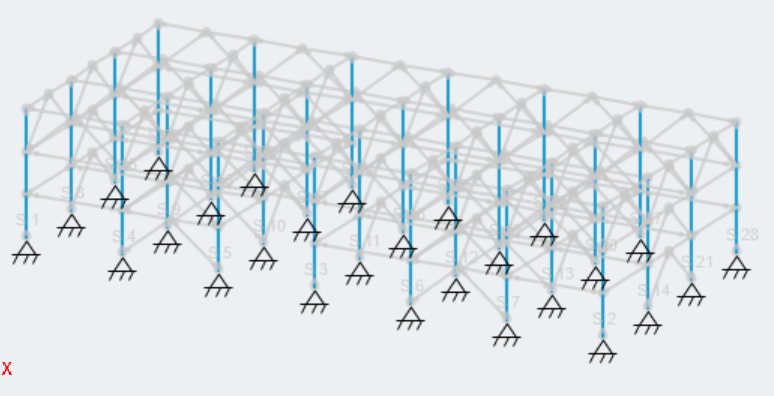
Φιγούρα 4: Η ενοποίηση όλων των ομάδων στηλών μας σε μια ομάδα.
Ρυθμίσεις και εργαλεία ορατότητας
Ο χώρος μοντέλων 3D στο SkyCiv Structural 3D επιτρέπει στον χρήστη απεριόριστη προσαρμογή όταν πρόκειται για αυτό που θέλετε να δείτε. Ας δούμε μερικές από τις ρυθμίσεις και τα εργαλεία ορατότητας στο 3D modeler.
Προβολές Μοντέλων
Για να μεταβείτε γρήγορα σε μία από τις προκαθορισμένες προβολές του μοντέλου σας, μεταβείτε στη γραμμή εργαλείων στη δεξιά πλευρά του χώρου του μοντέλου και κάντε κλικ στο Συμπληρώστε τα πεδία κουμπί. Στη συνέχεια, μπορείτε να επιλέξετε μία από τις προκαθορισμένες προβολές για να κατανοήσετε με σαφήνεια το μοντέλο σας:
Εναλλαγή ορατότητας αντικειμένου
Όταν το μοντέλο σας έχει συγκεντρώσει μεγάλο αριθμό κόμβων, μέλη, και φορτώνει, ο τρισδιάστατος χώρος μπορεί να φαίνεται ακατάστατος όταν όλα αυτά τα στοιχεία είναι ορατά: Για να ενεργοποιήσετε και να απενεργοποιήσετε την προβολή ορισμένων στοιχείων, μεταβείτε στη δεξιά γραμμή εργαλείων και κάντε κλικ στο Σύμβολο ματιών, αλλιώς γνωστό ως το Ρυθμίσεις ορατότητας. Θα πρέπει να εμφανιστεί μια λίστα στοιχείων που μπορείτε τώρα να επιλέξετε ή να αποεπιλέξετε για να βελτιώσετε περαιτέρω αυτό που προσπαθείτε να δείτε στο μοντέλο σας.
Ένα παράδειγμα ενεργοποίησης και απενεργοποίησης φορτίων στο μοντέλο σας:
Στη συνέχεια, μπορείτε να αποφορτιστείτε περαιτέρω ενεργοποιώντας το μέλος, ετικέτες κόμβων, υποστηρίζει, ή συνδυασμός:
Μια άλλη χρήσιμη εναλλαγή είναι η λιποθυμία της κατασκευής για την εξέταση φορτίων:
Κοιτάζοντας φορτία, μπορείτε να αλλάξετε την αναλογικότητά τους και να προσαρμόσετε την κλίμακα τους. Η συνολική κλίμακα εμφανίζεται στη γραμμή εργαλείων και μπορεί να ρυθμιστεί με το ρυθμιστικό όπως φαίνεται:
Απόκρυψη/Εμφάνιση και επιλογή
Για να κρύψετε οτιδήποτε στο χώρο του μοντέλου, απλά επιλέξτε το, στη συνέχεια πατήστε είτε CTRL + Η, ή Κάντε δεξί κλικ για να εμφανίσετε μια ποικιλία διαθέσιμων επιλογών, συμπεριλαμβανομένων Απόκρυψη επιλογής.
Επιλογή και απόκρυψη πολλών στοιχείων
Η αποτελεσματικότητα στην απόκρυψη αντικειμένων προέρχεται από την επιλογή πολλών αντικειμένων ταυτόχρονα και στη συνέχεια την απόκρυψή τους, αντί να κρύβει αντικείμενα ένα-ένα. Μπορείτε να επιλέξετε μεμονωμένα στοιχεία ένα κάθε φορά πατώντας παρατεταμένα το CTRL και μετά κάνοντας κλικ στα πρόσθετα μέλη που θέλετε να επιλέξετε. Ένα ολόκληρο παράθυρο στοιχείων μπορεί να επιλεγεί κρατώντας πατημένο το CTRL και, στη συνέχεια, κάντε κλικ και σύροντας το ποντίκι σας για να δημιουργήσετε ένα ορθογώνιο παράθυρο που να περιλαμβάνει μέλη.
Κρατήστε CTRL + Κάντε κλικ για να επιλέξετε μεμονωμένα στοιχεία
Κρατήστε πατημένο το CTRL, Κάντε κλικ και σύρετε τον κέρσορα από Δεξιά προς τα αριστερά για να επιλέξετε στοιχεία που περιέχονται εξ ολοκλήρου στο παράθυρο:
Κρατήστε πατημένο το CTRL, Κάντε κλικ και σύρετε τον κέρσορα από Από αριστερά προς τα δεξιά για να επιλέξετε στοιχεία που αγγίζουν το παράθυρο:
Εμφάνιση κρυφών αντικειμένων
Για εμφάνιση κρυφών στοιχείων, κάντε δεξί κλικ οπουδήποτε στο χώρο του μοντέλου και επιλέξτε “Προβολή όλων” στο αναδυόμενο μενού.
Απομόνωση αντικειμένων
Εάν θέλετε να κρύψετε τα πάντα εκτός από μερικά στοιχεία μοντέλου, υπάρχουν μερικοί τρόποι για να τα απομονώσετε στο χώρο του μοντέλου.
Ανατρέξτε στις διάφορες προβολές μοντέλων, Εμπρός, Συμπληρώστε τα πεδία, Μπλουζα, και τα λοιπά, και κρύψτε πράγματα που δεν θέλετε να δείτε επιλέγοντας πρώτα τα μέλη, και μετά να τα κρύψει:
CTRL + Κάντε κλικ όλα τα κομμάτια του μοντέλου που θέλετε να απομονώσετε, ώστε να εμφανίζονται όλα επιλεγμένα ταυτόχρονα. Τότε, είτε πατήστε CTRL + Εγώ, ή Κάντε δεξί κλικ και πατήστε Αντιστροφή επιλογής για να αντιστρέψετε την επιλογή. Τελικά, είτε πατήστε CTRL + Η, ή Κάντε δεξί κλικ και πατήστε Απόκρυψη επιλογής.
Το αποτέλεσμα θα πρέπει να είναι ο εκλεπτυσμένος αριθμός τρισδιάστατων στοιχείων που προσδιορίσατε.
Μαζί, Η ομαδοποίηση και η απόκρυψη επιταχύνουν τη μοντελοποίηση της πραγματικής δομής σας και αφήνουν τον χρήστη να εστιάσει στην ανάλυση και το σχεδιασμό.