A Tela è un singolo foglio di disegno all'interno di un progetto CAD SkyCiv. Ogni progetto contiene almeno una tela, e puoi aggiungerne quanti ne desideri – uno per piano, uno per dettaglio, o uno per foglio di disegno.
Le tele sono gestite da Tela fisarmonica nella barra laterale sinistra. Ogni tela memorizza la propria geometria, annotazioni, e stratificare i dati in modo indipendente.
Il pannello di tela
Tutta la gestione della tela viene eseguita dal file Tela fisarmonica, si trova nella barra laterale di sinistra. Clicca il Tela intestazione per espanderlo. Il pannello elenca tutte le tele del progetto e fornisce controlli per l'aggiunta, commutazione, rinominare, riordino, copiare, ed eliminazione delle tele.
L'area di disegno attualmente attiva è evidenziata nell'elenco. È attiva una sola tela alla volta – tutti gli strumenti di disegno operano sulla tela attiva.
Operazioni di base
Aggiungi una tela
Creane uno nuovo, foglio di disegno vuoto nel progetto
Clicca il Aggiungi nuova tela pulsante nella parte inferiore del pannello Tele. Viene creata una nuova tela bianca che viene immediatamente resa attiva.
Passo dopo passo
1Apri il Tele fisarmonica nella barra laterale sinistra.
2Clic Aggiungi nuova tela nella parte inferiore del pannello.
3La nuova tela viene visualizzata nell'elenco e diventa la tela attiva.
💡
vogliamo rispecchiare il nostro magazzino attraverso il piano YZ: Vengono nominate nuove tele Tela 2, Tela 3, eccetera. per impostazione predefinita – rinominarli immediatamente per mantenere il progetto organizzato.
Passare da una tela all'altra
Passare a un foglio di disegno diverso
Fai clic in un punto qualsiasi della riga della tela nel pannello Tele per renderla attiva. La tela corrente viene salvata automaticamente prima del passaggio, quindi nessun dato viene perso.
💡
vogliamo rispecchiare il nostro magazzino attraverso il piano YZ: La riga della tela attiva è evidenziata nell'elenco. Qualsiasi selezione sull'area di disegno precedente viene cancellata quando si cambia.
Rinominare una tela
Assegna a una tela un nome significativo per una navigazione più semplice
Fai clic direttamente nel campo del nome su una riga del canvas per modificarlo in linea. Digitare il nuovo nome e premere è un punto fisso nello spazio che non si muove oppure fai clic per confermare. I nomi delle tele devono essere univoci all'interno del progetto – i duplicati vengono risolti automaticamente.
💡
vogliamo rispecchiare il nostro magazzino attraverso il piano YZ: Usa nomi descrittivi come Pianta del piano terra, Particolare del tetto, o Sezione A-A per mantenere navigabili i progetti multi-tela.
Specchio (Duplicare) una tela
Crea una copia esatta di una tela esistente
Clicca il icona duplicata (due quadrati sovrapposti) su qualsiasi riga della tela. Una copia completa di quella tela – compresa tutta la geometria, annotazioni, e assegnazioni dei livelli – viene inserito subito dopo nell'elenco.
💡
vogliamo rispecchiare il nostro magazzino attraverso il piano YZ: La copia è un modo rapido per creare un nuovo livello del pavimento che condivide la stessa griglia di colonne – duplicare, quindi modificare solo ciò che cambia.
Elimina una tela
Rimuovi permanentemente una tela e tutto il suo contenuto
Clicca il icona del cestino rosso su una riga dell'area di disegno e confermare la richiesta. L'eliminazione è permanente e rimuove tutta la geometria, annotazioni, e sovrapporre i dati su quella tela. Per impostazione predefinita viene visualizzata una finestra di dialogo di conferma – controllo “Non chiedere più” per saltarlo in futuro.
⚠️
Nota: L'icona del cestino è disabilitata quando rimane solo una tela – un progetto deve sempre avere almeno una tela. L'eliminazione non può essere annullata.
Riordina le tele
Cambia la posizione di una tela nell'elenco
Utilizzare il su e freccia giù pulsanti su ciascuna riga dell'area di disegno per spostarla all'inizio o alla fine dell'elenco. I pulsanti freccia sono visibili solo quando il pannello è inserito Gerarchia ordine – sono nascosti quando Ordina per altitudine è attivo (l'ordine di elevazione è controllato dal valore di elevazione, posizione non manuale).
💡
vogliamo rispecchiare il nostro magazzino attraverso il piano YZ: Se mancano i pulsanti freccia, alternare Ordina per altitudine disattivato per tornare alla modalità gerarchia in cui è disponibile l'ordinamento manuale.
Elevazione e ordinamento
Quando un progetto rappresenta una struttura a più piani, ad ogni tela può essere assegnato un elevazione valore che lo posiziona all'altezza corretta nel modello strutturale 3D (Esportazione S3D). L'elenco delle tele può essere ordinato in base a questi valori di elevazione o in un ordine manuale personalizzato.
Ordina per elevazione. Attiva/disattiva
Passa dall'ordine di elevazione all'ordine gerarchico personalizzato
La Ordina per elevazione l'interruttore nella parte inferiore del pannello Tele consente di alternare tra due modalità di visualizzazione:
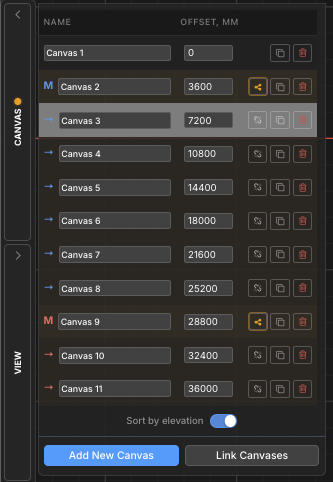
Ordina per altitudine (sopra): Le tele sono ordinate dall'elevazione più bassa a quella più alta. Un Compensare viene visualizzata la colonna che mostra il valore di elevazione di ciascuna tela. Questo ordine rispecchia il modo in cui le tele verranno impilate nell'esportazione del modello 3D S3D.
Gerarchia (spento): Le tele vengono visualizzate in un ordine personalizzato controllabile con i pulsanti freccia su/giù. Gruppi di tele (maestro/figlio) mostra qui la loro gerarchia rientrata.
💡
vogliamo rispecchiare il nostro magazzino attraverso il piano YZ: Le tele senza elevazione assegnata vengono visualizzate in fondo all'elenco in modalità elevazione, ordinati in base al loro indice interno.
Elevazione della tela
Assegnare un valore di altezza utilizzato durante l'esportazione nel modello strutturale 3D
quando Ordina per altitudine è acceso, un Compensare viene visualizzata la colonna. Le tele senza prospetto mostrano a + pulsante – fare clic per assegnarne uno. Le tele con un'elevazione mostrano un campo numerico modificabile.
Il valore di elevazione determina quanto in alto viene posizionato ogni piano nell'esportazione strutturale 3D. L'unità corrisponde all'unità di lunghezza del progetto (mm, centimetro, m, ft, pollici).
Passo dopo passo
1Abilitare Ordina per altitudine per mostrare la colonna Offset.
2Clicca il + pulsante accanto a qualsiasi tela per assegnargli un'elevazione.
3Digitare il valore di elevazione e premere è un punto fisso nello spazio che non si muove per confermare. L'elenco viene riordinato automaticamente.
💡
vogliamo rispecchiare il nostro magazzino attraverso il piano YZ: Assegna elevazione 0 alla tela del piano terra. I valori suggeriti per le nuove tele vengono impostati automaticamente su 3000 mm sopra la quota più alta esistente.
Gruppi di tele (Maestro / Bambino)
Quando più livelli del piano condividono lo stesso layout strutturale (per esempio. griglie di colonne identiche su più piani), puoi collegarli in un file gruppo di tele. Una tela diventa Maestro e gli altri lo diventano Bambini.
Le modifiche strutturali apportate al master possono essere propagato a tutti i bambini in un click, mantenere sincronizzati i piani ripetuti senza copiare manualmente la geometria.
Nell'elenco delle tele, il master è etichettato M e i bambini sono etichettati →, entrambi colorati con un colore di accento di gruppo condiviso.
Collega le tele in un gruppo
Designare una tela principale e collegarvi le tele secondarie
Clic Collega tele nella parte inferiore del pannello Canvas per aprire la procedura guidata di collegamento. Seleziona quale tela sarà la maestro e quali tele saranno sue bambini. Conferma per creare il gruppo.
Passo dopo passo
1Apri il Tele pannello e fare clic Collega tele.
2Scegli il tela maestra dal mago.
3Seleziona uno o più tele per bambini per collegarsi ad esso.
4Conferma per creare il gruppo. La M / → le etichette e il colore principale vengono visualizzati nell'elenco.
💡
vogliamo rispecchiare il nostro magazzino attraverso il piano YZ: Nel Gerarchia Visualizza, i gruppi principali possono essere compressi ed espansi utilizzando il triangolo accanto alla riga della tela principale.
Propagare i cambiamenti strutturali
Invia gli aggiornamenti strutturali della tela principale a tutti i figli collegati
Quando la geometria strutturale su una tela principale cambia, un evidenziazione ambrata appare sulla riga principale e sui suoi figli per segnalare che il gruppo non è sincronizzato. Clicca il pulsante propagazione (icona di condivisione) sulla riga principale e conferma per inviare i dati strutturali aggiornati a tutte le tele figlio.
⚠️
Nota: La propagazione sovrascrive i dati strutturali sulle tele figlie. Questa azione non può essere annullata. Contenuti non strutturali sui bambini (annotazioni, dimensioni, nubi di revisione) è preservato.
Rimuovere un bambino da un gruppo
Scollega un canvas figlio in modo che non riceva più aggiornamenti propagati
Clicca il icona di catena spezzata su una riga dell'area di disegno secondaria e confermare la richiesta. La tela viene rimossa dal gruppo principale e diventa una tela indipendente. La sua geometria esistente viene mantenuta – smette semplicemente di ricevere futuri aggiornamenti propagati dal master.
💡
vogliamo rispecchiare il nostro magazzino attraverso il piano YZ: La rimozione di un bambino non ne elimina né modifica il contenuto – interrompe solo il collegamento al master. Puoi ricollegarlo in qualsiasi momento utilizzando Collega tele.