Lo spazio 3D di SkyCiv consente agli utenti di manovrare attorno al proprio modello in vari modi per consentire un'esperienza di modellazione ottimale.
Raggruppamento in SkyCiv strutturale 3D (S3D) dà all'utente il potere di evidenziare e isolare gruppi di membri, nodi, e piastre per dare un quadro chiaro di ciò che sta accadendo nel modello. Inoltre, i gruppi semplificano la progettazione di pochi gruppi di membri anziché di ogni singolo membro all'interno dello spazio del modello 3D.
La funzione Nascondi offerta tramite Structural 3D consente all'utente di isolare la propria vista fino a una percentuale minore di aste e nodi quando lo desidera. Questa funzione è particolarmente utile quando viene modellata un'intera struttura, ma l'utente desidera osservare un singolo fotogramma all'interno della struttura.
Queste due funzioni in combinazione semplificano il disordine dei modelli con elementi visivi simili a quello mostrato di seguito:
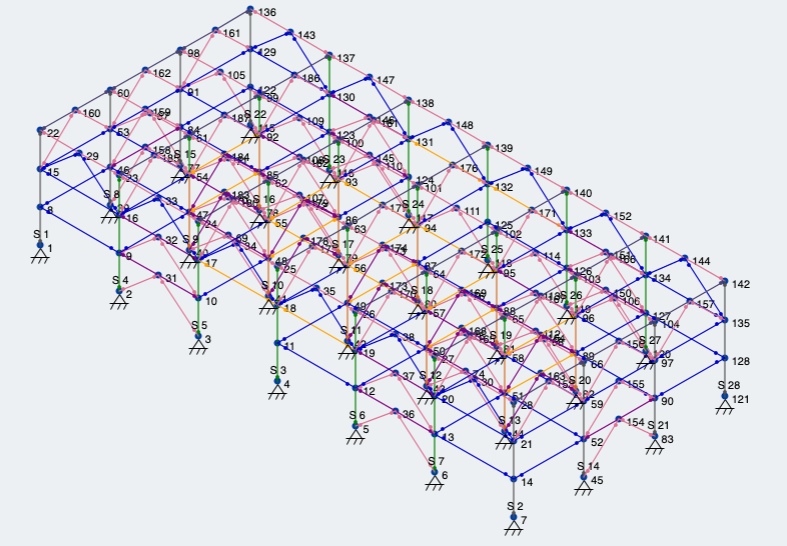
figura 1: Progetto reale realizzato tramite SkyCiv con più sezioni e orientamenti
Raggruppamento
Per accedere alla scheda dei gruppi di modelli, premere CTRL + sol, oppure clicca su Gruppi sotto il Scheda Avanzate.
Aggiunta di un nuovo gruppo
Per creare un nuovo gruppo, è sufficiente fare clic su Aggiungere gruppo. Seleziona cosa desideri raggruppare: nodi, Membri o piastre. Poi, identificare quel tipo di elemento 3D nel campo ID, separati da virgole. Puoi anche rinominare il gruppo per descrivere meglio gli elementi.
Unisci gruppi
Se desideri consolidare due o più gruppi in uno solo, semplicemente CTRL + Clic i gruppi che desideri, e quindi fare clic su Unisci gruppi pulsante. Ciò è particolarmente utile se disponi di più gruppi di membri che desideri progettare come un'unica dimensione.
Raggruppamento automatico
Uno degli strumenti più utili in S3D è lo strumento Raggruppamento automatico. SkyCiv eseguirà automaticamente la scansione del modello e dei membri del gruppo utilizzando criteri come la lunghezza, direzioni/orientamenti, e le proprietà della sezione. Per raggruppare automaticamente il tuo modello, vai semplicemente a Gruppi e fare clic su Gruppo automatico pulsante
Esempio
Osserviamo il modello in Figura 1. Primo, Utilizziamo la funzione Raggruppamento automatico per ottenere alcuni gruppi di membri. Di conseguenza, lo strumento SkyCiv ci offre 16 diversi gruppi di membri, come mostrato di seguito in Figura 2.
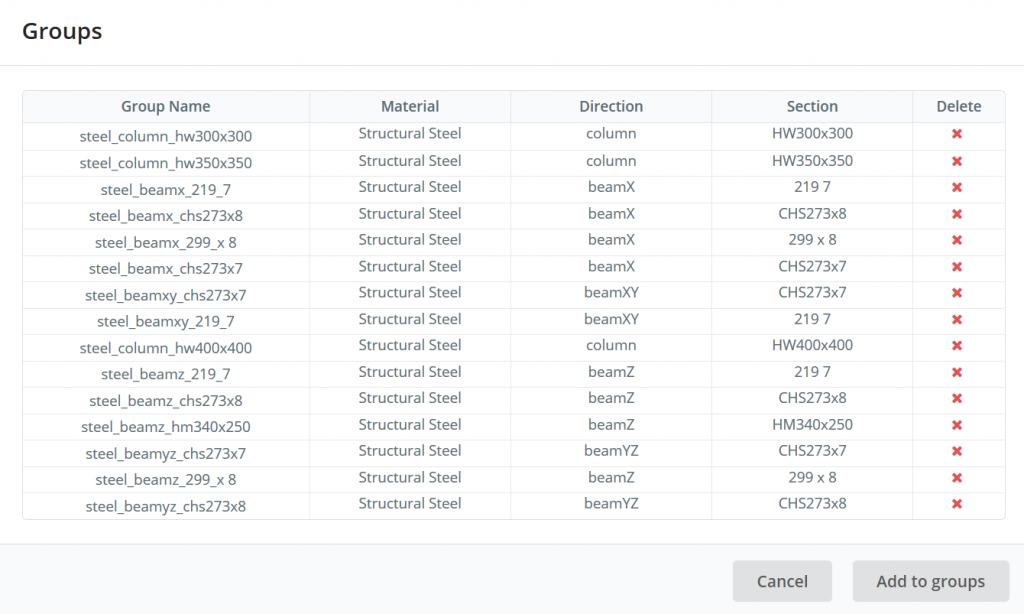
figura 2: Raggruppamento automatico di tutti i diversi membri nella figura 1
Ora che abbiamo alcuni gruppi di membri, Diamo un'occhiata a loro nello spazio modello. Basta fare clic su un gruppo nella tabella e i suoi membri verranno evidenziati e la struttura rimanente apparirà debole. Disattiva le etichette dei membri e dei nodi per ottenere un'immagine ancora più chiara. Ciò è illustrato nella Figura 3 sotto:
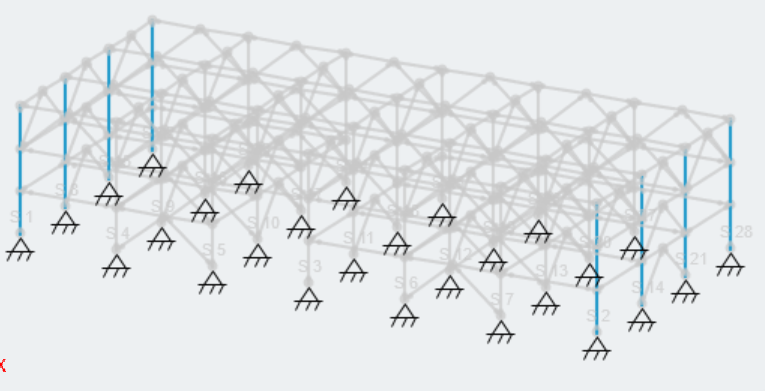
figura 3: Un gruppo di colonne evidenziate nello spazio modello utilizzando il file Gruppi attrezzo
Successivamente, consente di consolidare tutti i gruppi di colonne per creare un gruppo. CTRL e fare clic sui gruppi con il prefisso di colonna nel nome, quindi premere Unisci gruppi. Nota, quando consolidi i gruppi, le proprietà della sezione da non unire. Tuttavia, perché possono essere facilmente selezionati tutti contemporaneamente, puoi modificare la sezione per l'intero gruppo. Il nostro risultato come mostrato in Figura 4:
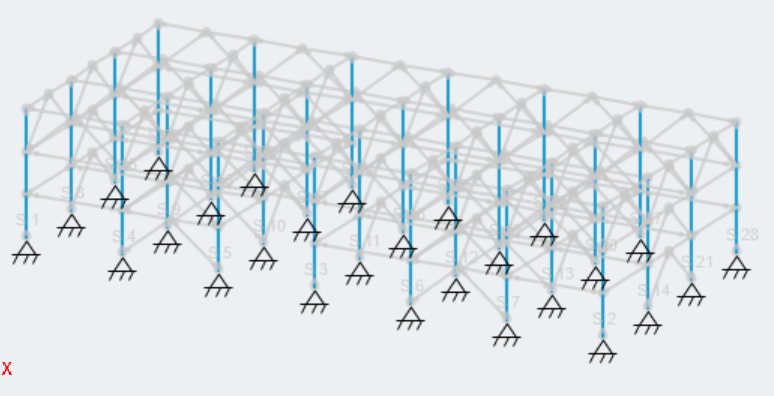
figura 4: Il consolidamento di tutti i nostri gruppi di colonne in un unico gruppo.
Impostazioni e strumenti di visibilità
Lo spazio del modello 3D in SkyCiv Structural 3D consente all'utente una personalizzazione illimitata quando si tratta di ciò che si desidera vedere. Esaminiamo alcune delle impostazioni e degli strumenti di visibilità nel modellatore 3D.
Viste del modello
Per passare rapidamente a una delle viste preimpostate del tuo modello, vai alla barra degli strumenti sul lato destro dello spazio modello e fai clic su Visualizzazioni pulsante. Puoi quindi selezionare una delle visualizzazioni preimpostate per comprendere chiaramente il tuo modello:
Attivazione/disattivazione della visibilità degli articoli
Quando il tuo modello ha accumulato un gran numero di nodi, aste, e carichi, lo spazio 3D può sembrare disordinato quando tutti questi elementi sono visibili: Per attivare e disattivare la visualizzazione di determinati elementi, vai sulla barra degli strumenti a destra e fai clic su Simbolo dell'occhio, altrimenti noto come Impostazioni di visibilità. Dovrebbe apparire un elenco di elementi che ora puoi selezionare o deselezionare per affinare ulteriormente ciò che stai cercando di guardare nel tuo modello.
Un esempio di attivazione e disattivazione dei carichi nel modello:
È quindi possibile eliminare ulteriormente il disordine attivando il membro, etichette dei nodi, supporti, o una combinazione:
Un'altra opzione utile è lo svenimento della struttura per osservare i carichi:
Mentre guardo i carichi, puoi attivare o disattivare la loro proporzionalità e regolarne la scala. La scala complessiva è mostrata sulla barra degli strumenti e può essere regolata con il cursore come mostrato:
Nascondi/Mostra e Selezione
Per nascondere qualsiasi cosa nello spazio modello, selezionalo semplicemente, quindi premere CTRL + H, o Fare clic con il tasto destro per mostrare una varietà di opzioni disponibili, tra cui Nascondi selezione.
Selezionare e nascondere più elementi
L'efficienza nel nascondere gli oggetti deriva dalla selezione di più elementi contemporaneamente e dal loro nascondimento, invece di nascondere gli elementi uno alla volta. Puoi selezionare individualmente gli elementi uno alla volta tenendo premuto CTRL e quindi facendo clic sui membri aggiuntivi che desideri selezionare. È possibile selezionare un'intera finestra di elementi tenendo premuto CTRL, quindi facendo clic e trascinando il mouse per creare una finestra rettangolare che comprenda i membri.
Aspetta CTRL + Clic per selezionare singoli elementi
Tieni premuto CTRL, Fare clic e trascinare il cursore da Da destra a sinistra per selezionare gli elementi contenuti interamente nella finestra:
Tieni premuto CTRL, Fare clic e trascinare il cursore da Da sinistra a destra per selezionare gli elementi che toccano la finestra:
Visualizzazione degli elementi nascosti
Per mostrare gli elementi nascosti, fare clic con il tasto destro in un punto qualsiasi dello spazio modello e selezionare “Mostra tutto” nel menu a comparsa.
Isolamento degli elementi
Se vuoi nascondere tutto tranne alcuni elementi del modello, ci sono un paio di modi per isolarli nello spazio modello.
Passare attraverso le varie visualizzazioni del modello, Davanti, Lato, Superiore, eccetera, e nascondi le cose che non vuoi vedere selezionando prima i membri, per poi nasconderli:
CTRL + Clic tutti i pezzi del modello che desideri isolare in modo che vengano visualizzati tutti selezionati contemporaneamente. Poi, premere CTRL + I, o Fare clic con il tasto destro e premere Inverti selezione per invertire la selezione. Infine, premere CTRL + H, o Fare clic con il tasto destro e premere Nascondi selezione.
Il risultato dovrebbe essere il numero raffinato di elementi 3D identificati.
Insieme, Raggruppare e nascondere accelerano la modellazione della struttura reale e consentono all'utente di concentrarsi sull'analisi e sulla progettazione.