Aggiungi rapidamente membri in base all'angolo o alla posizione relativa toccando "R".’
Oltre ai tradizionali metodi di modellazione in 3D strutturale, La funzione Membro relativo di SkyCiv offre agli utenti un altro modo per modellare le proprie strutture in modo più rapido e semplice.
Per utilizzare il Membro relativo funzione, selezionare prima un nodo e uno dei due:
un carico) premi "R", o
b) Fare clic con il tasto destro sul nodo e selezionare Aggiungi membro relativo.
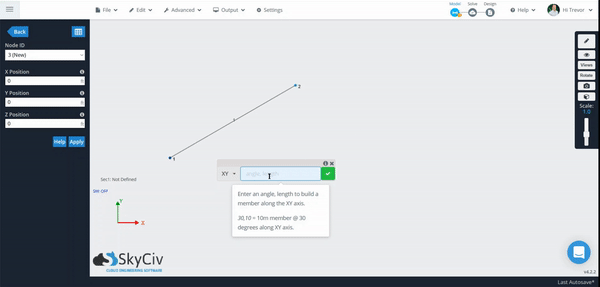
Verrà visualizzato un piccolo popup che è possibile spostare nello spazio del modello per assistere al meglio nella visualizzazione, come mostrato di seguito:
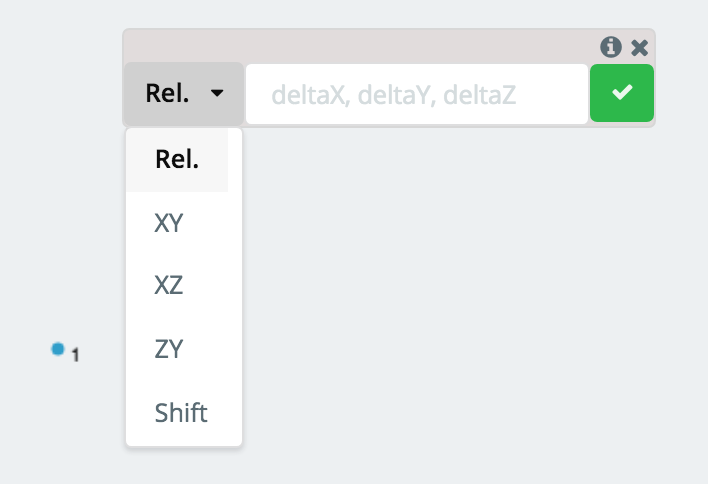
Da qui, utilizzare il menu a tendina per selezionare il metodo di aggiunta del relativo membro e il campo di input per inserire i dati richiesti. Esistono due metodi principali (Rel, Lunghezza/Angolo) all'aggiunta di membri relativi, che verrà approfondito di seguito:
Aggiunta di un membro relativo utilizzando la proiezione dell'asse globale
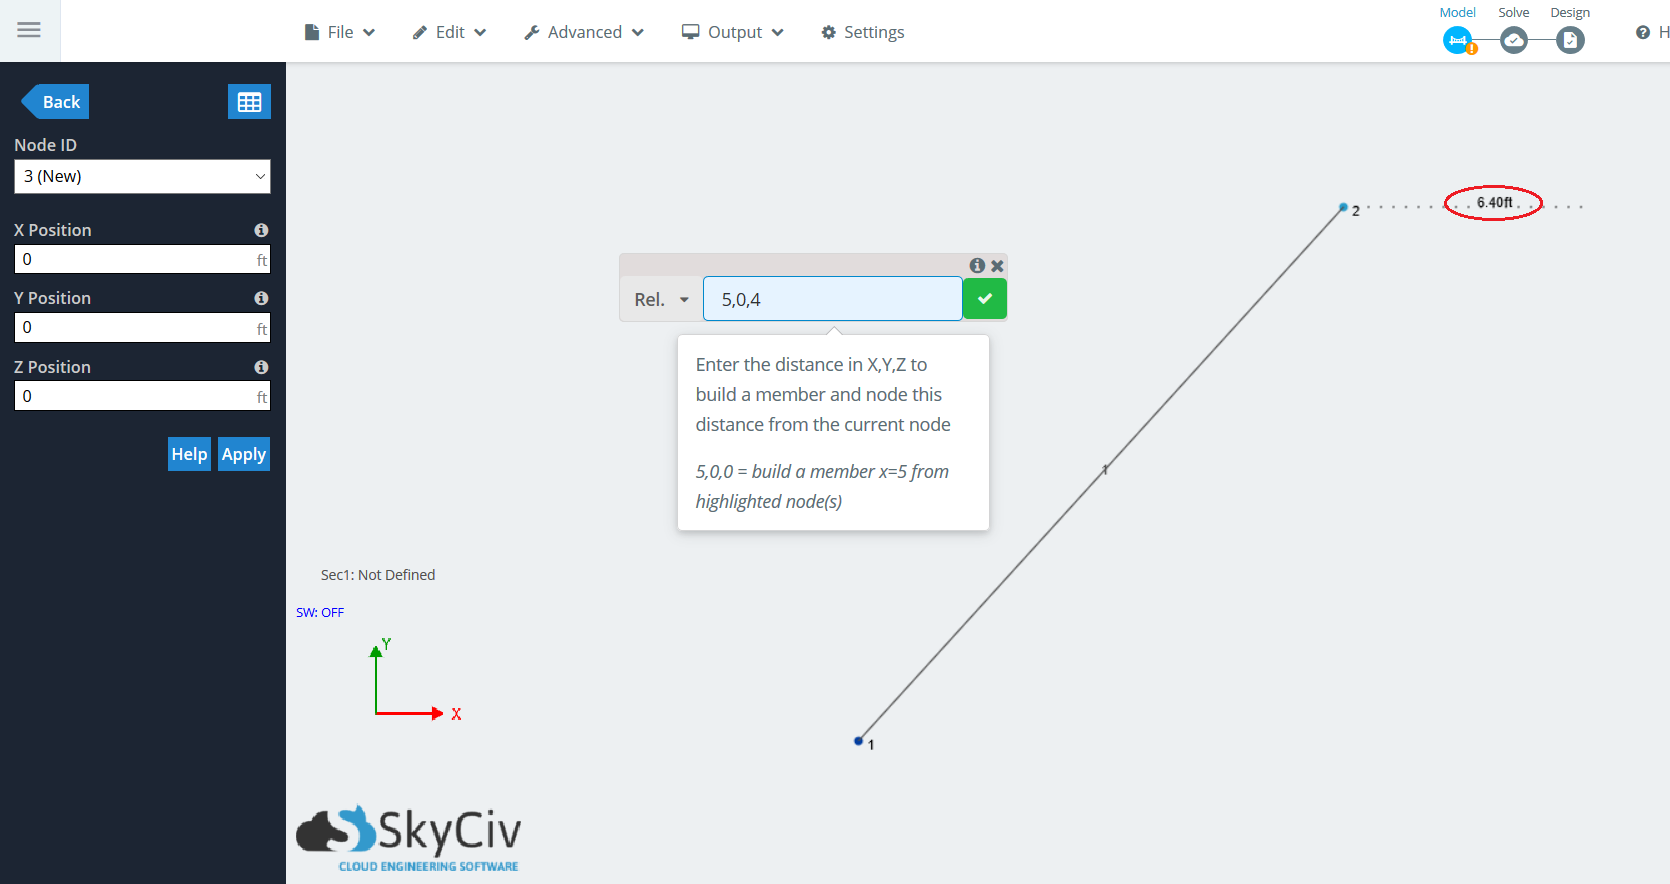
La “Rel.” Il metodo è il metodo predefinito per aggiungere un membro relativo. I tre valori mostrati nel campo di input (deltaX, delta Y, deltaZ) corrispondono al cambio di posizione dal nodo selezionato al nodo appena generato. Ciò è particolarmente utile per la modellazione nello spazio 3D quando si conosce la modifica in X, E, e Z tra i punti finali.
Esempio:
Se il nodo selezionato, dire Nodo 1, è nella posizione (0,1,4) e volevi generare un membro da Node 1 ad un nodo a (10,12,8), dire Nodo 2, metteresti (10,11,4) come i valori per (deltaX, delta Y, deltaZ). La proiezione al nuovo nodo verrà visualizzata come una linea tratteggiata:
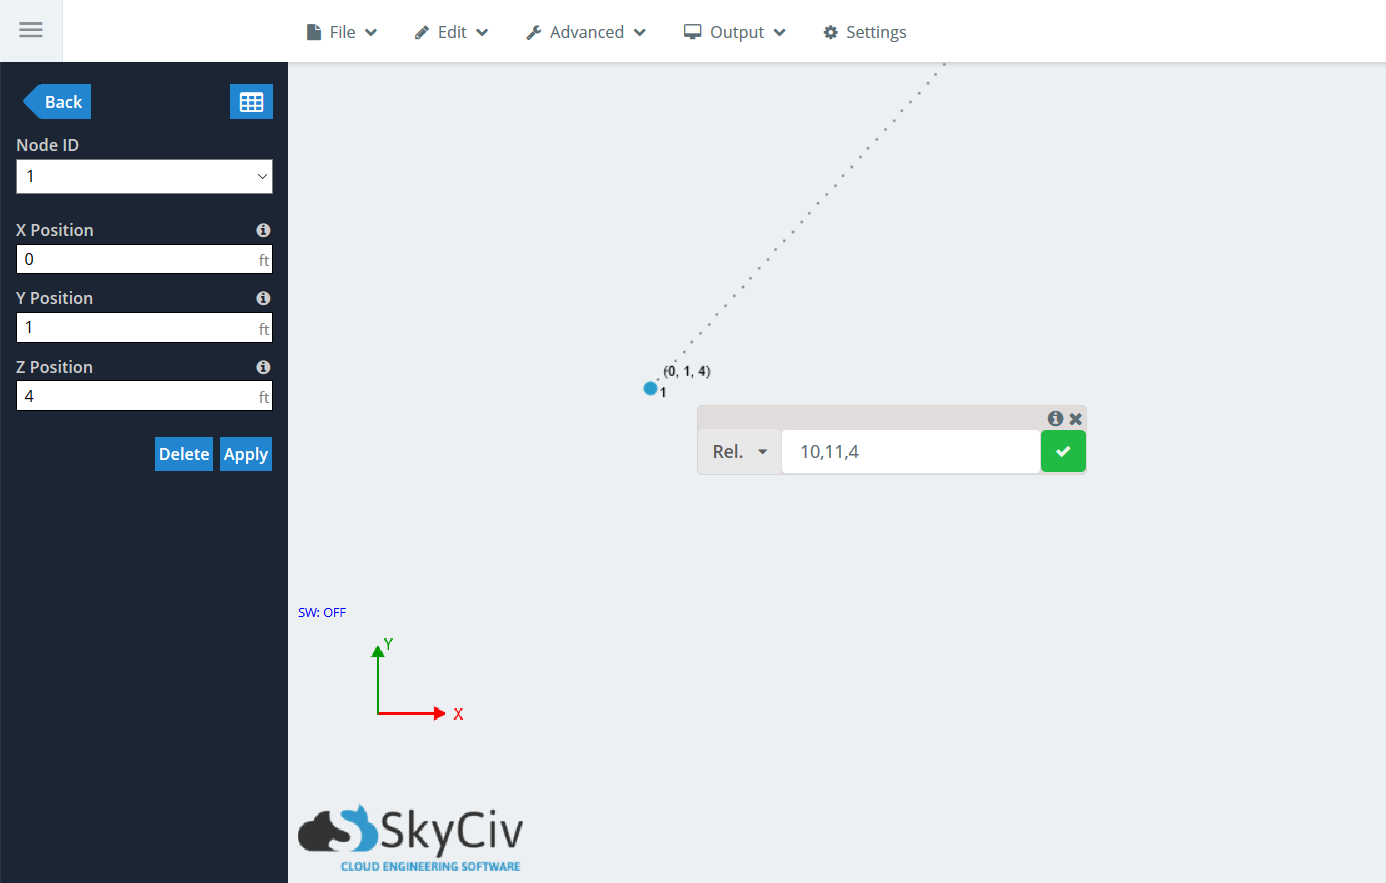
Fare clic sul segno di spunta verde, o colpito è un punto fisso nello spazio che non si muove, accettare la generazione del membro. La finestra dei membri relativi rimarrà attiva in modo da poter concatenare più membri di seguito. Se scegli di generare un altro membro, il nodo di origine sarà Node 2, quindi i valori delta saranno relativi ad esso, non Nodo 1.
Nota nell'immagine qui sotto, che mentre è visibile la linea di proiezione tratteggiata, visualizzerà la lunghezza del membro, simile a quando si utilizza lo strumento penna:
Aggiunta di un membro relativo utilizzando Angolo e Lunghezza
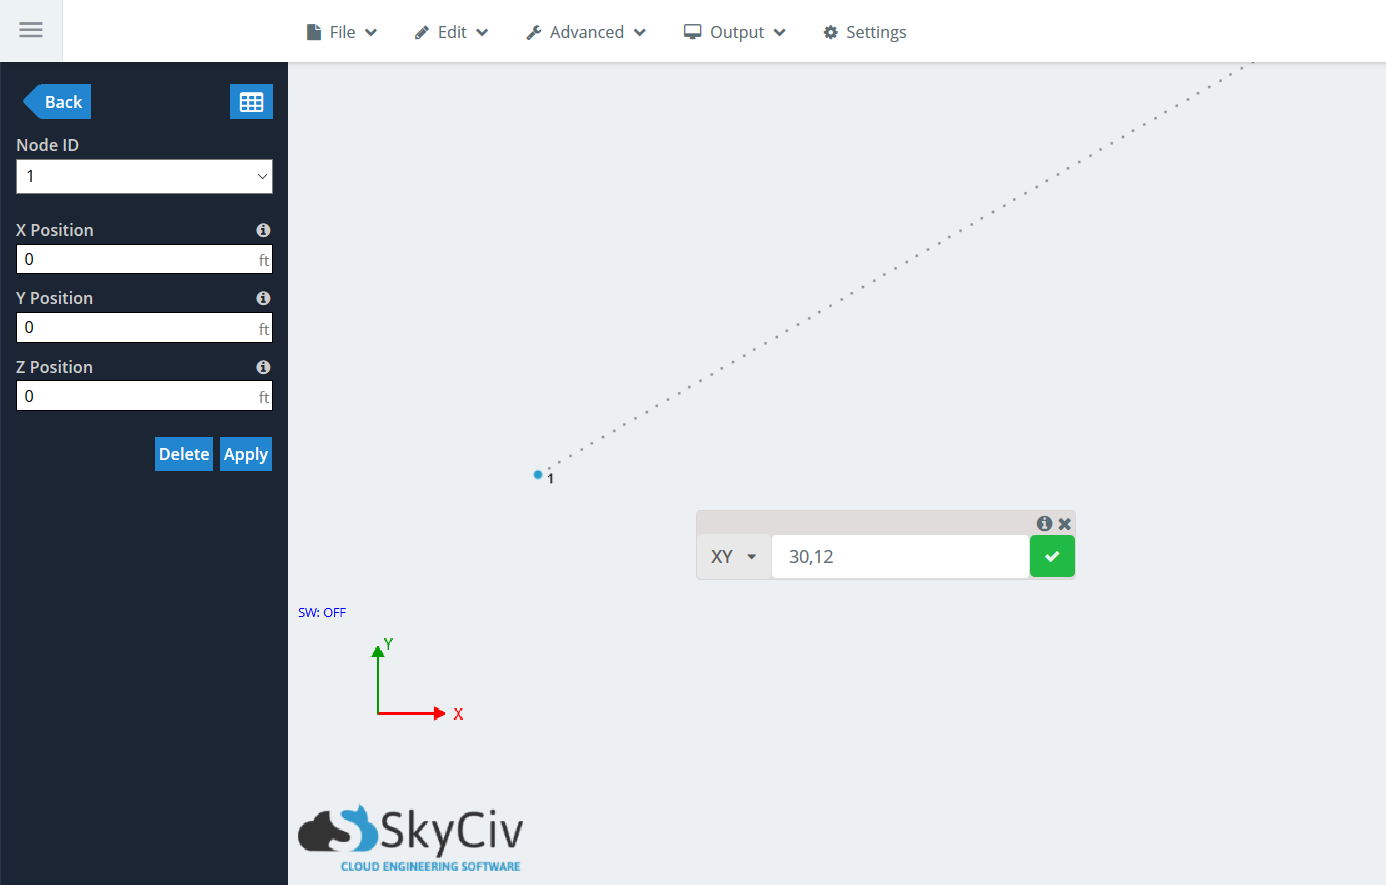
Questo metodo consente agli utenti di inserire rapidamente la lunghezza e l'angolo di un membro per un membro ad angolo rapido. È utile quando si modella nello spazio 2D e si conoscono l'angolo e la lunghezza dell'elemento che si desidera creare. È possibile creare un membro da un nodo selezionato inserendo l'angolo dall'orizzontale (andando in senso antiorario) e la lunghezza del membro.
Perché esiste un numero infinito di piani che possono essere utilizzati per generare un nodo nello spazio 3D, gli utenti hanno la possibilità di utilizzare questo metodo con uno dei tre piani dell'asse globale: XY, YZ, e XZ. I due valori mostrati nel campo di input di queste tre opzioni (angolo, lunghezza) corrispondono all'angolo in gradi rispetto all'orizzontale e alla lunghezza dell'asta, rispettivamente.
Esempio:
Supponiamo che tu voglia generare un membro angolato nel piano XY originato da un nodo in (Il,Il,Il), dire Nodo 1. Sai che il membro siede a 30 angolo di gradi rispetto all'orizzontale, in questo caso l'asse X, ed è 12 piedi lunghi. Seleziona il nodo, premi "R".’ per far apparire il Membro relativo funzione. Fai clic sul menu a discesa e vai a “XY”. Mettere in (30,12) nel campo di immissione, la proiezione apparirà nuovamente come una linea tratteggiata:
Fare clic sul segno di spunta verde, o colpito è un punto fisso nello spazio che non si muove, accettare la generazione del membro. La finestra dei membri relativi rimarrà attiva in modo da poter concatenare più membri di seguito. Se scegli di generare un altro membro, il nodo di origine sarà Node 2, quindi i valori delta saranno relativi ad esso, non Nodo 1.
Aggiunta di più membri relativi allo stesso tempo
Lo stesso Membro relativo la funzione membro non può essere utilizzata solo per generare singoli membri, ma molteplici allo stesso tempo. Il flusso di lavoro è lo stesso, tranne che gli utenti possono selezionare più nodi da cui desiderano generare membri relativi. Questi nodi non devono necessariamente trovarsi sullo stesso piano e possono trovarsi ovunque all'interno del progetto.
Esempio:
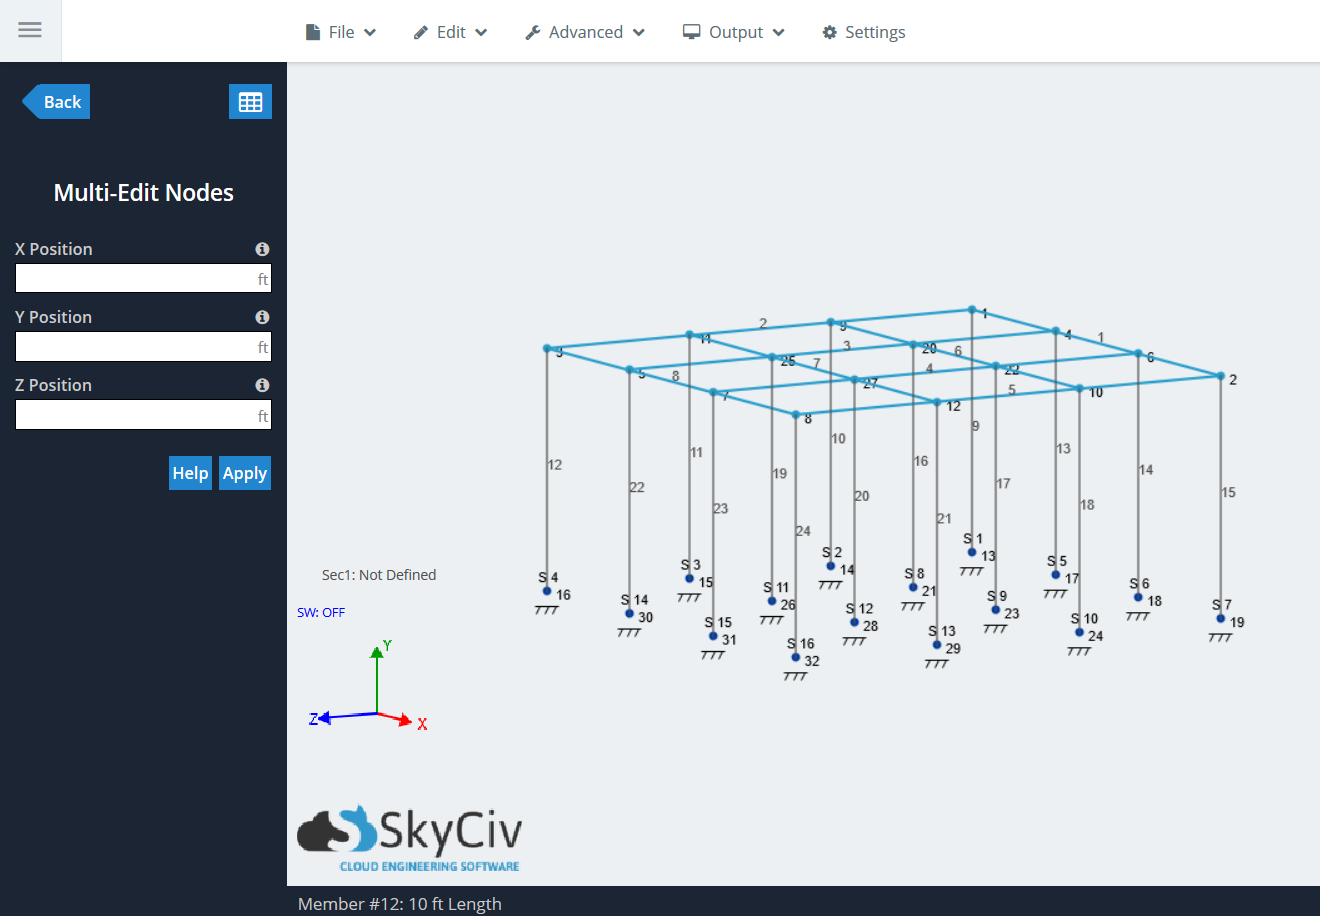
Per questo esempio, Consideriamo una semplice piattaforma elevata che può essere generata molto facilmente utilizzando Modelli di assemblaggio all'interno del 3D strutturale. Inizia facendo clic su Ctrl e trascinando da destra a sinistra per selezionare quello più in alto “pavimento” di nodi e membri.
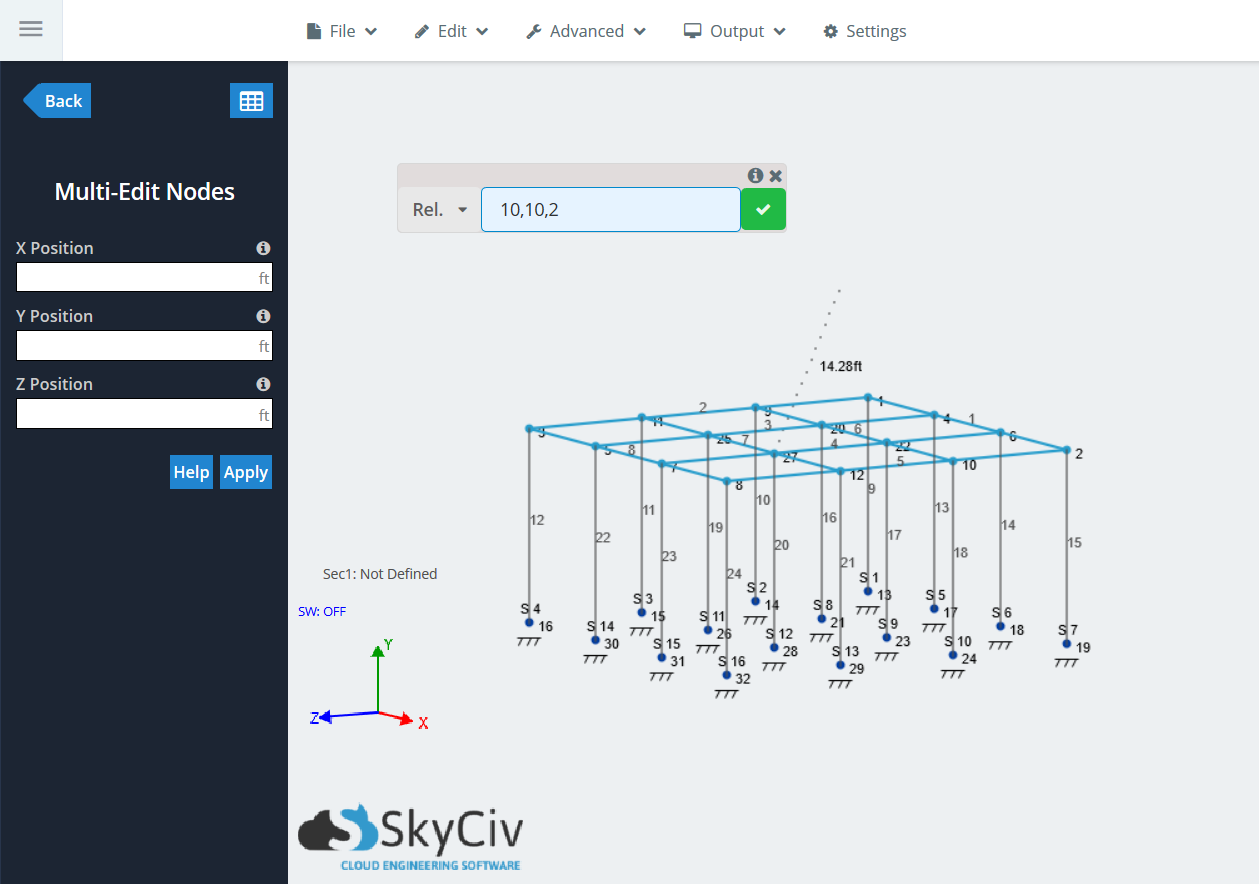
Nota: La Membro relativo la funzione genera membri solo dai nodi, non dai membri.
Adesso, creare membri relativi utilizzando il file “Rel.” funzione. stampa “R” per far apparire il Membro relativo funzione e digitare (10,10,2) per i nostri valori delta. Vedrai che è presente una linea di proiezione che mostra la linea dell'asta oltre alla lunghezza dell'asta:
Fare clic sul segno di spunta verde per generare i membri. Dovresti vedere un membro e un nodo creati per ogni nodo selezionato durante il processo.
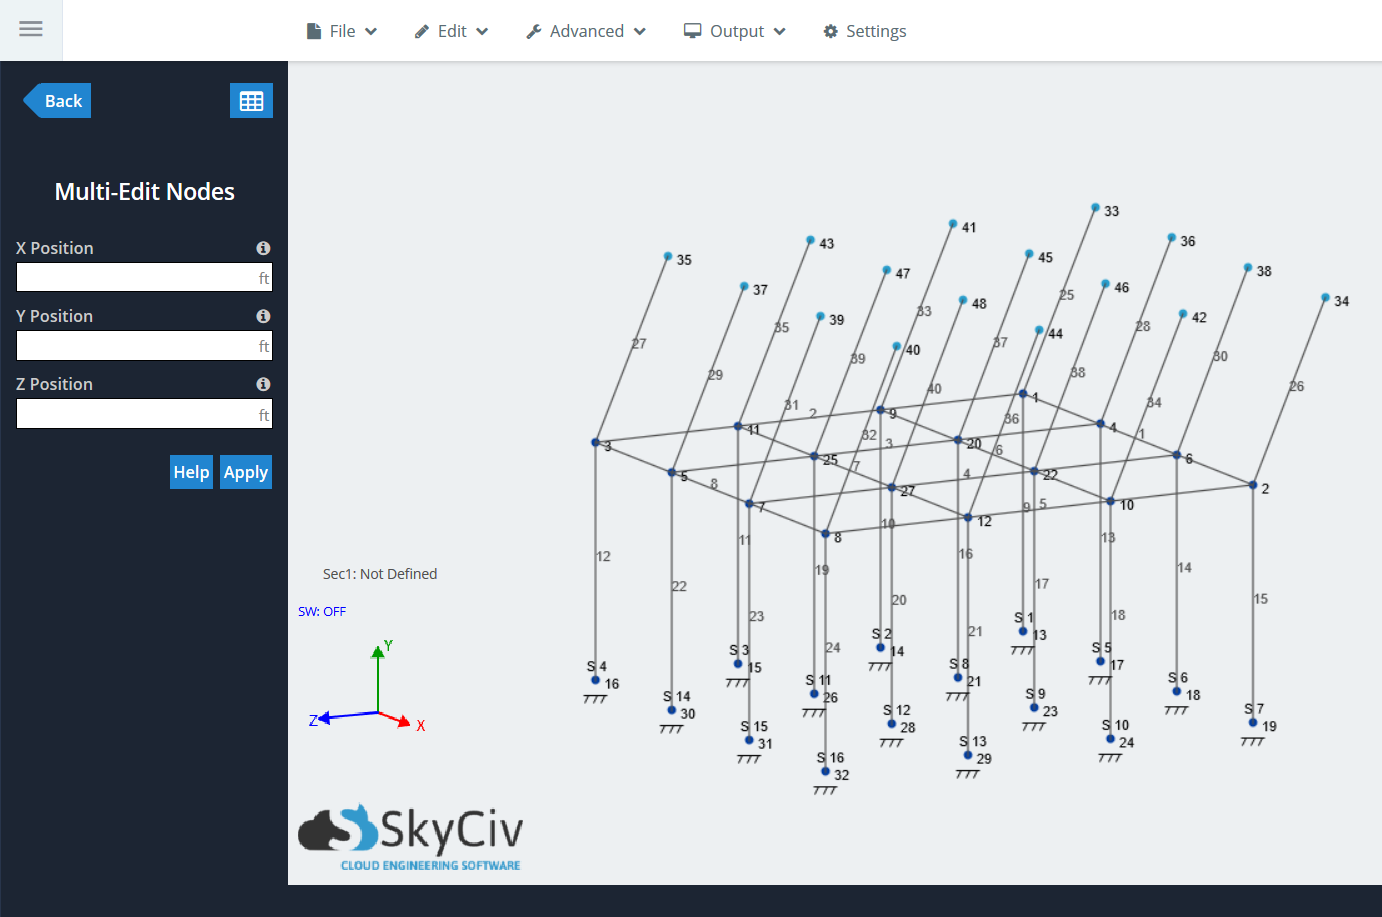
La possibilità di aggiungere più membri relativi contemporaneamente apre le porte a possibilità di modellazione quasi illimitate per gli utenti. Provalo la prossima volta che stai modellando un progetto.
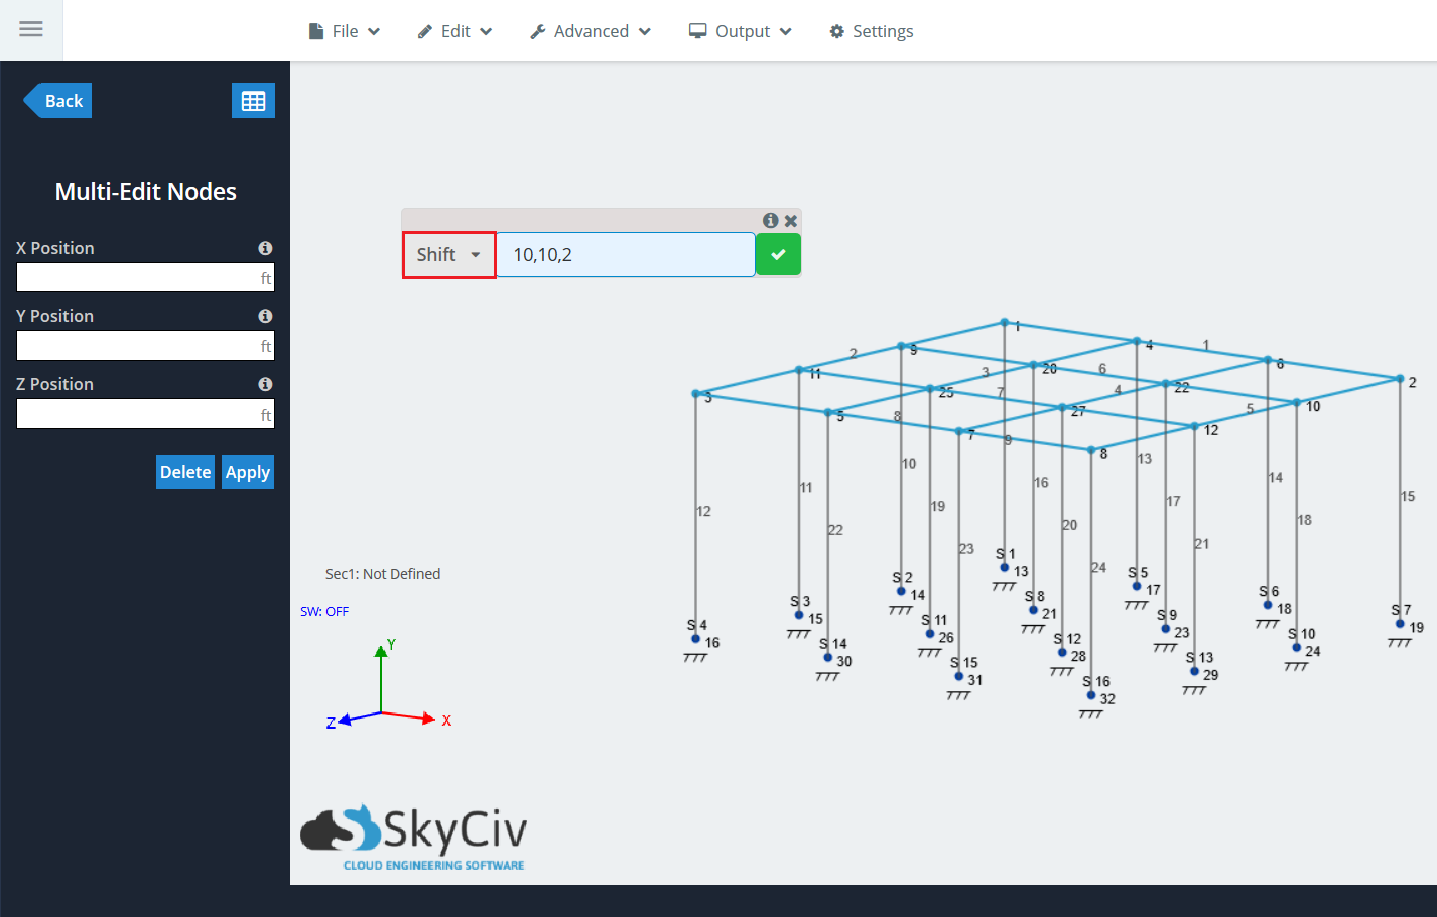
Shift mentre si utilizza la funzione membro relativa
L'ultima funzionalità utile situata all'interno della funzione Membro relativo è “Spostare”, che è l'ultima voce nel menu a discesa. Questa è una scorciatoia semplice e veloce per utilizzare la stessa funzione Shift Nodes, situato in modificare > operazioni > Nodi di spostamento. Uno o più nodi possono essere spostati nello spazio 3D, e rimarrai in contatto con i membri. Simile al “Rel.” funzione, gli utenti devono inserire le distanze di proiezione per ciascun asse globale’.
Esempio:
Utilizzando la stessa piattaforma elevata nell'ultimo esempio, ripetere la selezione degli stessi elementi sul “ultimo piano” della piattaforma. stampa “R” e trova “Spostare” nel menu a discesa. Digitare gli stessi valori di prima: (10,10,2). Quando si utilizza la funzione Shift, la linea di proiezione non verrà visualizzata perché non viene generato un nuovo membro:
Fare clic sul segno di spunta verde. Tutti i nodi precedentemente selezionati si sposteranno ora nella posizione indicata, spostare anche i membri:
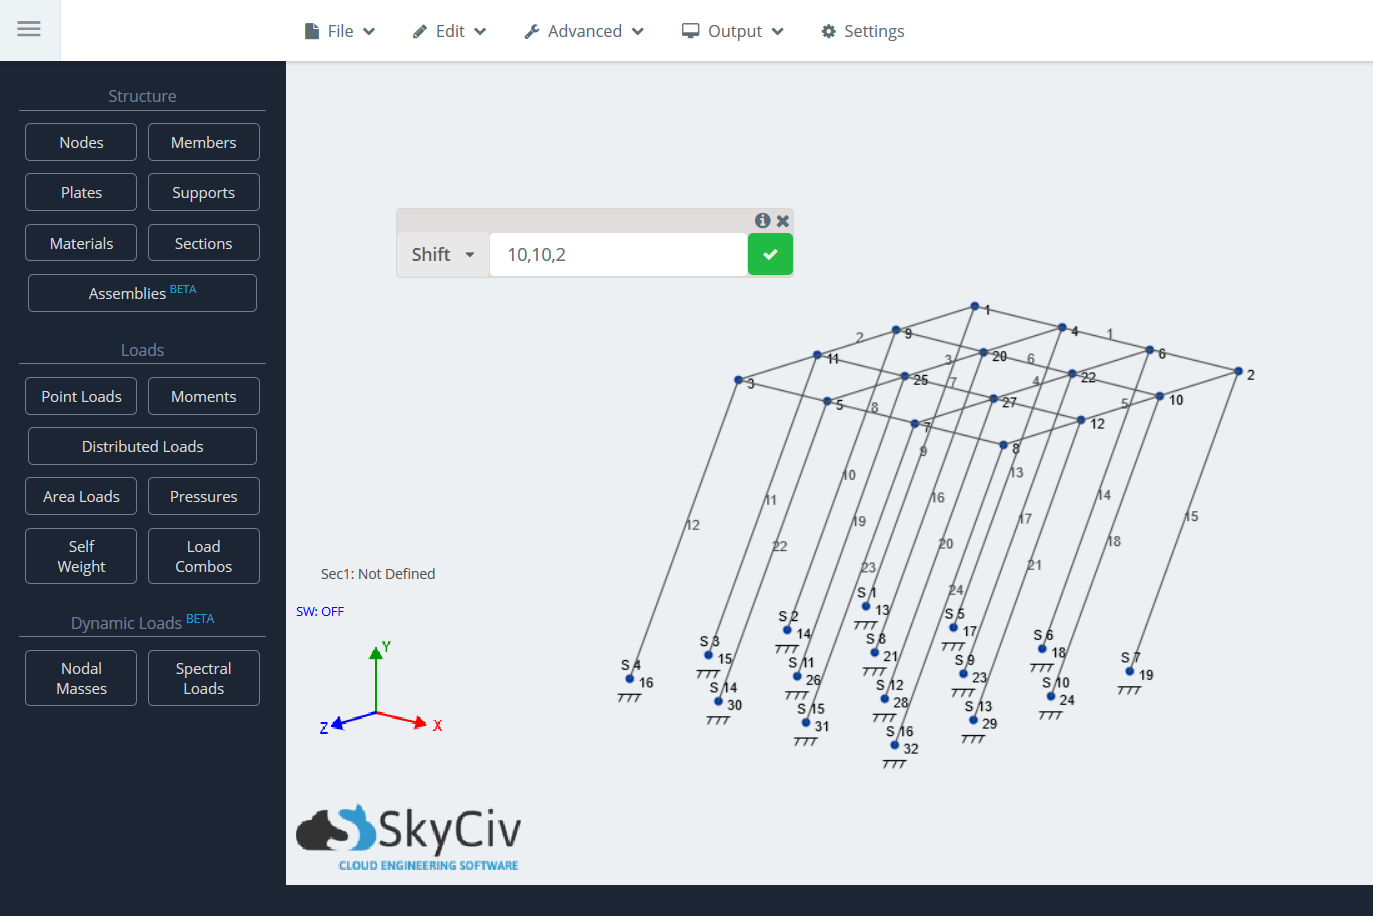
Nota: Questo può essere fatto anche con singoli nodi.