Ottieni le sezioni più ottimizzate per i tuoi progetti, in un solo clic.
SkyCiv Member Design Designer fa risparmiare tempo agli utenti, aggiungendo il controllo di ogni possibile sezione in un dato database e scegliendo la forma con l'area della sezione trasversale più bassa e il miglior rapporto di utilità. Attualmente, il Designer supporta tutti i codici di progettazione SkyCiv (AISC, NDS, AISI, AS, CSA, BS, Eurocodice e altro ancora…). Esistono alcuni criteri affinché il Designer funzioni correttamente:
- La sezione deve essere caricata da una libreria nel generatore di sezioni
- Il disegno del membro Dai un'occhiata la funzione deve essere in grado di essere eseguita
Il Designer esiste su tutto il nostro acciaio, software di progettazione di elementi in legno e formati a freddo tramite SkyCiv Structural 3D, SkyCiv Beam e il nostro software Standalone Design. Vuoi un video tutorial completo? Visita il nostro tutorial di esempio su questa funzione.
Avvio del Designer
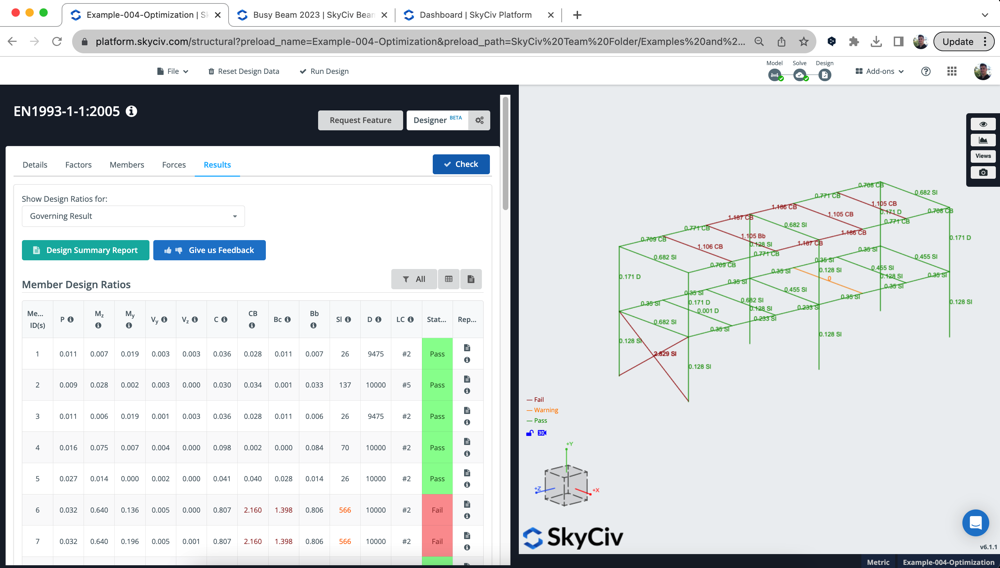
Per avviare il progetto del membro progettista, dovrai prima aprire il modulo Member Design su cui stai progettando la tua struttura. In questo esempio stiamo eseguendo una verifica dell'acciaio secondo l'Eurocodice. Una volta aperto il modulo, basta fare clic su progettista pulsante nell'angolo in alto a destra del modulo. Nel modello sotto, stiamo usando un modello in acciaio, che ha chiaramente alcuni membri dell’Eurocodice inadeguati, vediamo se riusciamo a farli passare:
Impostazioni Modali
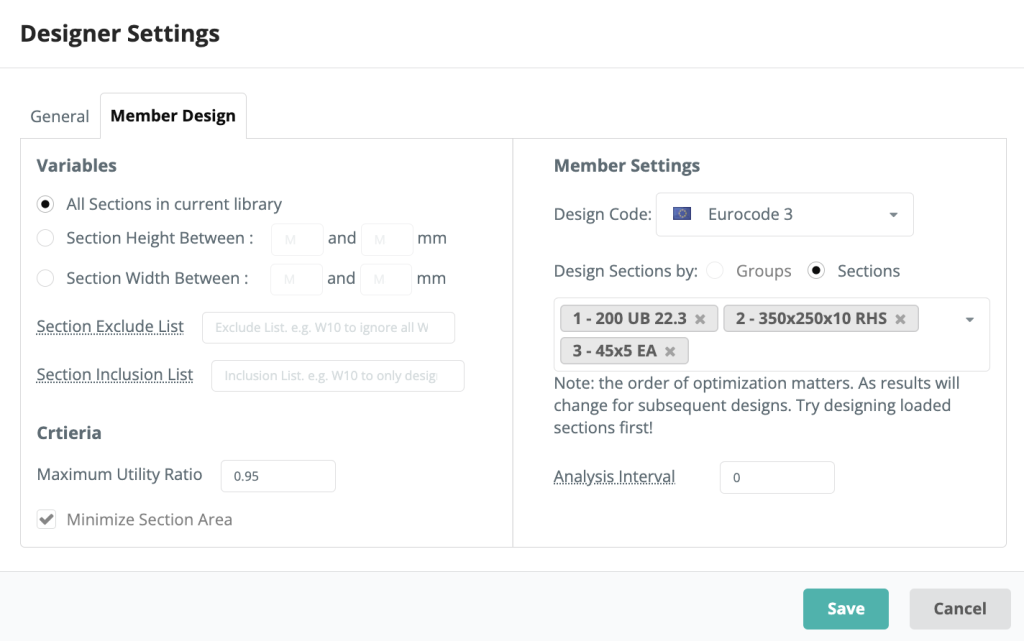
Gli utenti hanno a disposizione una serie di controlli e impostazioni, incluso un rapporto di utilità mirato, Limiti di altezza/larghezza della sezione e quali sezioni desideri progettare. Cliccando sul progettista pulsante, appariranno le seguenti opzioni:
Variabili
Gli utenti hanno la possibilità di scegliere tra tutte le sezioni della libreria, una gamma di altezze o larghezze di sezione. Queste opzioni determineranno quali sezioni, il Designer guarda quando seleziona la sezione più ottimizzata
Criteri
Gli utenti possono inserire il proprio rapporto di utilità massimo per il Designer, ciò significherebbe che qualsiasi risultato con un UR superiore a quello specificato non sarà considerato una scelta valida.
Impostazioni dei membri
In questa area delle impostazioni modali, gli utenti possono selezionare il proprio codice di progettazione come farebbero normalmente nel modulo Progettazione membro. Il modale importerà anche tutte le sezioni progettabili in questo modulo, ma l'utente ha il controllo per aggiungere/rimuovere quali sezioni desidera progettare. Il Designer progetterà una singola sezione alla volta.
La intervallo di analisi è un'impostazione importante, e dirà al software quanto spesso rieseguire il solutore FEA. Per impostazione predefinita è impostato su 0 – ciò significa che utilizzeremo le stesse forze interne durante il test di ciascuna sezione. Di solito va bene, dal momento flettente, la forza di taglio e i risultati assiali non cambieranno molto quando si cambia una sezione. Tuttavia, i risultati della deflessione cambieranno e potrebbero influenzare i risultati – poiché utilizziamo una sezione più leggera, il risultato della deflessione dovrà essere aggiornato man mano che il peso proprio viene ridotto.
Pertanto gli utenti possono aumentare la frequenza con cui il risolutore viene eseguito tra le sezioni di test. L’unico avvertimento qui è che rallenterà il processo, poiché il solutore FEA deve essere eseguito tra le modifiche della sezione. Ad esempio, se imposti l'intervallo come 1, si risolverà tra ogni singolo test di sezione.
Il processo del designer
Il Designer viene eseguito nel modo seguente:
- Esegue un'analisi/progettazione iniziale per garantire che l'impostazione del modello sia corretta e per determinare i risultati attuali
- Inizia a testare la prima sezione:
- Classifica tutte le sezioni nella libreria specificata in ordine di area della sezione trasversale
- Modifica una sezione nel modello ed esegue nuovamente l'analisi (dipende da intervallo di analisi ambientazione)
- Con i nuovi risultati delle analisi (curvatura, deviazione ecc..) testiamo la sezione successiva nella libreria
- Memorizzare i risultati ed eseguire l'analisi successiva
- Per velocità e prestazioni, eventuali test non necessari verranno saltati. Questi sono se (un carico) l'ultimo 5 i test hanno prodotto risultati peggiori o (b) abbiamo già trovato il miglior rapporto di utilità possibile (c) stiamo fallendo in gran numero, salteremo 5 sezioni
- Inizia dalla sezione successiva, con le sezioni aggiornate delle iterazioni precedenti portato a termine
Ecco perché l'ordine delle sezioni è importante, poiché aggiorneremo il modello man mano che procediamo se ti ritroverai con elementi più leggeri dalle ottimizzazioni della sezione precedente, influenzeranno i risultati nelle successive ottimizzazioni delle sezioni. Se aiuta, gli utenti possono rivedere il registro di esattamente ciò che ha fatto il Designer Visualizza registro quando arrivano i risultati.
Consideriamo il caso dove le colonne vengono ottimizzate per prime. Potrebbero passare, ma poi quando inizi a progettare le travi sopra (forse rendendoli più spessi/più pesanti) poi quando torni indietro ricontrolla le colonne, potrebbero fallire. Tuttavia, ottimizzandoli nell'ordine opposto, non dovrebbe avere questo problema.
risultati
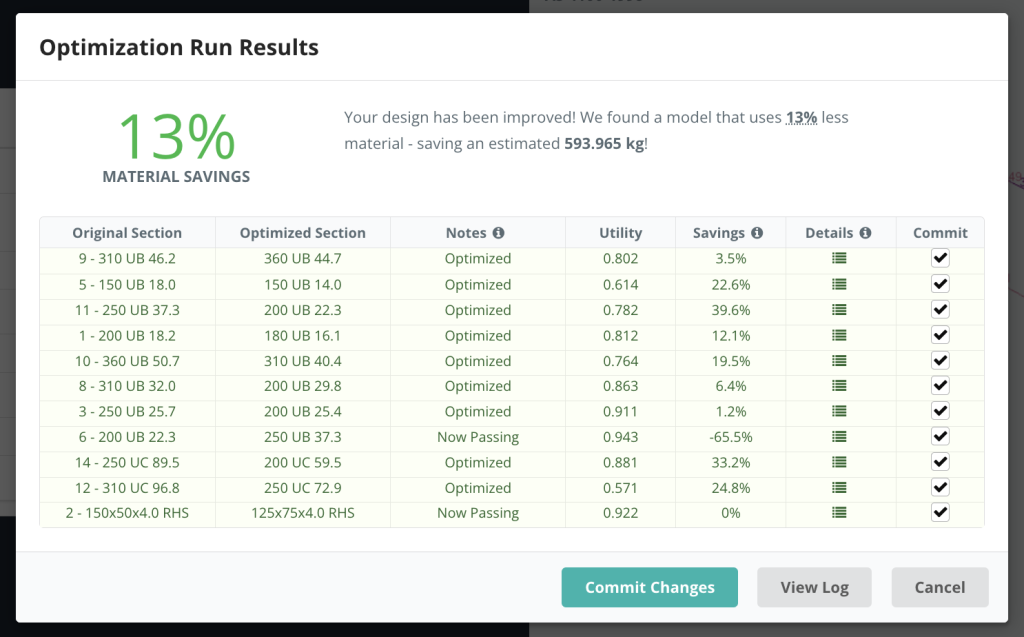
I risultati di ciascuna sezione verranno visualizzati in un popup, riassumendo la sezione selezionata, è il rapporto di utilità e le opzioni sull'impegno. Nell'esempio sottostante, tutti 3 le sezioni del modello sono state ottimizzate:
Possiamo dare un'occhiata più da vicino a tutte le corse e ai loro risultati facendo clic sull'icona sotto Iterazioni. Verrà visualizzato il seguente elenco dettagliato delle esecuzioni. Ad esempio, selezionando la sezione 2 (RHS) mostrerà quanto segue:
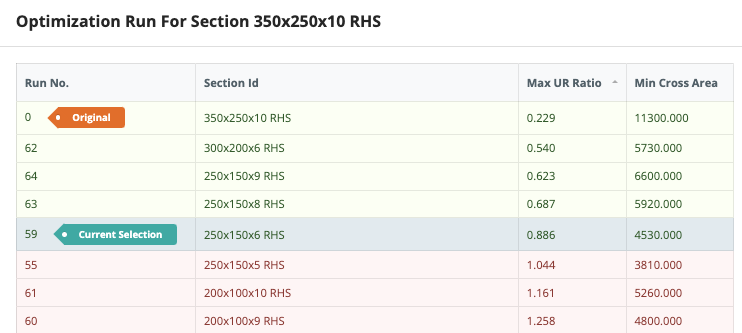
Da qui possiamo ordinare per Max UR, area trasversale e OFS (un indice ponderato) che mostrerà il miglior risultato in base ai criteri predeterminati (nelle impostazioni). Ciò consente agli utenti di rivedere le esecuzioni di ottimizzazione per assicurarsi che sia stata selezionata la sezione giusta. Nell'esempio sopra, impostiamo un rapporto di utilità massimo di 0.95 e il desiderio di ridurre al minimo l'area della sezione trasversale. Ha ridotto significativamente l'area e selezionato una sezione che soddisfa ancora questi criteri di progettazione.
Conferma dei tuoi risultati
Una volta che sei soddisfatto dei risultati, puoi colpire e Y si riferisce all'asse y e fare clic Applica modifiche accettare quelle sezioni. Il software commetterà queste forme sia nel modulo Design, e il tuo modello strutturale. Il software eseguirà inoltre nuovamente la verifica del progetto per fornire i risultati più aggiornati. Quindi nel nostro esempio sopra, dopo aver effettuato il commit possiamo vedere che le sezioni funzionano tutte (tranne l'unica sezione che era sovraccarica):

Modifica della sezione dalla modalità di progettazione, significherà che i risultati dell'analisi non sono allineati con il modello attuale. Per questa ragione, ti consigliamo vivamente di tornare indietro e risolvere il modello ed eseguire nuovamente il controllo di progettazione per garantire che i risultati dell'analisi e della progettazione siano sincronizzati.
Risoluzione dei problemi
Se non riesci a eseguire Designer, dovresti controllare quanto segue:
- Le tue sezioni sono caricate dal database delle sezioni SkyCiv? Le sezioni devono essere caricate dal database del Generatore di sezioni, in questo modo il Progettista sa quale catalogo di sezioni testare
- Puoi eseguire un progetto membro “Dai un'occhiata”? Ciò confermerà che le sezioni sono tutte progettabili e che il modello è impostato correttamente. Poiché il Designer esegue l'iterazione di questo, dovrà essere eseguito per il modello base per poter funzionare
- Hai qualche elemento speciale? (si assottiglia, membri rigidi)? L'interfaccia utente dovrebbe impedirlo, ma in certi casi questo può ancora sfuggire. Rimuovi quegli elementi speciali dalla modalità delle impostazioni e prova a eseguire nuovamente il Designer
- Controlla che i tuoi materiali corrispondano al codice di progettazione in fase di test. Ancora una volta, questo dovrebbe essere bloccato dall'interfaccia utente ma in alcuni casi ciò può verificarsi. Torna al tuo modello e controlla che le sezioni siano allineate al codice di progettazione che stai tentando di eseguire. Ad esempio, NDS deve avere materiali NDS adeguati oppure AISC deve avere un materiale in acciaio assegnato alla sezione.
- Il tuo modello è un sistema di unità opposto al sistema di unità standard di progettazione? Si consiglia di eseguire i codici di progettazione statunitensi in Imperial e AS,NEL,BS,CSA ecc.. standard tutti in sistema metrico