
Importare / Comandi di esportazione
La Importare / Esportare Il gruppo ti consente di spostare i dati tra SkyCiv CAD e formati esterni come le immagini, SVG, JSON, PDF, DXF, DWG, Generatore di sezioni, e S3D.
Utilizza i menu a discesa delle categorie per accedere agli strumenti correlati per ciascun formato.
Biblioteca di sezione Section
Importa sezione dalla libreria
Sfoglia e posiziona i profili di sezione trasversale standard dal database della sezione SkyCiv
IL
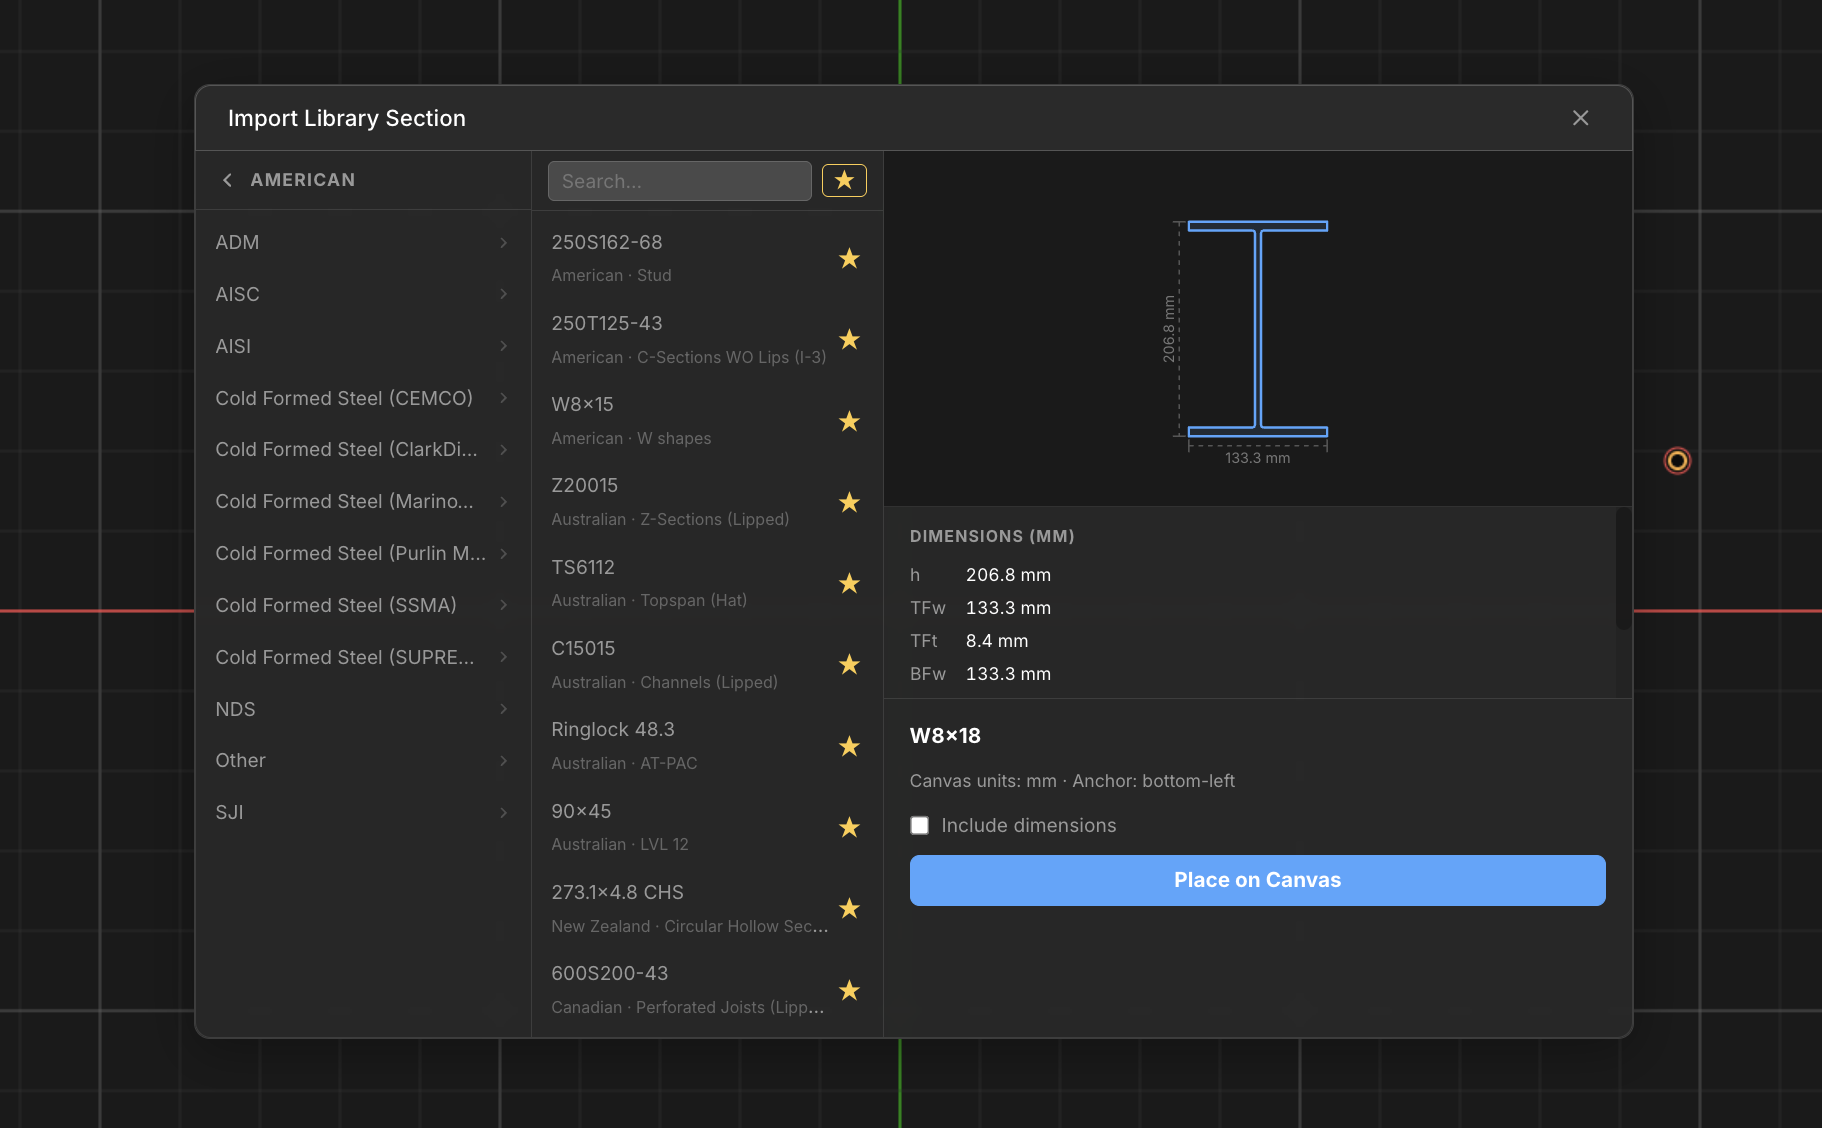
La Importa sezione dalla libreria la finestra di dialogo ti consente di sfogliare il database della sezione SkyCiv per paese, standard, e il database dei profili e importa automaticamente questa forma (come un blocco) nel tuo disegno nella scala e nelle dimensioni corrette. Seleziona un profilo qualsiasi – Travi a I, cavi, angoli, sezioni cave, e altro ancora – per visualizzarne in anteprima la geometria e le dimensioni, quindi posizionalo sulla tela come un blocco riutilizzabile.
Passo dopo passo
- 1Clicca il Importa sezione dalla libreria pulsante nella barra degli strumenti, oppure premere IL.
- 2Nel pannello di sinistra, approfondire Paese → Standard → Database per elencare i profili disponibili. In alternativa, digita nella casella di ricerca per trovare i profili in tutti i database.
- 3Fare clic sul nome di un profilo per visualizzare in anteprima la geometria e le dimensioni della sezione trasversale nel pannello di destra.
- 4(Opzionale) Clicca il ★ stella accanto a qualsiasi profilo per salvarlo nei Preferiti. Attiva il pulsante a forma di stella nella parte superiore dell'elenco per filtrare solo i profili salvati – disattivalo per tornare alla libreria completa.
- 5(Opzionale) Dai un'occhiata Includi dimensioni per aggiungere automaticamente annotazioni sulle quote di larghezza e profondità quando viene posizionata la sezione.
- 6Fare doppio clic il profilo o fare clic Posiziona su tela per accedere alla modalità di posizionamento. La finestra di dialogo si chiude e la sezione segue il cursore.
- 7Fare clic sull'area di disegno per posizionare la sezione. stampa Esc per uscire dalla modalità di posizionamento senza effettuare il posizionamento.
vogliamo rispecchiare il nostro magazzino attraverso il piano YZ: La sezione posizionata è un blocco riutilizzabile. Puoi posizionare più istanze dal pannello Blocchi senza riaprire la libreria. Premendo Esc o facendo clic su qualsiasi altro comando della barra degli strumenti (come Crea linea) chiuderà la finestra di dialogo della libreria.
immagini
La categoria Immagini fornisce l'importazione di immagini e SVG, e strumenti di esportazione raster per il contesto del disegno e i risultati finali.
Carica immagine (JPG/PNG)
Importa un'immagine raster come livello di riferimento sulla tela
Uso Carica immagine per importare un file JPG o PNG come riferimento di sfondo. Una volta posizionato, l'immagine può essere spostata, ridimensionato trascinandone gli angoli, o cancellato. Più immagini possono coesistere sulla stessa tela.
[__INSERISCI_IMMAGINE__]
Passo dopo passo
- 1Clic Carica immagine per aprire il selettore file.
- 2Seleziona un file immagine JPG o PNG.
- 3L'immagine appare su tela – utilizzare Sposta linee per riposizionarlo e trascinare un punto d'angolo per ridimensionarlo.
vogliamo rispecchiare il nostro magazzino attraverso il piano YZ: Le immagini di grandi dimensioni potrebbero rallentare il rendering. Utilizza PNG per sovrapposizioni trasparenti e JPG per sfondi fotografici solidi. Abilita il Griglia di snap per allineare l'immagine con precisione alla geometria del disegno.
Importa SVG
Importa un file SVG come geometria vettoriale modificabile sull'area di disegno
Importa SVG analizza un file SVG e converte gli elementi vettoriali supportati – percorsi, forme, Linee, e poligoni – in modificabile CAD geometria. Gli elementi importati vengono posizionati sull'area di disegno e possono essere selezionati, modificato, e utilizzato come qualsiasi altra geometria disegnata.
Passo dopo passo
- 1Clic Importa SVG per aprire il selettore file.
- 2Seleziona un file SVG.
- 3L'SVG viene analizzato e gli elementi vettoriali supportati vengono importati come geometria modificabile.
vogliamo rispecchiare il nostro magazzino attraverso il piano YZ: Dopo l'importazione, uso Zoom sulle estensioni per confermare che tutta la geometria sia arrivata. Riempimenti SVG complessi, gradienti, e il contenuto raster incorporato non sono supportati e verranno ignorati.
Salva tela come immagine
Esporta la vista tela corrente come file immagine PNG o JPG
Salva tela come immagine scatta un'istantanea di tutto ciò che è attualmente visibile sulla tela e la esporta come immagine raster. Scegli PNG per alta qualità con trasparenza, o JPG per file di dimensioni inferiori.
Passo dopo passo
- 1Clic Salva tela come immagine.
- 2Seleziona il formato PNG o JPG nella finestra di dialogo.
- 3Fare clic su Salva – l'immagine viene scaricata sul tuo computer.
vogliamo rispecchiare il nostro magazzino attraverso il piano YZ: PNG preserva la trasparenza e produce output di qualità superiore. JPG crea file notevolmente più piccoli. L'esportazione include tutta la geometria, dimensioni, immagini, e annotazioni attualmente visibili.
JSON
Carica Canvas da JSON
Ripristina un disegno salvato in precedenza da un file JSON
Carica Canvas da JSON ripristina un disegno completo da un file JSON SkyCiv CAD, compresa tutta la geometria, dimensioni, annotazioni, immagini, e le impostazioni esattamente come sono state salvate.
Passo dopo passo
- 1Clic Carica Canvas da JSON.
- 2Seleziona un file di disegno JSON salvato in precedenza.
- 3Il contenuto del disegno e tutte le impostazioni vengono completamente ripristinati.
vogliamo rispecchiare il nostro magazzino attraverso il piano YZ: Il caricamento di un file JSON sostituisce l'area di disegno corrente. Salva prima il tuo lavoro corrente utilizzando Salva tela in JSON prima di caricare un file diverso.
Salva tela in JSON
Esporta lo stato completo del disegno per il backup o la condivisione
Salva tela in JSON esporta il disegno completo come un singolo file JSON. Questo è il formato CAD nativo di SkyCiv e cattura tutta la geometria, dimensioni, annotazioni, immagini, strati, e impostazioni.
Passo dopo passo
- 1Clic Salva tela in JSON.
- 2Viene generato e scaricato un file JSON contenente tutti i dati del disegno.
vogliamo rispecchiare il nostro magazzino attraverso il piano YZ: Utilizza i salvataggi JSON come formato di backup principale. Salva le versioni nei momenti chiave (ad esempio, prima delle modifiche importanti) in modo da poter ripristinare uno stato funzionante noto, se necessario.
Carica file PDF
Importa una pagina PDF come immagine di riferimento di sfondo
Carica file PDF esegue il rendering di una pagina PDF come immagine di riferimento raster. Per i PDF multipagina puoi selezionare quale pagina importare. Regola la qualità del caricamento nel pannello Impostazioni di importazione prima dell'importazione.
Passo dopo passo
- 1Clic Carica file PDF.
- 2Seleziona un file PDF.
- 3Per PDF multipagina, scegli la pagina di destinazione nella finestra di dialogo.
- 4La pagina viene inserita come immagine di riferimento sulla tela.
vogliamo rispecchiare il nostro magazzino attraverso il piano YZ: Controlla il pannello Impostazioni di importazione per regolare la qualità del caricamento prima dell'importazione. Una qualità più elevata esegue il rendering in modo più nitido ma produce file più grandi. Utilizzare il Griglia di snap per calibrare la scala del disegno su una dimensione nota sul PDF.
Esporta in PDF
Crea un PDF a una o più pagine dalle regioni del riquadro del disegno selezionate
Esporta in PDF genera un PDF di qualità vettoriale con una o più pagine. Per ogni pagina selezioni un'area di cornice rettangolare sull'area di disegno che diventa l'area del contenuto di quella pagina.
Passo dopo passo
- 1Clic Esporta in PDF.
- 2Clic Aggiungi pagina nella finestra di dialogo per aggiungere pagine all'esportazione.
- 3Per ogni pagina, clicca il Telaio pulsante e trascina una regione sull'area di disegno.
- 4Esamina le anteprime delle pagine, quindi fare clic Esportare per scaricare il PDF.
vogliamo rispecchiare il nostro magazzino attraverso il piano YZ: Esporta layout di più fogli in un unico PDF aggiungendo una pagina per cornice di layout. Ogni pagina può coprire un'area diversa dello stesso disegno.
DXF / DWG
Importa file DXF
Carica la geometria e i layer DXF come elementi CAD modificabili
Importa file DXF analizza un file DXF e converte le entità supportate – Linee, polilinee, archi, cerchi, spline, e strati – nella geometria CAD SkyCiv modificabile.
Passo dopo passo
- 1Clic Importa file DXF.
- 2Seleziona un file DXF.
- 3Il file viene analizzato e le entità supportate vengono importate come geometria modificabile.
vogliamo rispecchiare il nostro magazzino attraverso il piano YZ: Dopo l'importazione, uso Zoom sulle estensioni per verificare che tutta la geometria sia presente. Esegui il Seleziona Duplicati per eliminare qualsiasi geometria sovrapposta dall'importazione.
Importa file DWG
Converti un file DWG in DXF e importalo in CAD
Importa file DWG carica il DWG sul server, lo converte in DXF utilizzando ODA File Converter, quindi importa il risultato esattamente come Importa DXF volevo.
Passo dopo passo
- 1Clic Importa file DWG.
- 2Seleziona un file DWG.
- 3Il DWG viene convertito in DXF sul server, quindi importato automaticamente.
vogliamo rispecchiare il nostro magazzino attraverso il piano YZ: L'importazione DWG richiede un passaggio di conversione lato server – i file di grandi dimensioni potrebbero richiedere qualche minuto. Se la geometria manca dopo l'importazione, il DWG potrebbe contenere tipi di entità non supportati non inclusi nella conversione DXF.
Esporta file DXF
Esporta la geometria del disegno in DXF per utilizzarla in altri strumenti CAD
Esporta file DXF converte la geometria del disegno in formato DXF e la scarica. Punti, Linee, polilinee, archi, e le assegnazioni dei livelli vengono esportate. Dimensioni e annotazioni non sono incluse nell'output DXF.
Passo dopo passo
- 1Clic Esporta file DXF.
- 2La geometria e i livelli vengono convertiti nel formato DXF.
- 3Il file DXF viene scaricato automaticamente.
vogliamo rispecchiare il nostro magazzino attraverso il piano YZ: Il file DXF esportato è compatibile con AutoCAD, FreeCAD, e altri software CAD. Le quote e le annotazioni della direttrice non vengono esportate – uso Esporta in PDF se hai bisogno di output annotato.
Esportazioni speciali
Esporta nel generatore di sezioni
Invia la geometria della sezione basata su tratteggio a SkyCiv Sezione Builder
Esporta nel generatore di sezioni trasferisce i confini del poligono riempito con tratteggio direttamente in SkyCiv Sezione Builder per l'analisi delle proprietà della sezione trasversale. Il modello di tratteggio definisce il contorno della sezione.
Passo dopo passo
- 1Disegna il poligono della sezione e riempilo con a Schiudere.
- 2Clicca il SB pulsante di esportazione.
- 3La regione di tratteggio viene trasferita come geometria della sezione nel Generatore di sezioni.
vogliamo rispecchiare il nostro magazzino attraverso il piano YZ: Il confine della sezione deve essere definito come un poligono chiuso con un riempimento tratteggiato. Il confine del tratteggio – non le linee di contorno – è ciò che viene esportato nel Generatore di sezioni.
Esportazione S3D strutturale
Esporta i dati del modello strutturale nel formato SkyCiv Structural 3D
Esportazione S3D strutturale analizza il disegno per gli elementi strutturali e genera un JSON compatibile con SkyCiv S3D da utilizzare nel software di analisi SkyCiv Structural 3D.
Passo dopo passo
- 1Clicca il S3D pulsante di esportazione.
- 2Esaminare il riepilogo degli elementi strutturali rilevati nella finestra di dialogo.
- 3Conferma per generare ed esportare il JSON compatibile con S3D.
vogliamo rispecchiare il nostro magazzino attraverso il piano YZ: Abilita il Strutturale attiva/disattiva nella barra degli strumenti prima di disegnare per garantire che le proprietà strutturali siano taggate nella geometria, che migliora la qualità dell'esportazione S3D.
