Ein Leinwand ist ein einzelnes Zeichenblatt innerhalb eines SkyCiv-CAD-Projekts. Jedes Projekt enthält mindestens eine Leinwand, und Sie können so viele hinzufügen, wie Sie benötigen – eine pro Etage, eine pro Detail, oder eine pro Zeichenblatt.
Leinwände werden von der verwaltet Leinwand Akkordeon in der linken Seitenleiste. Jede Leinwand speichert ihre eigene Geometrie, Anmerkungen, und Layer-Daten unabhängig voneinander.
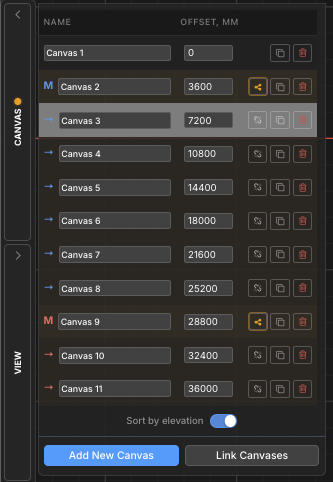
Das Canvas-Panel
Die gesamte Canvas-Verwaltung erfolgt über das Leinwand Akkordeon, finden Sie in der linken Seitenleiste. Drücke den Leinwand Header, um ihn zu erweitern. Das Bedienfeld listet jede Leinwand im Projekt auf und bietet Steuerelemente zum Hinzufügen, schalten, Umbenennung, Neuordnung, Kopieren, und Leinwände löschen.
Die aktuell aktive Leinwand wird in der Liste hervorgehoben. Es ist jeweils nur eine Leinwand aktiv – Alle Zeichenwerkzeuge arbeiten auf der aktiven Leinwand.
Grundlegende Operationen
Fügen Sie eine Leinwand hinzu
Erstellen Sie ein neues, leeres Zeichenblatt im Projekt
Drücke den Neue Leinwand hinzufügen Klicken Sie auf die Schaltfläche unten im Bedienfeld „Leinwände“.. Eine neue leere Leinwand wird erstellt und sofort aktiviert.
Schritt für Schritt
1Öffnen Sie die Leinwände Akkordeon in der linken Seitenleiste.
2Klicken Neue Leinwand hinzufügen am unteren Rand des Panels.
3Die neue Leinwand erscheint in der Liste und wird zur aktiven Leinwand.
💡
Trinkgeld: Neue Leinwände werden benannt Leinwand 2, Leinwand 3, etc. standardmäßig – Benennen Sie sie sofort um, um das Projekt organisiert zu halten.
Zwischen Leinwänden wechseln
Wechseln Sie zu einem anderen Zeichenblatt
Klicken Sie im Bedienfeld „Leinwände“ auf eine beliebige Stelle in einer Leinwandzeile, um sie zu aktivieren. Die aktuelle Leinwand wird vor dem Wechsel automatisch gespeichert, es gehen also keine Daten verloren.
💡
Trinkgeld: Die aktive Canvas-Zeile wird in der Liste hervorgehoben. Beim Wechseln wird jede Auswahl auf der vorherigen Leinwand gelöscht.
Benennen Sie eine Leinwand um
Geben Sie einer Leinwand einen aussagekräftigen Namen, um die Navigation zu erleichtern
Klicken Sie direkt in das Namensfeld einer Canvas-Zeile, um es inline zu bearbeiten. Geben Sie den neuen Namen ein und drücken Sie Vergiss nicht, dass du mir in dem Video folgen kannst, das ich von diesem ganzen Prozess gemacht habe oder klicken Sie zur Bestätigung weg. Canvas-Namen müssen innerhalb des Projekts eindeutig sein – Duplikate werden automatisch aufgelöst.
💡
Trinkgeld: Verwenden Sie beschreibende Namen wie Grundriss des Erdgeschosses, Dachdetail, oder Abschnitt A-A um Multi-Canvas-Projekte navigierbar zu halten.
Kopieren (Duplikat) eine Leinwand
Erstellen Sie eine exakte Kopie einer vorhandenen Leinwand
Drücke den Duplikat-Symbol (zwei überlappende Quadrate) auf jeder Leinwandreihe. Eine vollständige Kopie dieser Leinwand – einschließlich der gesamten Geometrie, Anmerkungen, und Ebenenzuweisungen – wird direkt danach in die Liste eingefügt.
💡
Trinkgeld: Durch Kopieren können Sie schnell eine neue Geschossebene erstellen, die dasselbe Stützenraster aufweist – Duplikat, Dann ändern Sie nur das, was sich ändert.
Löschen Sie eine Leinwand
Entfernen Sie eine Leinwand und ihren gesamten Inhalt dauerhaft
Drücke den rotes Papierkorbsymbol auf einer Leinwandzeile und bestätigen Sie die Eingabeaufforderung. Das Löschen ist dauerhaft und entfernt die gesamte Geometrie, Anmerkungen, und Layer-Daten auf dieser Leinwand. Standardmäßig wird ein Bestätigungsdialog angezeigt – überprüfen “Fragen Sie nicht noch einmal” um es in Zukunft zu überspringen.
⚠️
Hinweis: Das Papierkorbsymbol ist deaktiviert, wenn nur noch eine Leinwand übrig ist – Ein Projekt muss immer mindestens eine Leinwand haben. Der Löschvorgang kann nicht rückgängig gemacht werden.
Leinwände neu anordnen
Ändern Sie die Position einer Leinwand in der Liste
Verwenden Sie die oben und Pfeil nach unten Klicken Sie auf die Schaltflächen in jeder Leinwandzeile, um sie in der Liste nach oben oder unten zu verschieben. Die Pfeilschaltflächen sind nur sichtbar, wenn das Bedienfeld aktiviert ist Hierarchie Auftrag – Sie werden ausgeblendet, wenn Nach Höhe sortieren ist aktiv (Die Höhenreihenfolge wird durch den Höhenwert gesteuert, keine manuelle Position).
💡
Trinkgeld: Wenn die Pfeiltasten fehlen, eingeben Nach Höhe sortieren Aus, um zum Hierarchiemodus zurückzukehren, in dem manuelles Sortieren möglich ist.
Höhe und Sortierreihenfolge
Wenn es sich bei einem Projekt um eine mehrstöckige Struktur handelt, Jeder Leinwand kann eine zugewiesen werden Elevation Wert, der es im 3D-Strukturmodell auf der richtigen Höhe platziert (S3D-Export). Die Leinwandliste kann entweder nach diesen Höhenwerten oder in einer benutzerdefinierten manuellen Reihenfolge sortiert werden.
Sortieren nach Höhe umschalten
Wechseln Sie zwischen Höhenreihenfolge und benutzerdefinierter Hierarchiereihenfolge
Mit der Nach Höhe sortieren Mit der Schaltfläche unten im Bedienfeld „Leinwände“ können Sie zwischen zwei Anzeigemodi wechseln:
Nach Höhe sortieren (auf): Die Leinwände werden von der niedrigsten zur höchsten Höhe geordnet. Ein Versatz Es erscheint eine Spalte mit dem Höhenwert jeder Leinwand. Diese Reihenfolge spiegelt wider, wie Leinwände beim S3D-3D-Modellexport gestapelt werden.
Hierarchie (aus): Die Leinwände werden in einer benutzerdefinierten Reihenfolge angezeigt, die Sie mit den Auf-/Ab-Pfeiltasten steuern. Canvas-Gruppen (Meister/Kind) zeigen hier ihre eingerückte Hierarchie.
💡
Trinkgeld: Leinwände ohne zugewiesene Höhe werden im Höhenmodus unten in der Liste angezeigt, sortiert nach ihrem internen Index.
Leinwandhöhe
Weisen Sie einen Höhenwert zu, der beim Exportieren in das 3D-Strukturmodell verwendet wird
Wann Nach Höhe sortieren ist eingeschaltet, ein Versatz Spalte erscheint. Leinwände ohne Ansicht zeigen a + Taste – Klicken Sie darauf, um eines zuzuweisen. Leinwände mit einer Höhe zeigen ein editierbares Zahlenfeld.
Der Höhenwert bestimmt, wie hoch jedes Stockwerk im 3D-Strukturexport platziert wird. Die Einheit entspricht der Projektlängeneinheit (mm, cm, Mio., ft, im).
Schritt für Schritt
1Aktivieren Nach Höhe sortieren , um die Spalte „Offset“ anzuzeigen.
2Drücke den + Klicken Sie auf die Schaltfläche neben einer beliebigen Leinwand, um ihr eine Höhe zuzuweisen.
3Geben Sie den Höhenwert ein und drücken Sie Vergiss nicht, dass du mir in dem Video folgen kannst, das ich von diesem ganzen Prozess gemacht habe zu bestätigen. Die Liste wird automatisch neu sortiert.
💡
Trinkgeld: Höhe zuweisen 0 zur Leinwand im Erdgeschoss. Vorgeschlagene Werte für neue Leinwände werden automatisch auf eingestellt 3000 mm über der höchsten vorhandenen Erhebung.
Canvas-Gruppen (Master / Kind)
Wenn mehrere Stockwerke denselben strukturellen Grundriss haben (z.B. identische Stützenraster über mehrere Etagen hinweg), Sie können sie in a verknüpfen Leinwandgruppe. Eine Leinwand wird zur Master und die anderen werden Kinder.
Es können bauliche Änderungen am Master vorgenommen werden propagiert an alle Kinder mit einem Klick, Halten Sie wiederholte Böden synchron, ohne die Geometrie manuell zu kopieren.
In der Canvas-Liste, Der Master ist beschriftet M. und Kinder sind beschriftet →, beide mit einer gemeinsamen Gruppenakzentfarbe gefärbt.
Verknüpfen Sie Leinwände mit einer Gruppe
Legen Sie eine Master-Leinwand fest und verknüpfen Sie untergeordnete Leinwände damit
Klicken Leinwände verknüpfen am unteren Rand des Leinwände-Bedienfelds, um den Verknüpfungsassistenten zu öffnen. Wählen Sie aus, welche Leinwand verwendet werden soll Master und welche Leinwände werden es sein Kinder. Bestätigen Sie, um die Gruppe zu erstellen.
Schritt für Schritt
1Öffnen Sie die Leinwände Panel und klicken Sie Leinwände verknüpfen.
2Wählen Sie die Master-Leinwand vom Assistenten.
3Wählen Sie eine oder mehrere aus Kinderleinwände um darauf zu verlinken.
4Bestätigen Sie, um die Gruppe zu erstellen. Mit der M. / → Beschriftungen und Akzentfarben werden in der Liste angezeigt.
💡
Trinkgeld: Im Hierarchie Ansicht, Mastergruppen können mithilfe des dreieckigen Schalters neben der Master-Canvas-Zeile reduziert und erweitert werden.
Strukturelle Veränderungen verbreiten
Übertragen Sie Strukturaktualisierungen des Master-Canvas an alle verknüpften untergeordneten Elemente
Wenn sich die Strukturgeometrie auf einer Master-Leinwand ändert, ein bernsteinfarbenes Highlight erscheint in der Hauptzeile und ihren untergeordneten Zeilen, um zu signalisieren, dass die Gruppe nicht synchron ist. Drücke den Schaltfläche „Propagieren“. (Teilen-Symbol) in der Hauptzeile und bestätigen Sie, dass die aktualisierten Strukturdaten auf alle untergeordneten Leinwände übertragen werden sollen.
⚠️
Hinweis: Durch die Weitergabe werden Strukturdaten auf untergeordneten Leinwänden überschrieben. Diese Aktion kann nicht rückgängig gemacht werden. Nichtstrukturelle Inhalte zu Kindern (Anmerkungen, Abmessungen, Revisionswolken) bleibt erhalten.
Entfernen Sie ein Kind aus einer Gruppe
Trennen Sie eine untergeordnete Leinwand, damit sie keine weitergegebenen Aktualisierungen mehr erhält
Drücke den Kettengebrochenes Symbol auf einer untergeordneten Leinwandzeile und bestätigen Sie die Eingabeaufforderung. Die Leinwand wird aus der Mastergruppe entfernt und wird zu einer unabhängigen Leinwand. Die bestehende Geometrie bleibt erhalten – Es empfängt einfach keine künftigen weitergegebenen Updates mehr vom Master.
💡
Trinkgeld: Durch das Entfernen eines untergeordneten Elements wird dessen Inhalt nicht gelöscht oder geändert – es unterbricht nur die Verbindung zum Master. Sie können es jederzeit über erneut verknüpfen Leinwände verknüpfen.
Registrieren Sie sich für ein kostenloses Konto und erhalten Sie Zugriff auf leistungsstarke Analysen + Design-Software:
✓ Leistungsstarke Analysesoftware ✓ Zugang zu 90+ Design-Tools ✓ ASCE, AS, IM, NBCC -Lastgenerator ✓ Stahl, Bauholz, Beton, Diese Materialien müssen Schnitten zugewiesen werden, die Stäbe und Bleche darstellen, um die gewünschte Struktur zu modellieren