
Importieren / Export Commands
Mit der Importieren / Export group lets you move data between SkyCiv CAD and external formats such as images, SVG, JSON, PDF, DXF, DWG, Section Builder, and S3D.
Use category dropdowns to access related tools for each format.
Abschnittsbibliothek
Import Section from Library
Browse and place standard cross-section profiles from the SkyCiv section database
DAS
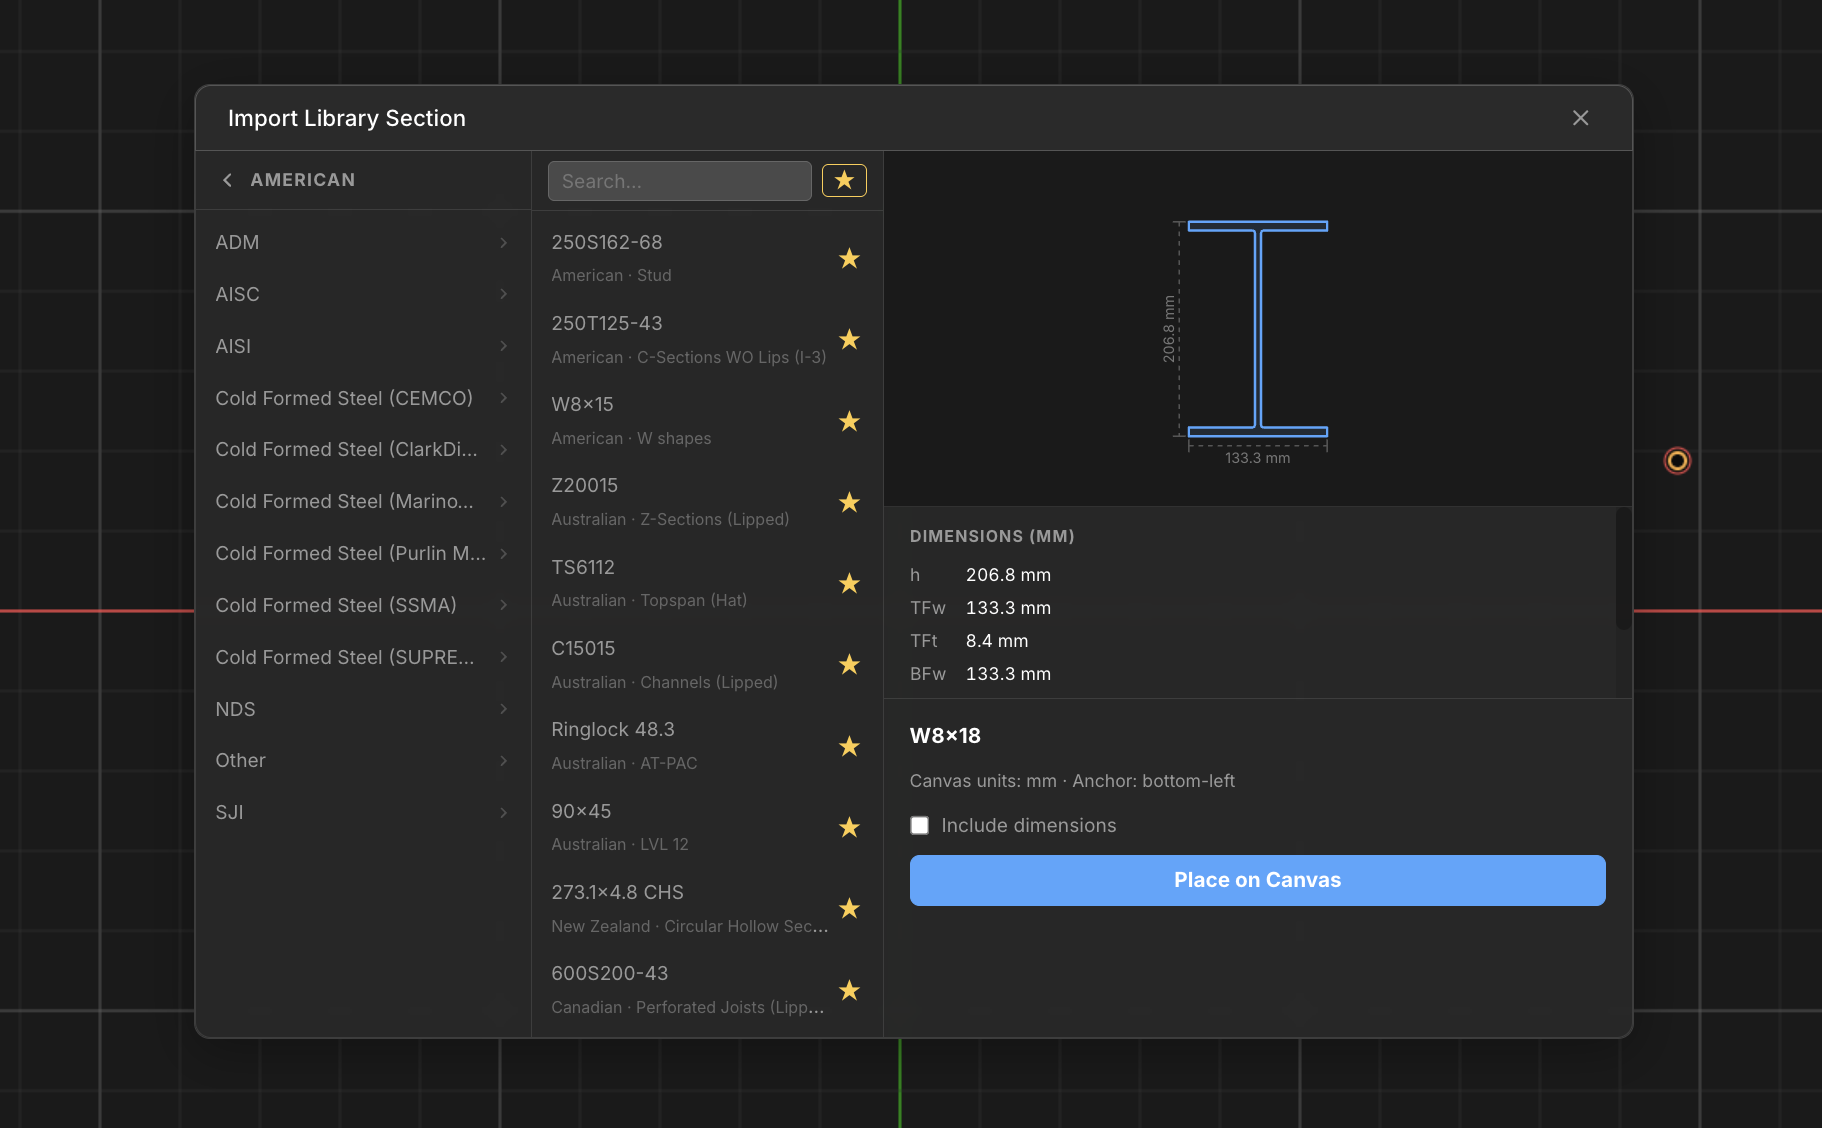
Mit der Import Section from Library dialog lets you browse the SkyCiv section database by country, Standard, and profile database and automatically import this shape (as a block) into your drawing at the correct scale and dimensions. Select any profile – I-Träger, Kanäle, Winkel, Hohlprofile, und vieles mehr – to preview its geometry and dimensions, then place it on the canvas as a reusable Block.
Schritt für Schritt
- 1Drücke den Import Section from Library button in the toolbar, oder drücken DAS.
- 2Im linken Bereich, drill down through Country → Standard → Database to list available profiles. Alternative, type in the search box to find profiles across all databases.
- 3Click a profile name to preview its cross-section geometry and dimensions in the right panel.
- 4(Optional) Drücke den ★ star next to any profile to save it to Favorites. Toggle the star button at the top of the list to filter to your saved profiles only – toggle it off to return to the full library.
- 5(Optional) Prüfen Include Dimensions to automatically add width and depth dimension annotations when the section is placed.
- 6Double-click the profile or click Place on Canvas to enter placement mode. The dialog closes and the section follows your cursor.
- 7Click on the canvas to place the section. Drücken Sie Esc to exit placement mode without placing.
Trinkgeld: The placed section is a reusable Block. You can place multiple instances from the Blocks panel without reopening the library. Pressing Esc or clicking any other toolbar command (such as Create Line) will close the library dialog.
Bilder
The Images category provides image and SVG import, and raster export tools for drawing context and deliverables.
Upload Image (JPG/PNG)
Import a raster image as a reference layer on the canvas
Benutzen Upload Image to import a JPG or PNG as a background reference. Once placed, the image can be moved, scaled by dragging its corners, or deleted. Multiple images can coexist on the same canvas.
[__INSERT_IMAGE__]
Schritt für Schritt
- 1Klicken Upload Image to open the file picker.
- 2Select a JPG or PNG image file.
- 3The image appears on canvas – use Move Lines to reposition it and drag a corner point to scale.
Trinkgeld: Large images may slow rendering. Use PNG for transparent overlays and JPG for solid photograph backgrounds. Aktivieren Sie die Snapping Grid to align the image precisely with drawing geometry.
Import SVG
Import an SVG file as editable vector geometry on the canvas
Import SVG parses an SVG file and converts supported vector elements – paths, Formen, Linien, and polygons – into editable CAD Geometrie. Imported elements are placed on the canvas and can be selected, verändert, and used like any other drawn geometry.
Schritt für Schritt
- 1Klicken Import SVG to open the file picker.
- 2Select an SVG file.
- 3The SVG is parsed and supported vector elements are imported as editable geometry.
Trinkgeld: After importing, benutzen Auf Grenzen zoomen to confirm all geometry came through. Complex SVG fills, gradients, and embedded raster content are not supported and will be skipped.
Leinwand als Bild speichern
Export the current canvas view as a PNG or JPG image file
Leinwand als Bild speichern takes a snapshot of everything currently visible on the canvas and exports it as a raster image. Choose PNG for high quality with transparency, or JPG for a smaller file size.
Schritt für Schritt
- 1Klicken Leinwand als Bild speichern.
- 2Select PNG or JPG format in the dialog.
- 3Click Save – the image is downloaded to your computer.
Trinkgeld: PNG preserves transparency and produces higher quality output. JPG creates significantly smaller files. The export includes all geometry, Abmessungen, Bilder, and annotations currently visible.
JSON
Upload Canvas from JSON
Restore a previously saved drawing from a JSON file
Upload Canvas from JSON restores a complete drawing from a SkyCiv CAD JSON file, including all geometry, Abmessungen, annotations, Bilder, and settings exactly as they were saved.
Schritt für Schritt
- 1Klicken Upload Canvas from JSON.
- 2Select a previously saved JSON drawing file.
- 3Drawing content and all settings are fully restored.
Trinkgeld: Loading a JSON file replaces the current canvas. Save your current work first using Save Canvas to JSON before uploading a different file.
Save Canvas to JSON
Export the complete drawing state for backup or sharing
Save Canvas to JSON exports the full drawing as a single JSON file. This is the native SkyCiv CAD format and captures all geometry, Abmessungen, annotations, Bilder, Schichten, and settings.
Schritt für Schritt
- 1Klicken Save Canvas to JSON.
- 2A JSON file containing all drawing data is generated and downloaded.
Trinkgeld: Use JSON saves as your primary backup format. Save versions at key milestones (z.B., before major edits) so you can restore to a known good state if needed.
Upload PDF File
Import a PDF page as a background reference image
Upload PDF File renders a PDF page as a raster reference image. For multi-page PDFs you can select which page to import. Adjust upload quality in the Import Settings panel before importing.
Schritt für Schritt
- 1Klicken Upload PDF File.
- 2Select a PDF file.
- 3For multi-page PDFs, choose the target page in the dialog.
- 4The page is inserted as a reference image on the canvas.
Trinkgeld: Check the Import Settings panel to adjust upload quality before importing. Higher quality renders more crisply but produces larger files. Verwenden Sie die Snapping Grid to calibrate the drawing scale to a known dimension on the PDF.
In PDF exportieren
Create a single or multi-page PDF from selected drawing frame regions
In PDF exportieren generates a vector-quality PDF with one or more pages. For each page you select a rectangular frame region on the canvas which becomes that page’s content area.
Schritt für Schritt
- 1Klicken In PDF exportieren.
- 2Klicken Add Page in the dialog to add pages to the export.
- 3For each page, drücke den Rahmen button and drag a region on the canvas.
- 4Review page previews, dann klicken Export to download the PDF.
Trinkgeld: Export multiple sheet layouts in one PDF by adding one page per layout frame. Each page can cover a different area of the same drawing.
DXF / DWG
DXF-Datei importieren
Load DXF geometry and layers as editable CAD elements
DXF-Datei importieren parses a DXF file and converts supported entities – Linien, Polylinien, Bögen, Kreise, splines, and layers – into editable SkyCiv CAD geometry.
Schritt für Schritt
- 1Klicken DXF-Datei importieren.
- 2Select a DXF file.
- 3File is parsed and supported entities are imported as editable geometry.
Trinkgeld: After importing, benutzen Auf Grenzen zoomen to verify all geometry is present. Laufen Wählen Sie Duplikate aus to clean up any overlapping geometry from the import.
Import DWG File
Convert a DWG file to DXF and import it into CAD
Import DWG File uploads the DWG to the server, converts it to DXF using ODA File Converter, then imports the result exactly as DXF importieren would.
Schritt für Schritt
- 1Klicken Import DWG File.
- 2Select a DWG file.
- 3The DWG is converted to DXF on the server, then imported automatically.
Trinkgeld: DWG import requires a server-side conversion step – large files may take a moment. If geometry is missing after import, the DWG may contain unsupported entity types not included in the DXF conversion.
Export DXF File
Export drawing geometry to DXF for use in other CAD tools
Export DXF File converts the drawing geometry to DXF format and downloads it. Punkte, Linien, Polylinien, Bögen, and layer assignments are exported. Dimensions and annotations are not included in the DXF output.
Schritt für Schritt
- 1Klicken Export DXF File.
- 2Geometry and layers are converted to DXF format.
- 3The DXF file is automatically downloaded.
Trinkgeld: The exported DXF file is compatible with AutoCAD, FreeCAD, and other CAD software. Dimensions and leader annotations are not exported – benutzen In PDF exportieren if you need annotated output.
Special Exports
Export in Section Builder
Send hatch-based section geometry to SkyCiv Section Builder
Export in Section Builder transfers hatch-filled polygon boundaries directly into SkyCiv Section Builder for cross-section property analysis. The hatch pattern defines the section outline.
Schritt für Schritt
- 1Draw the section polygon and fill it with a Hatch.
- 2Drücke den SB export button.
- 3The hatch region is transferred as section geometry into Section Builder.
Trinkgeld: The section boundary must be defined as a closed polygon with a hatch fill. The hatch boundary – not the outline lines – is what gets exported to Section Builder.
Structural S3D Export
Export structural model data to SkyCiv Structural 3D format
Structural S3D Export analyzes the drawing for structural elements and generates a SkyCiv S3D-compatible JSON for use in SkyCiv Structural 3D analysis software.
Schritt für Schritt
- 1Drücke den S3D export button.
- 2Review the summary of detected structural elements in the dialog.
- 3Confirm to generate and export the S3D-compatible JSON.
Trinkgeld: Aktivieren Sie die Strukturell toggle in the toolbar before drawing to ensure structural properties are tagged to your geometry, which improves the quality of the S3D export.
