Verwaltung der Änderungen bei SkyCiv & Autodesk® Revit®
Loslegen
SkyCiv hat bereits ein nettes Revit-Plugin, mit dem Benutzer das Modell von Revit nach SkyCiv exportieren können, neben anderen Funktionen wie Analyse, Gestaltung usw.
Bevor es weitergeht, Bitte stellen Sie sicher, dass Sie das Plugin installiert haben und sich dessen bewusst sind. Wenn nicht, Ich würde vorschlagen, dass Sie zu https gehen://skyciv.com/docs/skyciv-api/plugins/revit/ und machen Sie sich damit vertraut. Das ist ein Plugin ohne Double Link. Zum Herunterladen des Plugins mit Double Link, Bitte besuchen Sie die folgenden Links gemäß Ihrer Revit-Version
Sobald Sie es installiert haben, Dann lesen Sie bitte weiter.
Wir haben auch die Möglichkeit, das Modell aus SkyCiv in eine Revit-Datei zu exportieren, die dann in die Revit-Umgebung importiert werden kann. Man könnte sich dann fragen, wozu dieser Double Link nötig ist? Lassen Sie uns über das Problem sprechen. Da Revit und SkyCiv zwei verschiedene Softwareprogramme sind, Sie verfügen offensichtlich über unterschiedliche Mechanismen zum Speichern der Daten (sowohl strukturell als auch nicht strukturell). Aufgrund dieser Unterschiede, Früher wurden nur strukturelle Daten hin und her transportiert, mit dem unglücklichen Nebeneffekt, dass bei der Übertragung die nichtstrukturellen Daten verloren gingen. Wir haben die Double-Link-Funktionalität hinzugefügt, um dieses Problem gezielt anzugehen. Double Link bedeutet im Wesentlichen die Verbindung an beiden Enden ohne Datenlecks, um die Korrektheit sicherzustellen & Robustheit des Systems bei gleichzeitiger Flexibilität beim Arbeiten in zwei verschiedenen Systemen.
Lassen Sie uns in den folgenden Abschnitten ausführlich darüber sprechen.
Push-to-S3D
Angenommen, der Benutzer hat in der Revit-Umgebung an seinem Modell gearbeitet. Als nächster Schritt, Er möchte, dass das Modell in die S3D-Umgebung von SkyCiv transportiert wird und eine Analyse/Design für dasselbe Modell durchführt. Das Plugin hat “Push zu S3D” Funktionalität. Dadurch wird das Revit-Modell in das Dateiformat von SkyCiv umgewandelt und das Revit-Modell zusammen mit einigen anderen erforderlichen Informationen an SkyCiv gesendet.

Nach erfolgreichem Anruf, Der Standardbrowser wird mit der unten gezeigten Eingabeaufforderung geöffnet
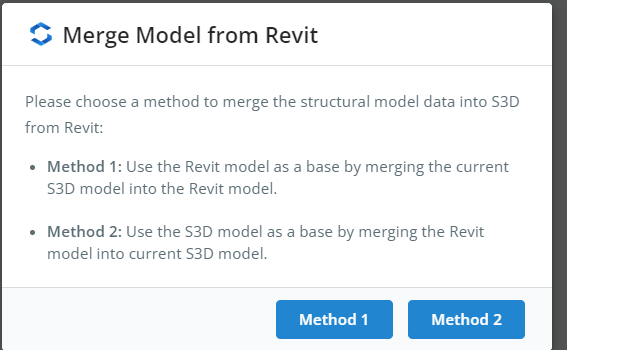
Was bedeuten diese Methoden?
In diesem Szenario, Wir haben zwei Datensätze. Revit-Daten und S3D-Daten. Wenn der Benutzer Method1 wählt, Das System übernimmt die aus Revit stammenden Daten als Basisdaten und führt die S3D-Daten darüber zusammen. Andererseits, wenn der Benutzer Method2 wählt, Das System nimmt die in S3D vorhandenen Daten als Basisdaten und fügt die Revit-Daten darüber zusammen.
Sobald der Benutzer eine der beiden Optionen auswählt, Das System führt die entsprechende Zusammenführung durch und leitet den Benutzer zum S3D-Modell weiter. Der Benutzer kann am Modell weiterarbeiten, Führen Sie andere Aktivitäten wie Analysen usw. durch. wie gewöhnlich. Es gibt keine Änderung am Verhalten des Modells in S3D.
Wenn Sie Push to S3D beherrschen, Dann lassen Sie uns über den zweiten Aspekt des Double Link sprechen
Mit Revit zusammenführen
Angenommen, der Benutzer hat in der S3D-Umgebung gearbeitet und möchte nun für einige Arbeiten zu Revit zurückkehren, indem er das neueste Modell in Revit überträgt. Er muss einem zweistufigen Prozess folgen
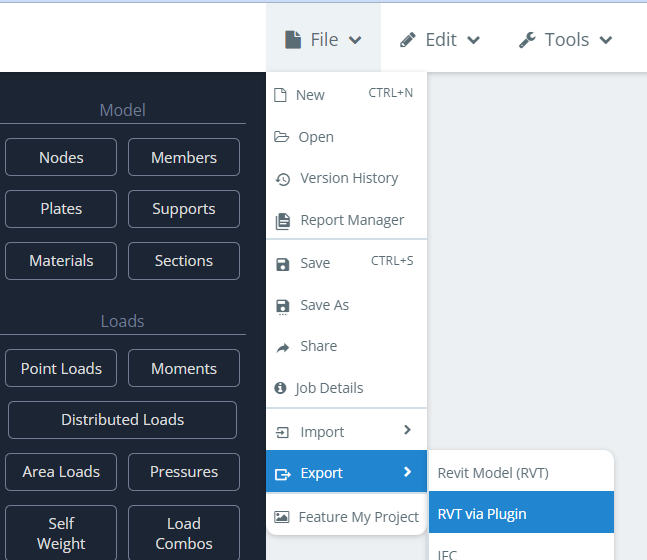
- Export nach RVT über Plugin Als ersten Schritt, Wir müssen die S3D-Daten als ZIP-Datei gebündelt haben. Dies erreichen Sie, indem Sie dem Pfad im Menü folgen Datei–>Export–> RVT über Plugin Wie nachfolgend dargestellt.
 Dadurch wird ein weiterer Dialog geöffnet, in dem dem Benutzer zwei Optionen zur Auswahl angezeigt werden.
 Wieder wie früher,
Wenn der Benutzer wählt Methode 1, Als Basisdaten übernimmt das System die Daten aus S3D. Dies bedeutet, dass nicht-strukturelle Daten aus dem Revit-Modell im resultierenden Modell nicht verfügbar sind. Nur Daten von S3D sind verfügbar.
Andererseits, wenn der Benutzer wählt Methode2, Das System übernimmt die Daten des vorherigen Revit-Modells (als Teil geschoben “Push zu S3D”) als Basisdaten und führen Sie die S3D-Daten darüber zusammen. Dies bedeutet, dass nicht-strukturelle Daten aus dem Revit-Modell erhalten bleiben und strukturelle Daten aus S3D hinzugefügt werden.
Bei beiden Auswahlmöglichkeiten, Das System übernimmt die neuesten Strukturdaten von S3D.
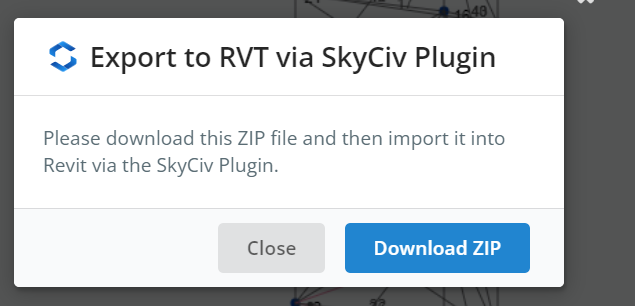
Sobald der Benutzer eine der beiden Optionen auswählt, Das System bereitet die ZIP-Datei vor und fordert den Benutzer auf, die ZIP-Datei herunterzuladen.

- Mit Revit zusammenführen Nach dem Herunterladen der Datei im vorherigen Schritt, Wir müssen diese Datei in Revit importieren. Plugin hat eine Schaltfläche namens “Mit Revit zusammenführen” für das Selbe.
 Einmal angeklickt, Der Benutzer wird aufgefordert, die Zip-Datei auszuwählen, die wir in einem früheren Schritt heruntergeladen haben. Sobald die Datei ausgewählt ist, Das System liest die Revit-Datei/SkyCiv-JSON-Datei oder beide, je nachdem, welche Auswahl der Benutzer getroffen hat, und erstellt das Modell entsprechend. Für den Fall, dass die Methode 1 ausgewählt wurde, Das Plugin erstellt das Modell von Grund auf neu und wenn der Prozess abgeschlossen ist, Der Benutzer muss die 3D-Ansicht explizit öffnen, indem er zu geht “Aussicht”–>”3DView”–>”Standard-3D-Ansicht”
 Dadurch wird ein weiterer Dialog geöffnet, in dem dem Benutzer zwei Optionen zur Auswahl angezeigt werden.
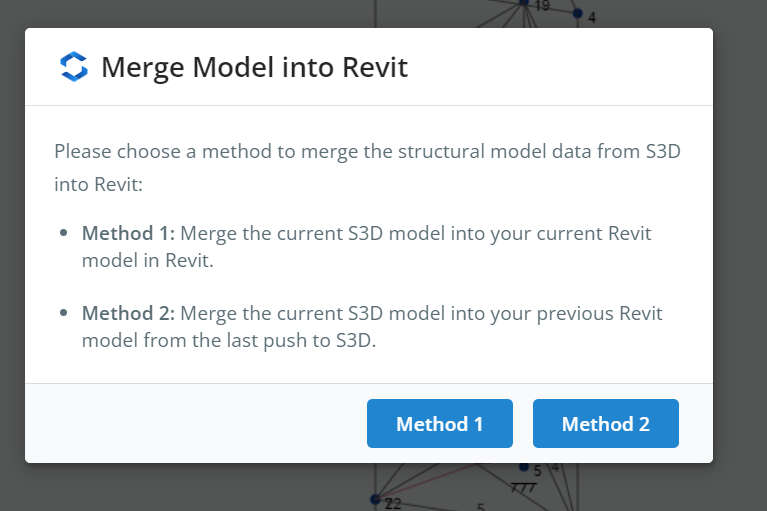 Wieder wie früher,
 Einmal angeklickt, Der Benutzer wird aufgefordert, die Zip-Datei auszuwählen, die wir in einem früheren Schritt heruntergeladen haben. Sobald die Datei ausgewählt ist, Das System liest die Revit-Datei/SkyCiv-JSON-Datei oder beide, je nachdem, welche Auswahl der Benutzer getroffen hat, und erstellt das Modell entsprechend. Für den Fall, dass die Methode 1 ausgewählt wurde, Das Plugin erstellt das Modell von Grund auf neu und wenn der Prozess abgeschlossen ist, Der Benutzer muss die 3D-Ansicht explizit öffnen, indem er zu geht “Aussicht”–>”3DView”–>”Standard-3D-Ansicht”
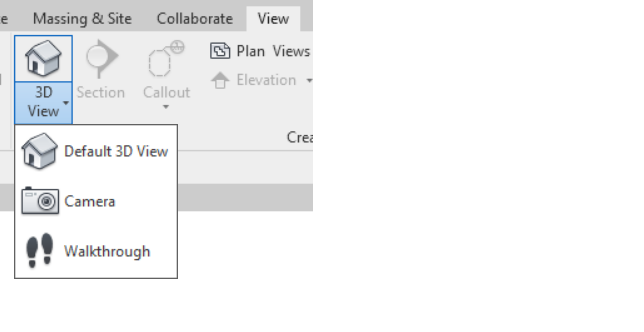
Damit ist der Fluss von Revit abgeschlossen —> SkyCiv und dann noch einmal SkyCiv–> Revit vervollständigt die Doppelter Link. Probieren Sie es aus.