Holen Sie sich die optimiertesten Abschnitte für Ihre Designs, mit einem einzigen Klick.
Der SkyCiv Member Design Designer spart Benutzern Zeit, indem jeder mögliche Abschnitt in einer bestimmten Datenbank überprüft und die Form mit der geringsten Querschnittsfläche und dem besten Nutzenverhältnis ausgewählt wird. Zur Zeit, Der Designer unterstützt alle SkyCiv-Designcodes (AISC, NDS, AISI, AS, CSA, BS, Eurocode und mehr…). Damit der Designer korrekt funktioniert, müssen einige Kriterien erfüllt sein:
- Der Abschnitt muss aus einer Bibliothek im Section Builder geladen werden
- Das Mitgliedsdesign Prüfen Die Funktion muss lauffähig sein
Der Designer ist auf allen unseren Stählen vorhanden, Software für die Konstruktion von Holz und kaltgeformten Bauteilen über SkyCiv Structural 3D, SkyCiv Beam und unsere Standalone-Design-Software. Möchten Sie eine vollständige Video-Komplettlösung?? Besuchen Sie unser Beispiel-Tutorial zu dieser Funktion.
Starten des Designers
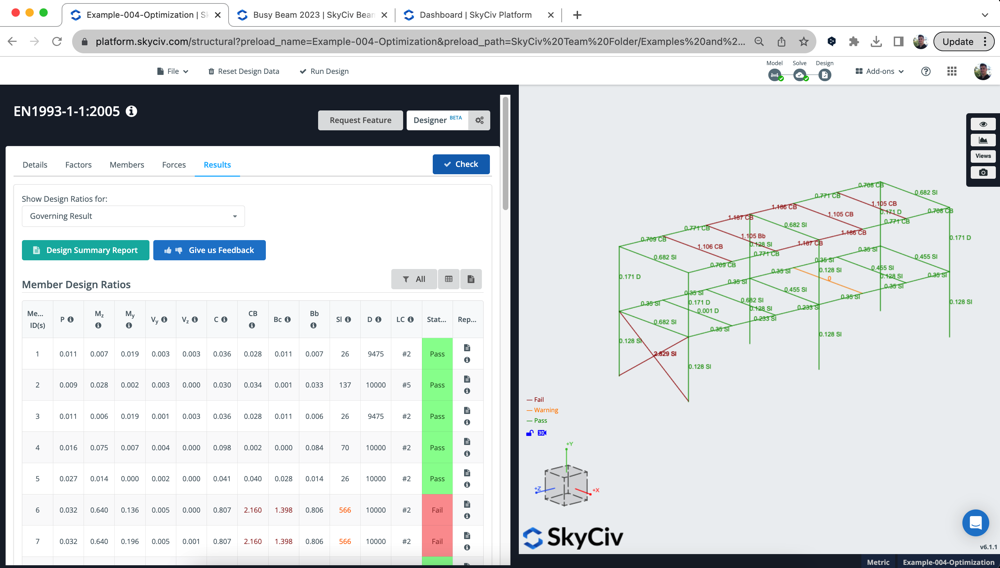
Um das Member Design zu starten Designer, Sie müssen zuerst das Member Design-Modul öffnen, für das Sie Ihre Struktur entwerfen möchten. In diesem Beispiel führen wir eine Eurocode-Stahlprüfung durch. Sobald das Modul geöffnet ist, Klicken Sie einfach auf die Designer Klicken Sie auf die Schaltfläche in der oberen rechten Ecke des Moduls. Im folgenden Modell, Wir verwenden ein Stahlmodell, Das hat eindeutig einige fehlerhafte Eurocode-Mitglieder zur Folge, Mal sehen, ob wir sie durchbringen können:
Modale Einstellungen
Benutzern stehen eine Reihe von Steuerelementen und Einstellungen zur Verfügung, einschließlich eines angestrebten Nutzenverhältnisses, Abschnittshöhen-/-breitengrenzen und welche Abschnitte Sie entwerfen möchten. Durch Anklicken des Designer Taste, Die folgenden Optionen werden angezeigt:
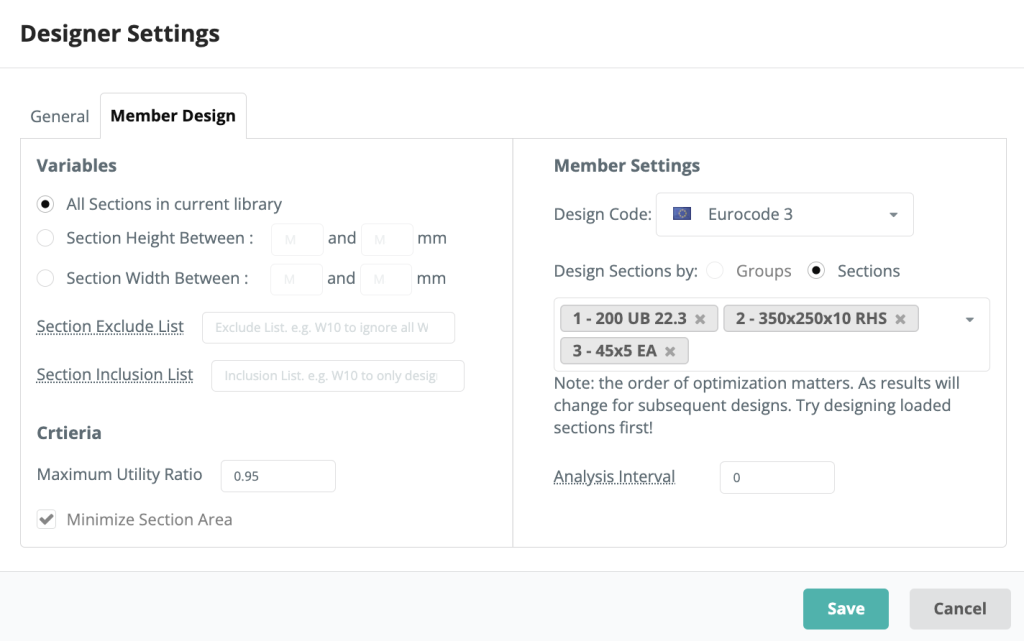
Variablen
Benutzer haben die Möglichkeit, zwischen allen Abschnitten der Bibliothek zu wählen, eine Reihe von Abschnittshöhen oder -breiten. Diese Optionen bestimmen, welche Abschnitte, Der Designer berücksichtigt bei der Auswahl des am besten optimierten Abschnitts
Kriterien
Benutzer können ihr eigenes maximales Nutzenverhältnis für den Designer eingeben, Dies würde bedeuten, dass jedes Ergebnis mit einem höheren UR als dem angegebenen nicht als gültige Auswahl betrachtet wird.
Mitgliedereinstellungen
In diesem Bereich des Einstellungsmodals, Benutzer können ihren Designcode wie gewohnt im Member Design-Modul auswählen. Das Modal importiert auch alle Abschnitte, die in diesem Modul gestaltbar sind, Der Benutzer hat jedoch die Kontrolle darüber, welche Abschnitte er entwerfen möchte. Der Designer entwirft jeweils einen einzelnen Abschnitt.
Mit der Analyseintervall ist eine wichtige Einstellung, und teilt der Software mit, wie oft der FEA-Löser erneut ausgeführt werden soll. Standardmäßig ist es auf eingestellt 0 – Das bedeutet, dass wir beim Testen jedes Abschnitts die gleichen internen Kräfte verwenden. Das ist normalerweise in Ordnung, seit dem Biegemoment, Scherkraft- und Axialergebnisse ändern sich beim Ändern eines Abschnitts nicht allzu sehr. Jedoch, Durchbiegungsergebnisse ändern sich und können die Ergebnisse beeinflussen – da wir einen leichteren Abschnitt verwenden, Das Durchbiegungsergebnis muss aktualisiert werden, wenn das Eigengewicht reduziert wird.
So können Benutzer dann die Häufigkeit erhöhen, mit der der Solver zwischen den Testabschnitten ausgeführt wird. Die einzige Einschränkung besteht darin, dass dadurch der Prozess verlangsamt wird, da der FEA-Löser zwischen Abschnittsänderungen ausgeführt werden muss. Zum Beispiel, wenn Sie das Intervall als festlegen 1, Es wird zwischen jedem einzelnen Abschnittstest neu aufgelöst.
Der Prozess des Designers
Der Designer wird wie folgt ausgeführt:
- Führt eine erste Analyse/Entwurf durch, um sicherzustellen, dass das Modell korrekt eingerichtet ist, und um aktuelle Ergebnisse zu ermitteln
- Beginnt mit dem Testen des ersten Abschnitts:
- Ordnet alle Abschnitte in der angegebenen Bibliothek in der Reihenfolge ihrer Querschnittsfläche
- Ändert einen Abschnitt im Modell und führt die Analyse erneut aus (abhängig von Analyseintervall Einstellung)
- Mit den neuen Analyseergebnissen (Biegen, Durchbiegung usw.) Wir testen den nächsten Abschnitt in der Bibliothek
- Speichern Sie die Ergebnisse und führen Sie die nächste Analyse durch
- Für Geschwindigkeit und Leistung, Alle unnötigen Tests werden übersprungen. Dies sind wenn (ein) der Letzte 5 Tests haben schlechtere Ergebnisse erbracht oder (b) Wir haben bereits das bestmögliche Nutzenverhältnis gefunden (c) Wir scheitern in großer Zahl, wir werden überspringen 5 Querschnitte
- Beginnen Sie mit dem nächsten Abschnitt, mit den aktualisierten Abschnitten aus früheren Iterationen durchgetragen
Deshalb ist die Reihenfolge der Abschnitte wichtig, da wir das Modell im Laufe der Zeit aktualisieren werden, wenn Sie am Ende leichtere Elemente aus den Optimierungen früherer Abschnitte erhalten, Sie wirken sich auf die Ergebnisse nachfolgender Abschnittsoptimierungen aus. Wenn es hilft, Benutzer können im Protokoll genau sehen, was der Designer unten getan hat Protokoll anzeigen wenn die Ergebnisse zurückkommen.
Betrachten Sie den Fall wobei die Spalten zuerst optimiert werden. Sie könnten bestehen, aber dann beginnen Sie mit der Gestaltung der Balken oben (vielleicht dicker/schwerer machen) Wenn Sie dann zurückgehen, überprüfen Sie die Spalten erneut, sie könnten scheitern. Jedoch, Optimierung in umgekehrter Reihenfolge, sollte dieses Problem nicht haben.
Ergebnisse
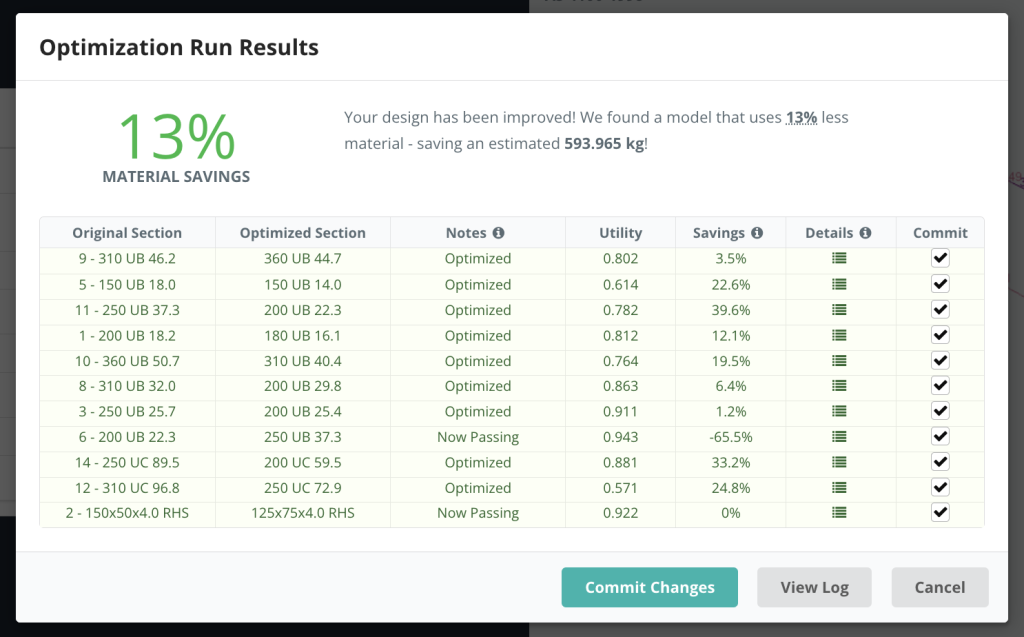
Die Ergebnisse jedes Abschnitts werden in einem Popup angezeigt, Zusammenfassung des ausgewählten Abschnitts, Es geht um das Nutzenverhältnis und die Optionen beim Festschreiben. Im folgenden Beispiel, alles 3 Teile des Modells wurden optimiert:
Wir können uns alle Läufe und ihre Ergebnisse genauer ansehen, indem wir auf das Symbol unten klicken Iterationen. Daraufhin wird die folgende detaillierte Liste der Läufe angezeigt. Zum Beispiel, Abschnitt auswählen 2 (RHS) wird Folgendes zeigen:
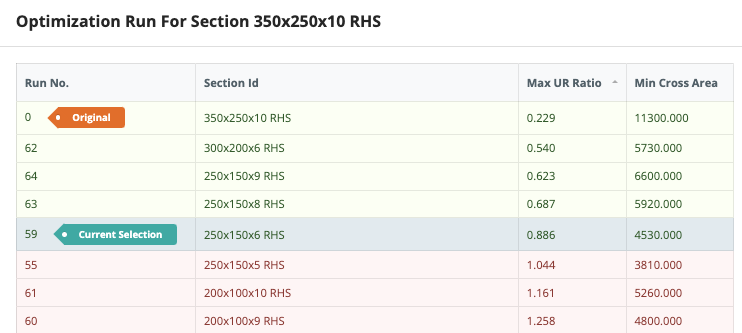
Von hier aus können wir nach Max UR sortieren, Cross-Area und SFO (ein gewichteter Index) Dies zeigt das beste Ergebnis basierend auf Ihren vorgegebenen Kriterien (in den Einstellungen). Dadurch können Benutzer die Optimierungsläufe überprüfen, um sicherzustellen, dass der richtige Abschnitt ausgewählt wurde. Im obigen Beispiel, Wir legen ein maximales Nutzenverhältnis von fest 0.95 und der Wunsch, die Querschnittsfläche zu minimieren. Man hat die Fläche deutlich verkleinert und einen Abschnitt ausgewählt, der diesen Gestaltungskriterien noch entspricht.
Festschreiben Ihrer Ergebnisse
Sobald Sie mit den Ergebnissen zufrieden sind, Du kannst schlagen In der Menüleiste auf der linken Seite und klicke Änderungen übernehmen diese Abschnitte zu akzeptieren. Die Software übernimmt diese Formen sowohl im Design-Modul als auch im Design-Modul, und Ihr Strukturmodell. Die Software führt außerdem Ihre Designprüfung erneut durch, um Ihnen die aktuellsten Ergebnisse zu liefern. So in unserem obigen Beispiel, Nach dem Festschreiben können wir sehen, dass alle Abschnitte funktionieren (bis auf den einen Abschnitt, der überlastet war):

Ändern Sie Ihren Abschnitt im Designmodus, bedeutet, dass Ihre Analyseergebnisse nicht mit Ihrem aktuellen Modell übereinstimmen. Deshalb, Wir empfehlen dringend, noch einmal zurückzugehen, Ihr Modell aufzulösen und die Entwurfsprüfung erneut durchzuführen, um sicherzustellen, dass Ihre Analyse- und Entwurfsergebnisse synchron sind.
Fehlerbehebung
Wenn Sie den Designer nicht zum Laufen bringen können, Sie sollten Folgendes überprüfen:
- Werden Ihre Abschnitte aus der SkyCiv-Abschnittsdatenbank geladen?? Die Abschnitte müssen aus der Section Builder-Datenbank geladen werden, Auf diese Weise weiß der Designer, welchen Abschnittskatalog er testen muss
- Können Sie ein Member Design ausführen? “Prüfen”? Dadurch wird bestätigt, dass alle Abschnitte gestaltbar sind und Ihr Modell korrekt eingerichtet ist. Da der Designer dies durchläuft, Damit es funktioniert, muss es für Ihr Basismodell laufen
- Haben Sie spezielle Elemente? (verjüngt sich, Starre Elemente)? Die Benutzeroberfläche sollte dies verhindern, aber in bestimmten Fällen kann dies trotzdem passieren. Bitte entfernen Sie diese speziellen Elemente aus dem Einstellungsmodal und versuchen Sie erneut, den Designer auszuführen
- Überprüfen Sie, ob Ihre Materialien mit dem zu testenden Designcode übereinstimmen. Nochmal, Dies sollte von der Benutzeroberfläche blockiert werden, kann aber in einigen Fällen passieren. Gehen Sie zurück zu Ihrem Modell und überprüfen Sie, ob diese Abschnitte mit dem Designcode übereinstimmen, den Sie ausführen möchten. Zum Beispiel, NDS sollte über geeignete NDS-Materialien verfügen, oder AISC sollte dem Abschnitt ein Stahlmaterial zugewiesen haben.
- Handelt es sich bei Ihrem Modell um ein Einheitensystem, das dem Entwurfsstandard-Einheitensystem entgegengesetzt ist?? Wir empfehlen, US-Designcodes in Imperial und AS auszuführen,IM,BS,CSA usw.. Standards alle in metrisch