A Tela é uma única folha de desenho dentro de um projeto CAD SkyCiv. Cada projeto contém pelo menos uma tela, e você pode adicionar quantos precisar – um por andar, um por detalhe, ou um por folha de desenho.
As telas são gerenciadas a partir do Tela acordeão na barra lateral esquerda. Cada tela armazena sua própria geometria, anotações, e colocar dados em camadas de forma independente.
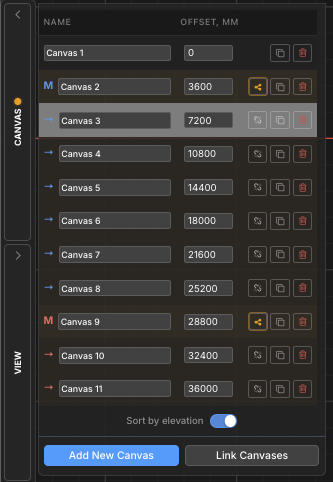
O painel de tela
Todo o gerenciamento do canvas é feito a partir do Tela acordeão, encontrado na barra lateral esquerda. Clique no Tela cabeçalho para expandi-lo. O painel lista todas as telas do projeto e fornece controles para adicionar, comutação, renomear, reordenando, copiando, e excluindo telas.
A tela atualmente ativa é destacada na lista. Apenas uma tela está ativa por vez – todas as ferramentas de desenho operam na tela ativa.
Operações Básicas
Adicionar uma tela
Crie um novo, folha de desenho em branco no projeto
Clique no Adicionar nova tela botão na parte inferior do painel Telas. Uma nova tela em branco é criada e imediatamente ativada.
Passo a passo
1Abra o Telas acordeão na barra lateral esquerda.
2Clique Adicionar nova tela na parte inferior do painel.
3A nova tela aparece na lista e se torna a tela ativa.
💡
Comece selecionando a parte da estrutura que você deseja espelhar: Novas telas são nomeadas Tela 2, Tela 3, etc. por padrão – renomeie-os imediatamente para manter o projeto organizado.
Alternar entre telas
Mover para uma folha de desenho diferente
Clique em qualquer lugar em uma linha da tela no painel Telas para ativá-la. A tela atual é salva automaticamente antes de mudar, então nenhum dado é perdido.
💡
Comece selecionando a parte da estrutura que você deseja espelhar: A linha da tela ativa é destacada na lista. Qualquer seleção na tela anterior é apagada quando você alterna.
Renomear uma tela
Dê um nome significativo a uma tela para facilitar a navegação
Clique diretamente no campo de nome em uma linha da tela para editá-lo in-line. Digite o novo nome e pressione Encomende Viagra online na Inglaterra ou clique fora para confirmar. Os nomes das telas devem ser exclusivos dentro do projeto – duplicatas são resolvidas automaticamente.
💡
Comece selecionando a parte da estrutura que você deseja espelhar: Use nomes descritivos como Planta Térrea, Detalhe do telhado, ou Seção A-A para manter projetos multicanvas navegáveis.
Suprimindo e mudando sua estrutura Repita (Duplicado) uma tela
Crie uma cópia exata de uma tela existente
Clique no ícone duplicado (dois quadrados sobrepostos) em qualquer linha da tela. Uma cópia completa dessa tela – incluindo toda a geometria, anotações, e atribuições de camada – é inserido diretamente após ele na lista.
💡
Comece selecionando a parte da estrutura que você deseja espelhar: Copiar é uma maneira rápida de criar um novo nível de piso que compartilhe a mesma grade de colunas – duplicado, então modifique apenas o que muda.
Excluir uma tela
Remover permanentemente uma tela e todo o seu conteúdo
Clique no ícone de lixo vermelho em uma linha da tela e confirme o prompt. A exclusão é permanente e remove toda a geometria, anotações, e colocar dados em camadas nessa tela. Uma caixa de diálogo de confirmação é mostrada por padrão – verificar “Não pergunte novamente” para ignorá-lo no futuro.
⚠️
Observação: O ícone da lixeira é desativado quando resta apenas uma tela – um projeto deve sempre ter pelo menos uma tela. A exclusão não pode ser desfeita.
Reordenar telas
Alterar a posição de uma tela na lista
Use o acima e seta para baixo botões em cada linha da tela para movê-la para frente ou para trás na lista. Os botões de seta só ficam visíveis quando o painel está em Hierarquia pedido – eles estão escondidos quando Classificar por elevação está ativo (a ordem de elevação é controlada pelo valor de elevação, não posição manual).
💡
Comece selecionando a parte da estrutura que você deseja espelhar: Se os botões de seta estiverem faltando, - Classificar por elevação desligado para retornar ao modo de hierarquia onde a ordenação manual está disponível.
Elevação e ordem de classificação
Quando um projeto representa uma estrutura de vários andares, cada tela pode receber um elevação valor que o coloca na altura correta no modelo estrutural 3D (Exportação S3D). A lista de telas pode ser classificada por esses valores de elevação ou em uma ordem manual personalizada.
Alternar classificar por elevação
Alternar entre ordem de elevação e ordem de hierarquia personalizada
A Classificar por elevação alternar na parte inferior do painel Telas alterna entre dois modos de exibição:
Classificar por elevação (-): As telas são ordenadas da elevação mais baixa para a mais alta. A Desvio aparece uma coluna mostrando o valor de elevação de cada tela. Esta ordem reflete como as telas serão empilhadas na exportação do modelo 3D S3D.
Hierarquia (desligado): As telas aparecem em uma ordem personalizada que você controla com os botões de seta para cima/para baixo. Grupos de telas (mestre/filho) mostre sua hierarquia recuada aqui.
💡
Comece selecionando a parte da estrutura que você deseja espelhar: As telas sem uma elevação atribuída aparecem na parte inferior da lista no modo de elevação, classificados por seu índice interno.
Elevação da tela
Atribuir um valor de altura usado ao exportar para o modelo estrutural 3D
Quando Classificar por elevação está ligado, a Desvio coluna aparece. Telas sem elevação apresentam + botão – clique nele para atribuir um. Telas com elevação mostram um campo numérico editável.
O valor da elevação determina a altura de cada andar na exportação estrutural 3D. A unidade corresponde à unidade de comprimento do projeto (milímetros, cm, m, ft, no).
Passo a passo
1Habilitar Classificar por elevação para mostrar a coluna Offset.
2Clique no + botão próximo a qualquer tela para atribuir-lhe uma elevação.
3Digite o valor da elevação e pressione Encomende Viagra online na Inglaterra confirmar. A lista é reordenada automaticamente.
💡
Comece selecionando a parte da estrutura que você deseja espelhar: Atribuir elevação 0 para a tela do térreo. Os valores sugeridos para novas telas são automaticamente definidos como 3000 mm acima da cota mais alta existente.
Grupos de telas (Mestre / Filho)
Quando vários níveis de piso compartilham o mesmo layout estrutural (por exemplo. grades de colunas idênticas em vários andares), você pode vinculá-los em um grupo de telas. Uma tela se torna a Mestre e os outros se tornam Crianças.
As alterações estruturais feitas no mestre podem ser propagado para todas as crianças em um clique, mantendo os pisos repetidos sincronizados sem copiar manualmente a geometria.
Na lista de telas, o mestre é rotulado M e as crianças são rotuladas hip-delete-não usado, ambos coloridos com uma cor de destaque de grupo compartilhada.
Vincular telas em um grupo
Designe uma tela mestre e vincule telas filhas a ela
Clique Telas de links na parte inferior do painel Telas para abrir o assistente de vinculação. Selecione qual tela será a mestre e quais telas serão suas crianças. Confirme para criar o grupo.
Passo a passo
1Abra o Telas painel e clique Telas de links.
2Escolha o tela mestre do mago.
3Selecione um ou mais telas infantis para vincular a ele.
4Confirme para criar o grupo. A M / hip-delete-não usado rótulos e cores de destaque aparecem na lista.
💡
Comece selecionando a parte da estrutura que você deseja espelhar: No Hierarquia visualizar, grupos mestres podem ser recolhidos e expandidos usando o botão de alternância triangular próximo à linha da tela mestre.
Propagar Mudanças Estruturais
Enviar atualizações estruturais da tela mestre para todos os filhos vinculados
Quando a geometria estrutural em uma tela mestre é alterada, a destaque âmbar aparece na linha mestre e seus filhos para sinalizar que o grupo está fora de sincronia. Clique no botão de propagação (ícone de compartilhamento) na linha mestre e confirme para enviar os dados estruturais atualizados para todas as telas filhas.
⚠️
Observação: A propagação substitui dados estruturais em telas filhas. Esta ação não pode ser desfeita. Conteúdo não estrutural sobre crianças (anotações, dimensões, nuvens de revisão) é preservado.
Remover uma criança de um grupo
Desanexe uma tela filha para que ela não receba mais atualizações propagadas
Clique no ícone de cadeia quebrada em uma linha da tela filha e confirme o prompt. A tela é removida do grupo mestre e se torna uma tela independente. Sua geometria existente é mantida – ele simplesmente para de receber futuras atualizações propagadas do mestre.
💡
Comece selecionando a parte da estrutura que você deseja espelhar: Remover um filho não exclui nem modifica seu conteúdo – apenas quebra o link para o mestre. Você pode vinculá-lo novamente a qualquer momento usando Telas de links.
Registre -se para uma conta gratuita e obtenha acesso a análises poderosas + software de design:
✓ Software de análise poderoso ✓ Acesso a 90+ Ferramentas de projeto ✓ ASCE, AS, EN, Gerador de carga NBCC ✓ Aço, Madeira, Concreto, Esses materiais precisam ser atribuídos a seções que representam membros e placas para modelar a estrutura que você precisa