Gerenciando as mudanças na SkyCiv & Autodesk® Revit®
Começando
O SkyCiv já possui um bom plug-in do Revit que permite aos usuários exportar o modelo do Revit para o SkyCiv, entre outros recursos, como Análise, Projeto etc.
Antes de seguir em frente, certifique-se de ter o plug-in instalado e de estar ciente dele. Se não, Eu sugiro que você vá para https://skyciv.com/docs/skyciv-api/plugins/revit/ e familiarize-se com ele. Esse é um plugin sem Double Link. Para baixar o plugin com Double Link, visite os links abaixo de acordo com sua versão do Revit
Depois de instalado, então por favor continue lendo.
Também temos a funcionalidade de exportar o modelo do SkyCiv para o arquivo Revit que pode ser importado no ambiente Revit. Alguém poderia perguntar qual é a necessidade deste Double Link então? Vamos falar sobre o problema. Como Revit e SkyCiv são dois softwares diferentes, eles obviamente têm os diferentes mecanismos de armazenamento dos dados (estruturais como não estruturais). Devido a essas diferenças, costumávamos ter apenas dados estruturais transportados de um lado para o outro, com o infeliz efeito colateral de perder os dados não estruturais na transição. Adicionamos a funcionalidade Double Link para resolver especificamente esse problema. Double Link significa essencialmente o link em ambas as extremidades sem vazamentos de dados para garantir a exatidão & robustez do sistema, permitindo flexibilidade de trabalho em dois sistemas diferentes.
Vamos falar sobre isso em detalhes nas seções a seguir.
Empurre para S3D
Suponha que o usuário esteja trabalhando no ambiente Revit em seu modelo. Como próximo passo, ele deseja que o modelo seja transportado para o ambiente S3D do SkyCiv e realize Análise/Projeto no mesmo modelo. O plug-in tem “Empurre para S3D” funcionalidade. Isso transformará o modelo do Revit no formato de arquivo do SkyCiv e enviará o modelo do Revit junto com algumas outras informações necessárias para o SkyCiv.

Após chamada bem-sucedida, o navegador padrão será aberto com o prompt conforme mostrado abaixo
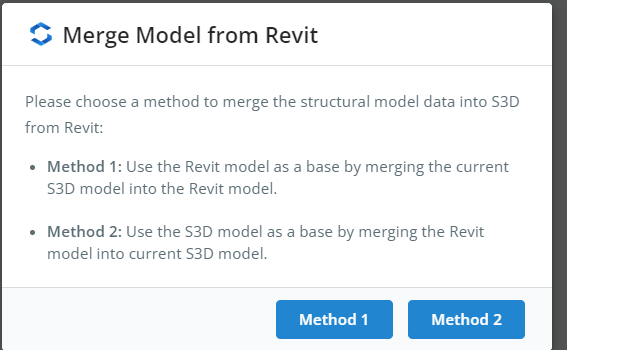
O que esses métodos significam?
Neste cenário, temos dois conjuntos de dados. Dados do Revit e dados S3D. Se o usuário escolher Method1, o sistema pegará os dados provenientes do Revit como dados base e mesclará os dados S3D no topo. Por outro lado, se o usuário escolher Method2, o sistema pegará os dados presentes no S3D como dados base e mesclará os dados do Revit no topo.
Depois que o usuário seleciona uma das duas opções, o sistema fará a mesclagem apropriada e redirecionará o usuário para o modelo S3D. O usuário pode continuar trabalhando no modelo, realizar outras atividades como análise, etc.. como sempre. Não há mudança na forma como o modelo se comporta em S3D.
Se você já pegou o jeito do Push to S3D, então vamos falar sobre o segundo aspecto do Double Link
Mesclar no Revit
Suponha que o usuário esteja trabalhando no ambiente S3D e agora queira voltar ao Revit para algum trabalho, levando o modelo mais recente para o Revit. Ele tem que seguir o processo de duas etapas
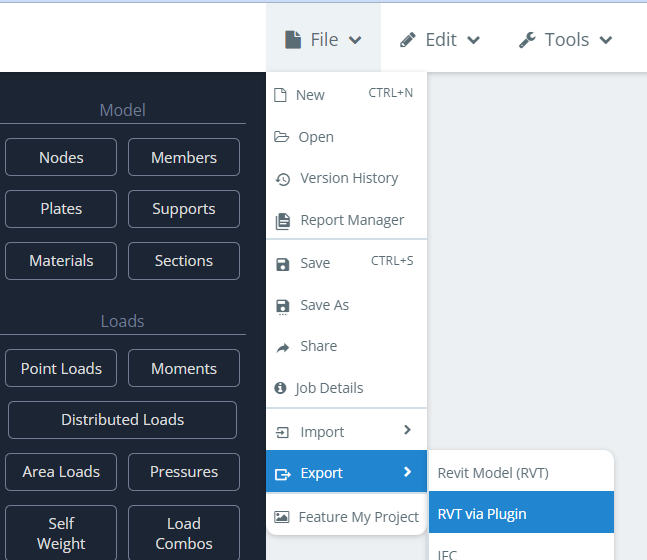
- Exportar para RVT via Plugin Como primeiro passo, precisamos ter os dados S3D agrupados como um arquivo zip. Isso pode ser conseguido seguindo o caminho no menu Arquivo–>Exportar–> RVT via plug-in como mostrado abaixo.
 Isso abrirá outra caixa de diálogo na qual o usuário terá duas opções para escolher.
 Novamente como antes,
Se o usuário escolher Método 1, o sistema pegará os dados do S3D como dados base. Isto significará que os dados não estruturais do Revit Model não estarão disponíveis no modelo resultante. Apenas os dados do S3D estarão disponíveis.
Por outro lado, se o usuário escolher Método2, o sistema pegará os dados presentes no modelo anterior do Revit (empurrado como parte de “Empurre para S3D”) como os dados base e mesclar os dados S3D no topo. Isso significará que os dados não estruturais do modelo do Revit serão preservados e os dados estruturais do S3D serão adicionados.
Em ambas as escolhas, o sistema obterá os dados estruturais mais recentes do S3D.
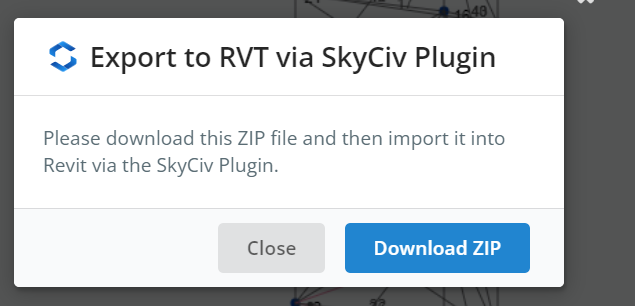
Depois que o usuário seleciona uma das duas opções, o sistema preparará o zip e solicitará que o usuário baixe o zip.

- Mesclar no Revit Depois de baixar o arquivo na etapa anterior, precisaremos importar esse arquivo no Revit. Plugin tem um botão chamado “Mesclar no Revit” para o mesmo.
 Uma vez clicado, ele pedirá ao usuário para selecionar o arquivo zip que baixamos na etapa anterior. Assim que o arquivo for selecionado, o sistema lerá o arquivo revit/arquivo SkyCiv Json ou ambos, dependendo das escolhas que o usuário fez e construirá o modelo de acordo. Para o caso em que o Método1 foi selecionado, o plug-in construirá o modelo do zero e quando o processo for concluído, o usuário terá que abrir a visualização 3D explicitamente indo para “Visualizar”–>”3DViewName”–>”Visualização 3D padrão”
 Isso abrirá outra caixa de diálogo na qual o usuário terá duas opções para escolher.
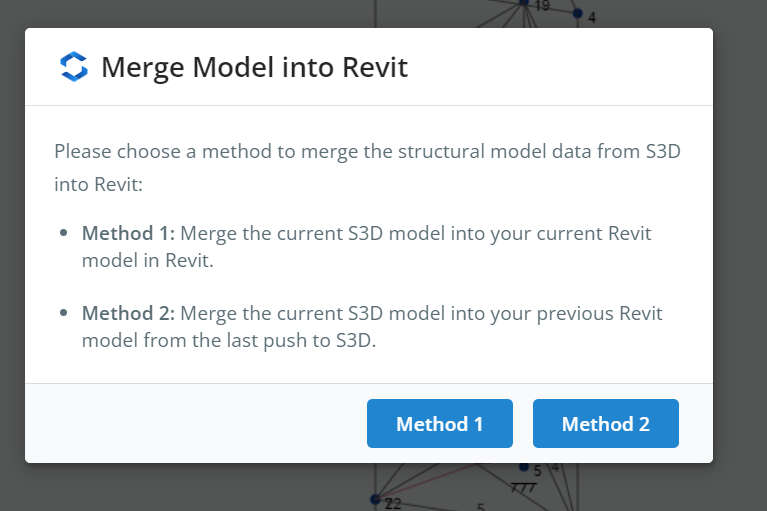 Novamente como antes,
 Uma vez clicado, ele pedirá ao usuário para selecionar o arquivo zip que baixamos na etapa anterior. Assim que o arquivo for selecionado, o sistema lerá o arquivo revit/arquivo SkyCiv Json ou ambos, dependendo das escolhas que o usuário fez e construirá o modelo de acordo. Para o caso em que o Método1 foi selecionado, o plug-in construirá o modelo do zero e quando o processo for concluído, o usuário terá que abrir a visualização 3D explicitamente indo para “Visualizar”–>”3DViewName”–>”Visualização 3D padrão”
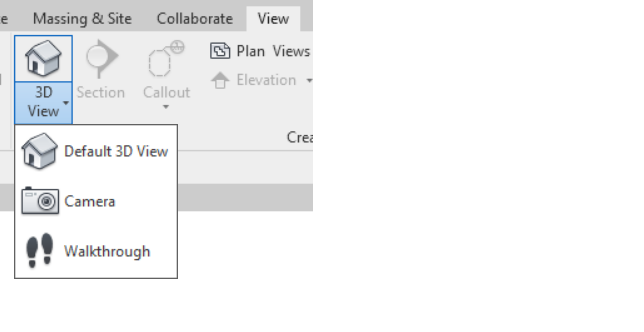
Isso completa o fluxo do Revit —> SkyCiv e novamente SkyCiv–> Revit completando o Link duplo. Experimente.