
Como importar um arquivo DWG para um software de análise estrutural
DWG is a commonly used CAD drawing format that stores geometric information, including lines, points and shapes. While CAD software primarily works with drawing geometry, structural analysis software requires additional information, such as structural members, sections and supports.
SkyCiv simplifies this process through CloudCAD, allowing users to import DWG geometry, assign structural properties and export the resulting model directly into SkyCiv Structural 3D (S3D).
Neste guia, we’ll walk through the process of importing a DWG file into SkyCiv and preparing it for structural analysis.
Passo 1: Open CloudCAD
There are two ways to begin importing a DWG file into SkyCiv.
Opção 1: Start directly in CloudCAD
Open SkyCiv CloudCAD to begin importing your DWG drawing.
Opção 2: Start from Structural 3D (S3D)
No SkyCiv Structural 3D, navegar para File → Import → DWG (CloudCAD).
Selecting this option will automatically open CloudCAD, where you can import your DWG file.
Both methods follow the same workflow from this point onwards.
Passo 2: Import Your DWG File
Once CloudCAD is open, drag and drop your DWG file into the workspace.
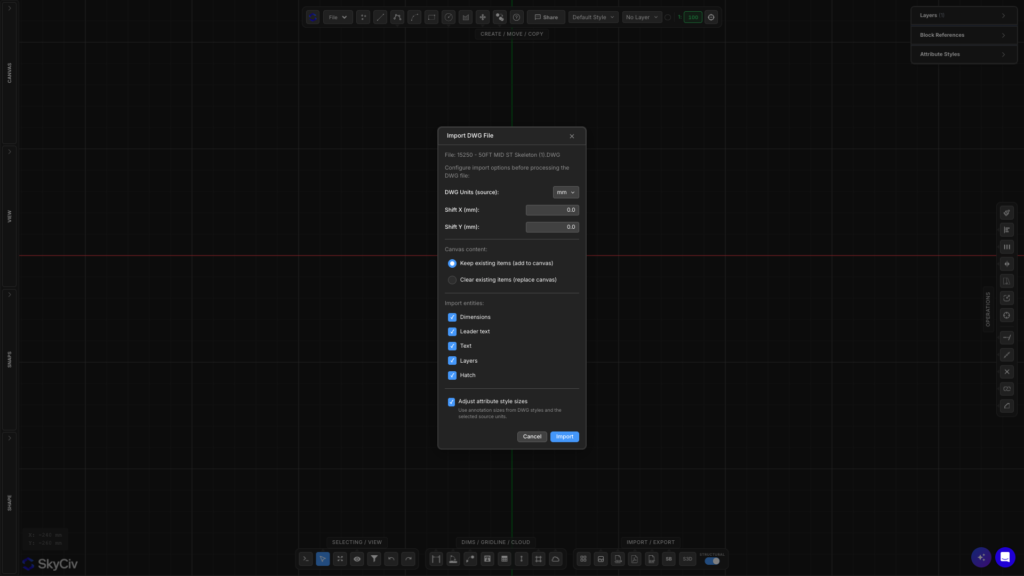
A Importar arquivo DWG window will appear, allowing you to configure the import settings before processing the drawing.
The available options include:
- DWG Units: Specify the units used in the original drawing.
- Shift X / Shift Y: Adjust the position of the imported geometry.
- Canvas Content: Choose whether to retain existing geometry or replace it.
- Import Entities: Select whether to include dimensions, texto, layers and hatch geometry.
Once the appropriate settings have been selected, clique Importar.
CloudCAD will automatically process the DWG file and display the supported drawing geometry.
Unlike the previous DWG import workflow, the geometry does not need to be manually traced. Imported lines and points can be selected and modified directly within CloudCAD.
Review the imported drawing to ensure the required geometry has been recognised correctly.
Passo 3: Assign Structural Data
Before exporting the imported geometry to Structural 3D, the appropriate structural properties should be assigned.
This allows CloudCAD to interpret the drawing geometry as structural elements, como vigas, colunas, supports and plates.
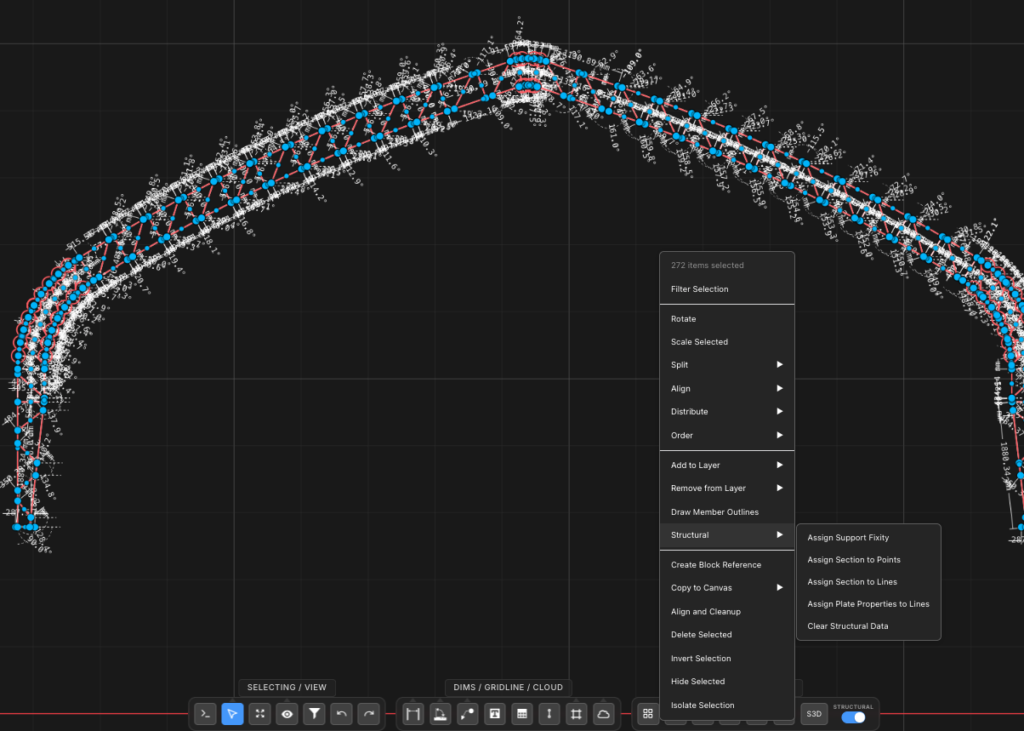
To assign structural data:
- Select the relevant geometry within CloudCAD.
- Right-click the selected elements.
- Navegue até o Estrutural submenu.
- Choose the appropriate structural assignment.
The available options include:
- Assign Section to Lines: Assign cross-sections to lines representing structural beam members.
- Assign Section to Points: Define point-based structural members, such as columns.
- Atribuir Fixidade de Suporte: Apply boundary conditions to selected points.
- Atribuir propriedades da placa: Define properties for applicable plate geometry.
Ensure Modo Estrutural is enabled for geometry intended to be included in the exported structural model.
Structural properties can also be reviewed and adjusted through the Structural Exporter, which provides default section and support settings.
Observação: Only geometry intended to form part of the structural model should be assigned structural properties. Drawing annotations and other non-structural elements should be excluded where appropriate.
Passo 4: Review the Structural Exporter
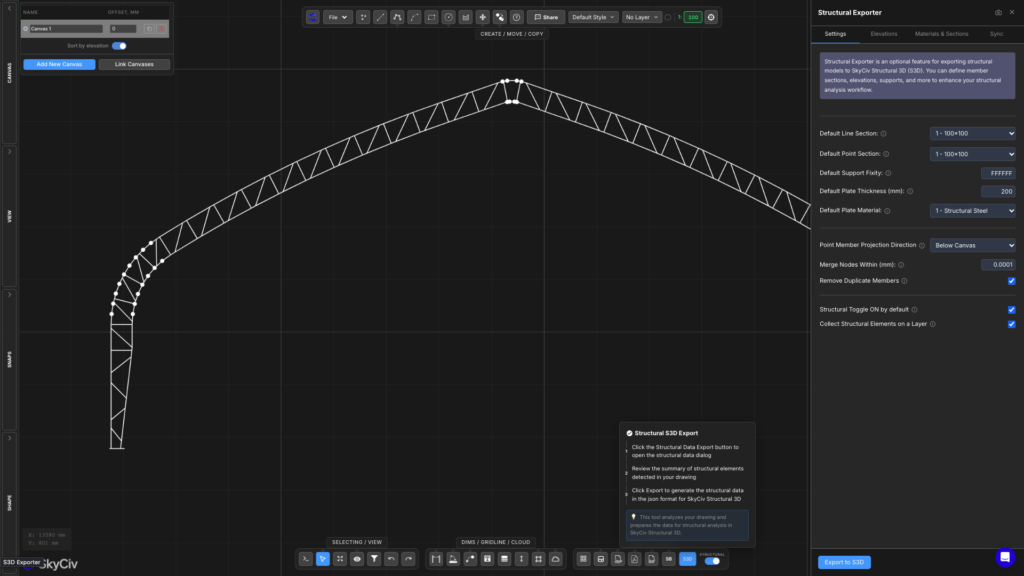
Once the required structural data has been assigned, Clique no S3D button in the bottom-right corner of CloudCAD to open the Structural Exporter.
The Structural Exporter allows you to review and configure the model before transferring it into Structural 3D.
Configurações
Debaixo de Configurações aba, review the available structural export options, incluindo:
- Default Line Section
- Default Point Section
- Default Support Fixity
- Default Plate Thickness and Material
- Point Member Projection Direction
- Merge Nodes Within
- Remove Duplicate Members
These settings control how the imported geometry and assigned structural properties are interpreted during export.
e não precisam exibir um único valor de pressão
Navegue até o e não precisam exibir um único valor de pressão tab to review the canvas orientation and elevation settings.
Selecione o apropriado Eixo Normal (X, Y ou Z) based on the orientation of the imported drawing.
If required, adjust the canvas elevation offset to position the geometry correctly within the exported model.
Revisão de dados estruturais
Antes de exportar, it is recommended to review the assigned structural data.
Within the e não precisam exibir um único valor de pressão aba, click the magnifying-glass icon beside the relevant canvas to examine its structural elements.
The available categories include:
- Line Members
- Point Members
- Point Supports
- Hatch Plates
These tables allow you to review the structural properties associated with the imported geometry and make adjustments where required.
Materiais & Seções
A Materiais & Seções tab displays the materials and member sections available for the structural model.
Additional materials and sections can be added from the relevant libraries as required.
Review the available sections and materials to ensure they are appropriate for the elements being exported.
Passo 5: Exportar para 3D estrutural
Once the geometry and structural properties have been reviewed, the model is ready to be transferred into Structural 3D.
To complete the process:
- Abra o Exportador Estrutural.
- Confirm the structural settings and canvas orientation.
- Clique Exportar para S3D.
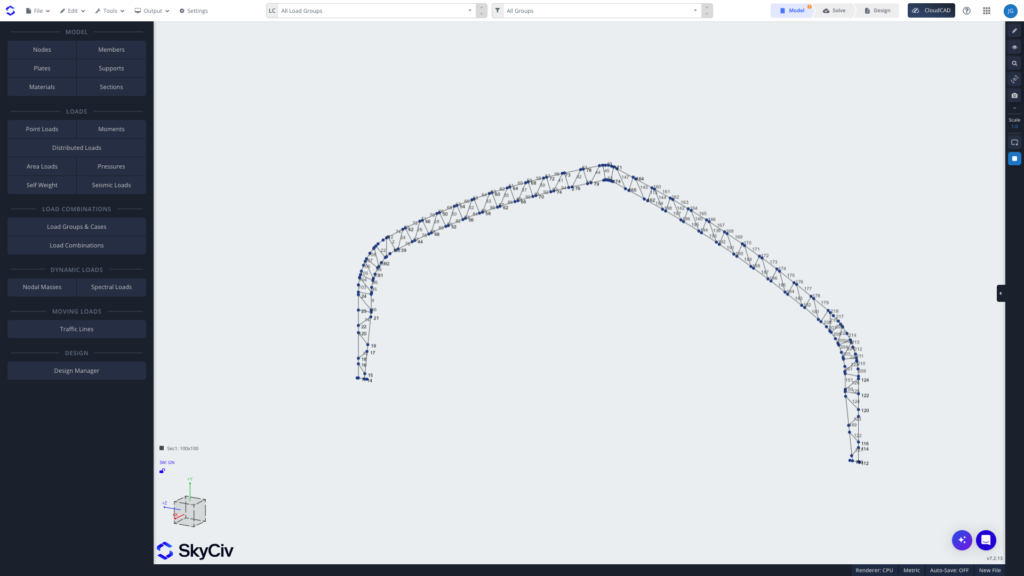
CloudCAD will generate the corresponding structural model and open it in SkyCiv Structural 3D.
Passo 6: Review Your Model in Structural 3D
After exporting, review the generated model in Structural 3D to confirm that the geometry and structural properties have transferred correctly.
Check that the required members are connected, sections are assigned appropriately and supports are positioned correctly.
Daqui, you can continue preparing the model for structural analysis by applying loads, defining load combinations and completing the necessary analysis and design checks.
Conclusão
Importing DWG files into SkyCiv is now handled through CloudCAD, providing a streamlined workflow for converting CAD geometry into structural analysis models.
By automatically importing the drawing geometry and allowing structural properties to be assigned before export, CloudCAD helps reduce the manual modelling required to transfer CAD drawings into Structural 3D.
For further information on structural assignments and export settings, refer to the CloudCAD Export to Structural 3D documentation.
