A Canvas is een enkel tekenblad binnen een SkyCiv CAD-project. Elk project bevat minimaal één canvas, en je kunt er zoveel toevoegen als je nodig hebt – één per verdieping, één per detail, of één per tekenblad.
Canvassen worden beheerd vanuit de Canvas accordeon in de linkerzijbalk. Elk canvas slaat zijn eigen geometrie op, annotaties, en gegevens onafhankelijk van elkaar laagsgewijs aanbrengen.
Het canvaspaneel
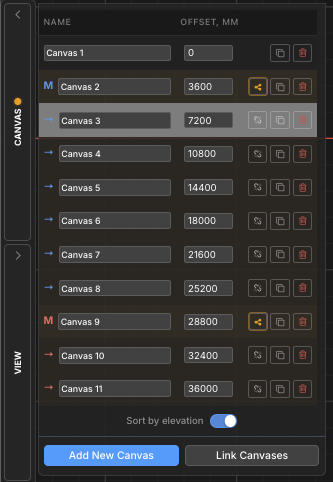
Al het canvasbeheer wordt gedaan vanuit de Canvas accordeon, te vinden in de linkerzijbalk. Klik op de Canvas koptekst om deze uit te vouwen. Het paneel vermeldt elk canvas in het project en biedt besturingselementen voor het toevoegen ervan, schakelen, hernoemen, opnieuw ordenen, kopiëren, en doeken verwijderen.
Het momenteel actieve canvas wordt gemarkeerd in de lijst. Er is slechts één canvas tegelijk actief – alle tekengereedschappen werken op het actieve canvas.
Basisbewerkingen
Voeg een canvas toe
Maak een nieuwe, leeg tekenblad in het project
Klik op de Nieuw canvas toevoegen knop onder aan het deelvenster Canvassen. Er wordt een nieuw leeg canvas gemaakt en onmiddellijk actief gemaakt.
Stap voor stap
1Open de Doeken accordeon in de linkerzijbalk.
2Klik Nieuw canvas toevoegen aan de onderkant van het paneel.
3Het nieuwe canvas verschijnt in de lijst en wordt het actieve canvas.
💡
De volgende pop-up wordt dan weergegeven met de twee volgende vereiste invoer:: Nieuwe doeken krijgen een naam Canvas 2, Canvas 3, enzovoort. standaard – hernoem ze onmiddellijk om het project georganiseerd te houden.
Wisselen tussen doeken
Ga naar een ander tekenblad
Klik ergens op een canvasrij in het deelvenster Canvassen om deze actief te maken. Het huidige canvas wordt automatisch opgeslagen voordat er wordt overgeschakeld, er gaan dus geen gegevens verloren.
💡
De volgende pop-up wordt dan weergegeven met de twee volgende vereiste invoer:: De actieve canvasrij wordt gemarkeerd in de lijst. Elke selectie op het vorige canvas wordt gewist wanneer u overschakelt.
De naam van een canvas wijzigen
Geef een canvas een betekenisvolle naam voor eenvoudiger navigatie
Klik rechtstreeks in het naamveld op een canvasrij om deze inline te bewerken. Typ de nieuwe naam en druk op Enter of klik weg om te bevestigen. Canvasnamen moeten uniek zijn binnen het project – duplicaten worden automatisch opgelost.
💡
De volgende pop-up wordt dan weergegeven met de twee volgende vereiste invoer:: Gebruik beschrijvende namen zoals Plattegrond begane grond, Dakdetail, of Sectie A-A om projecten met meerdere canvassen navigeerbaar te houden.
Je structuur onderdrukken en verschuiven Herhalen (de rechtervoet bevindt zich naar binnen vanaf het einde van de brug) een doek
Maak een exacte kopie van een bestaand canvas
Klik op de duplicaat icoon (twee overlappende vierkanten) op elke canvasrij. Een volledige kopie van dat canvas – inclusief alle geometrie, annotaties, en laagtoewijzingen – wordt direct erna in de lijst ingevoegd.
💡
De volgende pop-up wordt dan weergegeven met de twee volgende vereiste invoer:: Kopiëren is een snelle manier om een nieuw verdiepingsniveau te maken dat hetzelfde kolomraster deelt – duplicaat, wijzig dan alleen wat er verandert.
Een canvas verwijderen
Verwijder een canvas en alle inhoud ervan definitief
Klik op de rood prullenbakpictogram op een canvasrij en bevestig de prompt. Het verwijderen is permanent en verwijdert alle geometrie, annotaties, en laaggegevens op dat canvas plaatsen. Er wordt standaard een bevestigingsvenster weergegeven – rekening “Vraag het niet opnieuw” om het in de toekomst over te slaan.
⚠️
Notitie: Het prullenbakpictogram is uitgeschakeld als er nog maar één canvas overblijft – een project moet altijd minimaal één canvas hebben. Het verwijderen kan niet ongedaan worden gemaakt.
Canvasdoeken opnieuw ordenen
Wijzig de positie van een canvas in de lijst
Gebruik de omhoog en pijl naar beneden knoppen op elke canvasrij om deze eerder of later in de lijst te verplaatsen. Pijlknoppen zijn alleen zichtbaar als het paneel is geplaatst Hiërarchie bestellen – ze zijn verborgen wanneer Sorteer op hoogte is actief (De hoogtevolgorde wordt bepaald door de hoogtewaarde, geen handmatige positie).
💡
De volgende pop-up wordt dan weergegeven met de twee volgende vereiste invoer:: Als de pijlknoppen ontbreken, schakelaar Sorteer op hoogte uit om terug te keren naar de hiërarchiemodus waar handmatig bestellen beschikbaar is.
Hoogte en sorteervolgorde
Wanneer een project een structuur met meerdere verdiepingen vertegenwoordigt, Aan elk canvas kan een Voor onze casestudy waarde die het op de juiste hoogte in het 3D-constructiemodel plaatst (S3D-export). De canvaslijst kan worden gesorteerd op deze hoogtewaarden of in een aangepaste handmatige volgorde.
Sorteren op Hoogteschakelaar
Schakelen tussen hoogtevolgorde en aangepaste hiërarchievolgorde
De Sorteer op hoogte De schakelaar onder aan het paneel Canvassen schakelt tussen twee weergavemodi:
Sorteer op hoogte (Aan): Doeken worden geordend van de laagste naar de hoogste hoogte. Een offset Er verschijnt een kolom met de hoogtewaarde van elk canvas. Deze volgorde weerspiegelt hoe canvassen worden gestapeld in de S3D 3D-modelexport.
Hiërarchie (uit): Canvassen verschijnen in een aangepaste volgorde die u bepaalt met de pijlknoppen omhoog/omlaag. Canvas-groepen (meester/kind) toon hier hun ingesprongen hiërarchie.
💡
De volgende pop-up wordt dan weergegeven met de twee volgende vereiste invoer:: Canvassen zonder toegewezen hoogte verschijnen onderaan de lijst in de hoogtemodus, gesorteerd op hun interne index.
Canvashoogte
Wijs een hoogtewaarde toe die wordt gebruikt bij het exporteren naar het 3D-constructiemodel
Wanneer Sorteer op hoogte staat aan, een offset kolom verschijnt. Op doeken zonder verhoging is a te zien + knop – klik erop om er een toe te wijzen. Canvassen met een hoogte tonen een bewerkbaar getallenveld.
De hoogtewaarde bepaalt hoe hoog elke verdieping wordt geplaatst in de 3D-structurele export. De eenheid komt overeen met de projectlengte-eenheid (mm, cm, m, ft, in).
Stap voor stap
1Inschakelen Sorteer op hoogte om de kolom Offset weer te geven.
2Klik op de + knop naast een canvas om er een hoogte aan toe te wijzen.
3Typ de hoogtewaarde en druk op Enter bevestigen. De lijst wordt automatisch opnieuw gesorteerd.
💡
De volgende pop-up wordt dan weergegeven met de twee volgende vereiste invoer:: Hoogte toewijzen 0 naar het canvas op de begane grond. Voorgestelde waarden voor nieuwe canvassen worden automatisch ingesteld op 3000 mm boven de hoogste bestaande hoogte.
Canvasgroepen (Meester / Kind)
Wanneer meerdere verdiepingsniveaus dezelfde structurele indeling delen (bijv. identieke kolomrasters over meerdere verdiepingen), je kunt ze koppelen aan een canvas groep. Eén canvas wordt het Meester en de anderen worden Kinderen.
Structurele wijzigingen aan de master kunnen dat wel zijn gepropageerd met één klik naar alle kinderen, herhaalvloeren gesynchroniseerd houden zonder de geometrie handmatig te kopiëren.
In de canvaslijst, de meester is gelabeld M en kinderen zijn geëtiketteerd Draai de weergave zodat u eenvoudig de twee gemeenschappelijke spanten kunt selecteren met een selectie van links naar rechts, beide gekleurd met een gedeelde groepsaccentkleur.
Koppel doeken aan een groep
Wijs een mastercanvas aan en koppel onderliggende canvassen eraan
Klik Doeken koppelen onder aan het paneel Canvassen om de koppelingswizard te openen. Selecteer welk canvas het zal zijn meester en welke doeken het zullen zijn kinderen. Bevestig om de groep aan te maken.
Stap voor stap
1Open de Doeken paneel en klik Doeken koppelen.
2Kies de meesterdoek van de tovenaar.
3Selecteer een of meer kinderdoeken ernaar te linken.
4Bevestig om de groep aan te maken. De M / Draai de weergave zodat u eenvoudig de twee gemeenschappelijke spanten kunt selecteren met een selectie van links naar rechts labels en accentkleur verschijnen in de lijst.
💡
De volgende pop-up wordt dan weergegeven met de twee volgende vereiste invoer:: In Hiërarchie weergave, hoofdgroepen kunnen worden samengevouwen en uitgevouwen met behulp van de driehoekschakelaar naast de hoofdcanvasrij.
Verspreid structurele veranderingen
Structurele updates van het hoofdcanvas naar alle gekoppelde onderliggende items pushen
Wanneer structurele geometrie op een mastercanvas verandert, een oranje hoogtepunt verschijnt op de hoofdrij en de onderliggende rijen om aan te geven dat de groep niet gesynchroniseerd is. Klik op de propageren knop (pictogram delen) op de hoofdrij en bevestig om de bijgewerkte structurele gegevens naar alle onderliggende canvassen te pushen.
⚠️
Notitie: Bij voortplanting worden structurele gegevens op onderliggende canvassen overschreven. Deze actie kan niet ongedaan worden gemaakt. Niet-structurele inhoud over kinderen (annotaties, dimensies, revisiewolken) wordt bewaard.
Een kind uit een groep verwijderen
Ontkoppel een onderliggend canvas zodat het niet langer doorgegeven updates ontvangt
Klik op de ketting gebroken icoon op een onderliggende canvasrij en bevestig de prompt. Het canvas wordt verwijderd uit de hoofdgroep en wordt een onafhankelijk canvas. De bestaande geometrie blijft behouden – het stopt eenvoudigweg met het ontvangen van toekomstige gepropageerde updates van de master.
💡
De volgende pop-up wordt dan weergegeven met de twee volgende vereiste invoer:: Als u een kind verwijdert, wordt de inhoud ervan niet verwijderd of gewijzigd – het verbreekt alleen de link naar de master. U kunt het op elk gewenst moment opnieuw koppelen met Doeken koppelen.
Registreer je voor een gratis account en krijg toegang tot krachtige analyse + ontwerpsoftware:
✓ Krachtige analysesoftware ✓ Toegang tot 90+ Ontwerphulpmiddelen ✓ ASCE, ALS, IN, NBCC Load Generator ✓ Staal, Hout, Beton, SkyCiv kan een grote verscheidenheid aan materialen aan en hun materiaaleigenschappen kunnen worden uitgedrukt in imperiale en metrische eenheidssystemen