De Activiteiten groep in de rechter werkbalk bevat gereedschappen voor het bewerken van geometrieën voor bijsnijden, verlengen, splitsen, meedoen, schaalvergroting, en eigendomsmatching.
De meeste bewerkingen werken op geselecteerde geometrie. Gebruik de actieve snap instellingen voor nauwkeurige pikhouwelen en richtpunten.
Activiteiten
Operationele hulpmiddelen zijn gegroepeerd in vervolgkeuzelijsten in de rechterbalk. Klik op de categorieknop om de huidige tool te activeren, of open de miniwerkbalk om een ander gereedschap in dezelfde stapel te kiezen.
Match eigenschappen
Kopieer stijl- en attribuuteigenschappen van het ene object naar het andere
De Match eigenschappen De opdracht past eigenschappen van een bronobject toe op compatibele doelobjecten.
Stap voor stap
- 1Selecteer een bronobject waarvan u de eigenschappen wilt kopiëren.
- 2Klik Match eigenschappen om de penseelmodus te activeren.
- 3Klik op compatibele doelelementen om eigenschappen direct toe te passen.
- 4Ga door met klikken, of gebruik hek- of raamselectie voor meerdere doelen.
- 5druk op Esc om de penseelmodus te verlaten.
De volgende pop-up wordt dan weergegeven met de twee volgende vereiste invoer:: Match Properties kopieert visuele eigenschappen zoals kleur, lijn gewicht, lijnstijl, en laag. Alleen eigenschappen die compatibel zijn met het doelobjecttype worden toegepast.
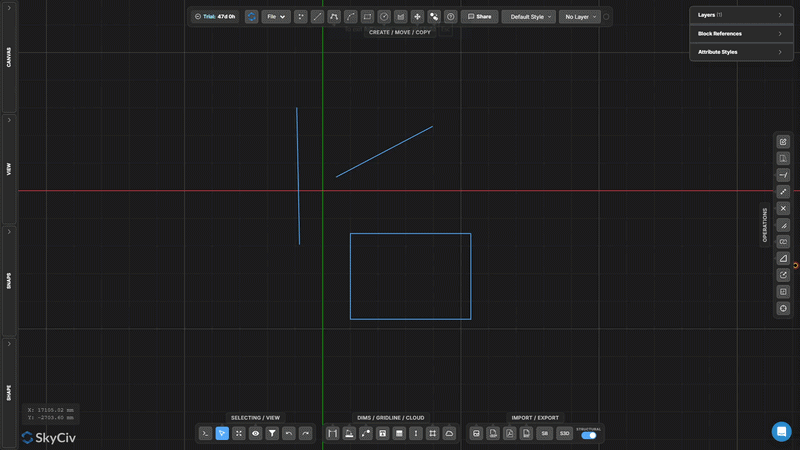
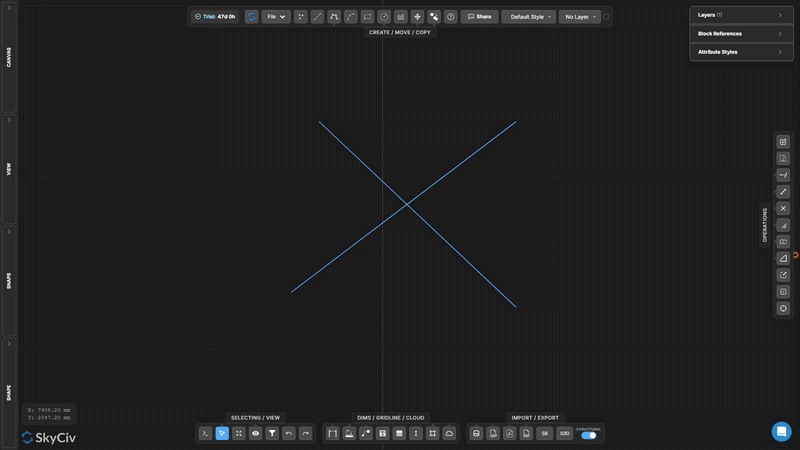
Strek
Verplaats geselecteerde hoekpunten met behulp van een kruisvenster of lasso
Strek verplaatst hoekpunten terwijl de topologie rond verbonden geometrie behouden blijft.
[__INSERT_IMAGE__]
Stap voor stap
- 1Activeren Strek.
- 2Selecteer hoekpunten met een van rechts naar links kruisend venster of lasso.
- 3Versleep de middelste handgreep voor een vrije beweging, of de X/Y-handvatten voor een beperkte beweging.
De volgende pop-up wordt dan weergegeven met de twee volgende vereiste invoer:: Alleen de hoekpunten binnen de kruisende selectie worden verplaatst; lijnen die zijn verbonden met die hoekpunten buiten de selectie worden uitgerekt om de connectiviteit te behouden.
Lijn verlengen
Verleng een lijn totdat deze een doellijn of -punt raakt
Lijn verlengen verlengt een geselecteerde lijn om aan een doelgrens te voldoen. De lijn wordt in de bestaande richting verlengd totdat deze het gekozen doel kruist.
Stap voor stap
- 1Activeren Lijn verlengen.
- 2Klik op de lijn die u wilt verlengen (tegen het einde wil je groeien).
- 3Klik op de doellijn of het punt waarnaar u wilt uitbreiden.
De volgende pop-up wordt dan weergegeven met de twee volgende vereiste invoer:: Klik aan het einde van de regel die u wilt verlengen – het gereedschap strekt zich uit vanaf het dichtstbijzijnde eindpunt in de richting van het doel.
Trimmen
Verwijder lijn- of boogsegmenten die worden gedefinieerd door snijranden
Trimmen verwijdert delen van lijnen of bogen met andere geometrie als snijranden. Selecteer eerst de snijkanten, bevestig ze, klik of markeer vervolgens de segmenten die u wilt verwijderen.
Stap voor stap
- 1Activeren Trimmen.
- 2Selecteer de snijkantgeometrie (lijnen, bogen, cirkels).
- 3druk op Enter of Spatiebalk om snijkanten te bevestigen.
- 4Klik of hek de segmenten om te verwijderen.
De volgende pop-up wordt dan weergegeven met de twee volgende vereiste invoer:: U kunt een raam- of hekselectie gebruiken om meerdere segmenten tegelijk te trimmen nadat u de snijkanten hebt bevestigd.
Splits de lijn in segmenten
Verdeel een lijn in N gelijke segmenten
Splits de lijn in segmenten verdeelt een enkele lijn in een opgegeven aantal segmenten van gelijke lengte. Elk resulterend segment is een onafhankelijk lijnelement.
Stap voor stap
- 1Activeer het gereedschap.
- 2Klik op de lijn die u wilt splitsen.
- 3Voer het aantal divisies in en druk op Enter.
De volgende pop-up wordt dan weergegeven met de twee volgende vereiste invoer:: Handig voor het maken van op gelijke afstanden geplaatste steunpunten langs een balk of voor het verdelen van een overspanning voor analyse van de belastingverdeling.
Lijn op interval splitsen
Splits een lijn in herhaalde intervallen van vaste lengte
Lijn op interval splitsen verdeelt een lijn in segmenten van een bepaalde vaste lengte. Aan het einde wordt een restsegment gemaakt als de lijnlengte geen geheel veelvoud is van het interval.
Stap voor stap
- 1Activeer het gereedschap.
- 2Klik op de lijn die u wilt splitsen.
- 3Voer de intervallengte in en druk op Enter.
De volgende pop-up wordt dan weergegeven met de twee volgende vereiste invoer:: Gebruik dit voor het maken van gelijkmatig verdeelde tussenknooppunten langs een doorlopend element op een bekende afstand (bijv., elke 500 mm voor de indeling van de balken).
Gesplitst op positie langs lijn
Splits een lijn op een verschoven afstand van een van de eindpunten
Gesplitst op positie voegt een breekpunt in op een gemeten afstand van het ene uiteinde van de geselecteerde lijn, het creëren van twee afzonderlijke segmenten op die offsetpositie.
Stap voor stap
- 1Activeer het gereedschap.
- 2Klik op een lijn (de klikpositie bepaalt vanaf welk eindpunt moet worden gemeten).
- 3Voer de offsetafstand in en druk op Enter.
De volgende pop-up wordt dan weergegeven met de twee volgende vereiste invoer:: Klik in de buurt van het eindpunt waarvan u wilt meten – het gereedschap gebruikt het dichtstbijzijnde eindpunt als referentie voor de offsetafstand.
Gesplitste lijnen op kruispunten
Splits automatisch alle geselecteerde lijnen op kruispunten
Gesplitste lijnen op kruispunten vindt alle punten waar geselecteerde lijnen elkaar kruisen en voegt gesplitste knooppunten in op elk kruispunt. Er zijn geen invoerwaarden vereist – de bediening is volledig automatisch.
Stap voor stap
- 1Selecteer de regels die u wilt verwerken.
- 2Klik Gesplitste lijnen op kruispunten.
- 3Alle kruispunten worden automatisch gedetecteerd en gesplitst.
De volgende pop-up wordt dan weergegeven met de twee volgende vereiste invoer:: Voer dit uit voordat u het gebruikt Gezamenlijke selectie of het uitvoeren van topologie-afhankelijke bewerkingen – het zorgt ervoor dat kruisende lijnen daadwerkelijke knooppuntpunten delen.
Gesplitst doel
Splits vooraf geselecteerde doelobjecten met behulp van afzonderlijke splittergeometrie
Gesplitst doel is een splitsing in twee fasen, waarbij u eerst de te splitsen objecten markeert (doelen), selecteer vervolgens afzonderlijk de geometrie waarmee u ze wilt splitsen (splitters). Alleen doelobjecten worden gesneden.
[__INSERT_IMAGE__]
Stap voor stap
- 1Selecteer vooraf de doelobjecten die u wilt splitsen.
- 2Activeren Gesplitst doel.
- 3Selecteer de splittergeometrie.
- 4druk op Enter om doelen op kruispunten te splitsen met splitters.
De volgende pop-up wordt dan weergegeven met de twee volgende vereiste invoer:: Gebruik Split Target als u specifieke lijnen met een snijrand wilt splitsen, maar de snijgeometrie intact wilt houden (in tegenstelling tot Trim, wat ook de snijder wijzigt).
Splitsen bij overlappingen
Detecteer en scheid overlappende collineaire lijnsegmenten
Splitsen bij overlappingen vindt segmenten van geselecteerde lijnen die collineair zijn en elkaar overlappen, splitst ze vervolgens zodat de overlappende gebieden discreet worden, individueel selecteerbare geometrie.
[__INSERT_IMAGE__]
Stap voor stap
- 1Selecteer lijnen die overlappende collineaire gedeelten kunnen hebben.
- 2Klik Splitsen bij overlappingen.
- 3Overlappende gebieden worden opgesplitst in afzonderlijke segmenten.
De volgende pop-up wordt dan weergegeven met de twee volgende vereiste invoer:: Combineer met Selecteer Duplicaten om overtollige overlappende lijnen in geïmporteerde DXF-bestanden te identificeren en te verwijderen.
Polylijn exploderen
Verdeel een polylijn in onafhankelijke lijn- of boogsegmenten
Polylijn exploderen ontleedt een polylijn met meerdere segmenten in afzonderlijke, onafhankelijke segmenten. Handig als u moet bewerken, verwijderen, of pas bewerkingen toe op slechts een deel van een polylijn.
[__INSERT_IMAGE__]
Stap voor stap
- 1Selecteer de polylijn die u wilt exploderen.
- 2Klik Polylijn exploderen.
- 3Elk segment wordt individueel selecteerbaar en bewerkbaar.
De volgende pop-up wordt dan weergegeven met de twee volgende vereiste invoer:: De omgekeerde werking is Sluit lijnen en bogen aan, die verbonden segmenten weer samenvoegt tot één enkele polylijn.
Sluit lijnen en bogen aan
Voeg verbonden lijnen en bogen samen tot één polylijn
Sluit lijnen en bogen aan combineert een keten van verbonden segmenten tot één doorlopend polylijnobject. Lijnen en bogen moeten eindpunten delen om te kunnen worden verbonden.
Stap voor stap
- 1Selecteer lijnen en bogen die eindpunten delen.
- 2Klik Sluit lijnen en bogen aan.
- 3Verbonden segmenten worden samengevoegd tot één doorlopende polylijn.
De volgende pop-up wordt dan weergegeven met de twee volgende vereiste invoer:: Alle geselecteerde segmenten moeten één doorlopende keten vormen. Als segmenten gaten hebben, gebruik Uitlijnen op lijnuiteinden en eerst het gereedschap Punt verplaatsen om de eindpunten te sluiten.
Filet maken
Rond een scherpe hoek tussen twee lijnen met een boog
Filet maken vervangt een scherpe hoek tussen twee lijnen door een raakboog met een opgegeven straal. De oorspronkelijke lijnuiteinden zijn bijgesneden om plaats te bieden aan de boog.
Stap voor stap
- 1Activeren Filet maken.
- 2Stel de afrondingsradius in het dialoogvenster in.
- 3Klik op de hoek (kruispunt gebied) van de twee regels die moeten worden toegepast.
De volgende pop-up wordt dan weergegeven met de twee volgende vereiste invoer:: De straal moet klein genoeg zijn om binnen de lengtes van beide lijnen vanaf de hoek te passen. Er wordt een live voorbeeld getoond voordat u bevestigt.
Afschuining maken
Maak een rechte schuine snede in een hoek
Afschuining maken snijdt een rechte diagonale afschuining over een hoek tussen twee lijnen. Stel de afschuiningsafstand in om te bepalen hoe ver vanaf de hoek elke lijn wordt afgesneden.
Stap voor stap
- 1Activeren Afschuining maken.
- 2Stel de afschuiningsafstand in het dialoogvenster in.
- 3Klik op de hoekgeometrie om de afschuining toe te passen.
De volgende pop-up wordt dan weergegeven met de twee volgende vereiste invoer:: Afschuining snijdt standaard gelijkmatig vanaf beide lijnen. Voor een asymmetrische afschuining (verschillende afstanden aan elke kant), stel twee afzonderlijke afschuiningswaarden in het dialoogvenster in.
Objecten schalen
Schaal de geselecteerde geometrie met een factor vanaf een draaipunt
Objecten schalen wijzigt de grootte van de geselecteerde geometrie met een uniforme schaalfactor ten opzichte van een gekozen draaipunt. In een dialoogvenster kunt u kiezen of u annotaties wilt toevoegen (dimensies, tekst, leiders, rasterlijnen, tafels) zijn ook geschaald.
Stap voor stap
- 1Selecteer de objecten die u wilt schalen.
- 2Klik Objecten schalen en configureer de annotatieschaalopties in het dialoogvenster.
- 3Klik op het canvas om het schaaldraaipunt in te stellen (oorsprong) punt.
- 4Typ de schaalfactor en druk op Enter (1.0 = geen verandering, 0.5 = de helft, 2.0 = dubbel).
De volgende pop-up wordt dan weergegeven met de twee volgende vereiste invoer:: Gebruik het dialoogvenster Schaalopties om te bepalen of de annotatiegrootte mag worden aangepast (dimensies, tekst, leiders, tafels) schalen met de geometrie of blijven op hun huidige grootte.
Schaalframe
Creëer een persistente lokale schaalzone met een zichtbaar kader
Schaalframe creëert een blijvende rechthoekige zone met een bijbehorende schaalfactor. Geometrie die in het frame is getekend of geplaatst, wordt op die lokale schaal weergegeven. Handig voor detailbijschriften op een andere tekenschaal.
[__INSERT_IMAGE__]
Stap voor stap
- 1Activeren Schaalframe.
- 2Klik op de eerste hoek, vervolgens de tegenoverliggende hoek om het frame te definiëren.
- 3Typ de schaalfactor in de invoer en druk op Esc solliciteren.
De volgende pop-up wordt dan weergegeven met de twee volgende vereiste invoer:: Het frame blijft na creatie op het canvas staan. Selecteer en verwijder het wanneer het niet langer nodig is. De schaalinvoer blijft beschikbaar voor latere bewerking terwijl het frame is geselecteerd.
Herkomst bijwerken
Verplaats de oorsprong van de tekeningcoördinaat (0,0) naar een nieuwe locatie
Herkomst bijwerken verplaatst het referentiecoördinatensysteem van de tekening. Alle coördinaatwaarden (X, EN) die op het canvas worden weergegeven en in de gegevens worden geëxporteerd, worden opnieuw berekend ten opzichte van de nieuwe oorsprong.
[__INSERT_IMAGE__]
Stap voor stap
- 1Activeren Herkomst bijwerken.
- 2Klik op de nieuwe oorsprongslocatie op het canvas.
- 3Coördineer de update van de uitlezingen onmiddellijk ten opzichte van de nieuwe (0,0) punt.
De volgende pop-up wordt dan weergegeven met de twee volgende vereiste invoer:: Klik op een bestaand knooppunt voor een precieze nieuwe oorsprong. Voor constructietekeningen, snap naar een bekend kolom- of datumkruispunt om de coördinaten uit te lijnen met het projectreferentieraster.
Ontgrendel uw
gratis Account
Registreer je voor een gratis account en krijg toegang tot krachtige analyse + ontwerpsoftware:
✓ Krachtige analysesoftware
✓ Toegang tot 90+ Ontwerphulpmiddelen
✓ ASCE, ALS, IN, NBCC Load Generator
✓ Staal, Hout, Beton, SkyCiv kan een grote verscheidenheid aan materialen aan en hun materiaaleigenschappen kunnen worden uitgedrukt in imperiale en metrische eenheidssystemen