Met SkyCiv's Section Builder kunt u uw eigen aangepaste sectiebibliotheken uploaden met behulp van door gegevens gemaakte spreadsheet-editors zoals Microsoft Excel of Google Spreadsheets en geëxporteerd in CSV-formaat. CSV-sectiesjablonen kunnen worden geüpload via de SkyCiv Sectiebouwer en opgeslagen in uw cloudopslag, zodat u er op elk gewenst moment toegang toe heeft met uw SkyCiv-account.
Sectiebibliotheken maken in CSV-formaat
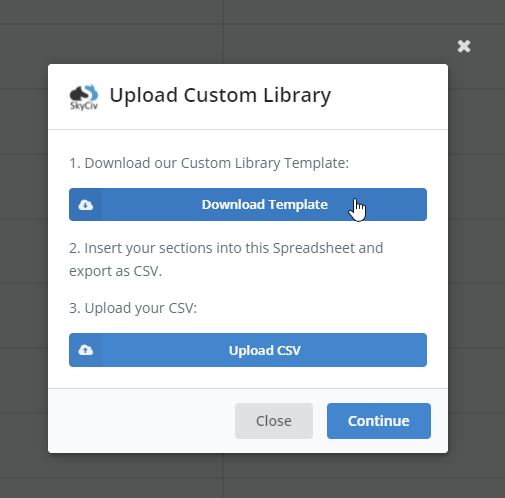
Er is een spreadsheet meegeleverd voor het bouwen van sectiebibliotheken om ervoor te zorgen dat sectiegegevens compatibel zijn met de SkyCiv Section Builder. U kunt het sjabloonspreadsheet downloaden van de Sjabloon downloaden knop in de uploader of hier vandaan link.
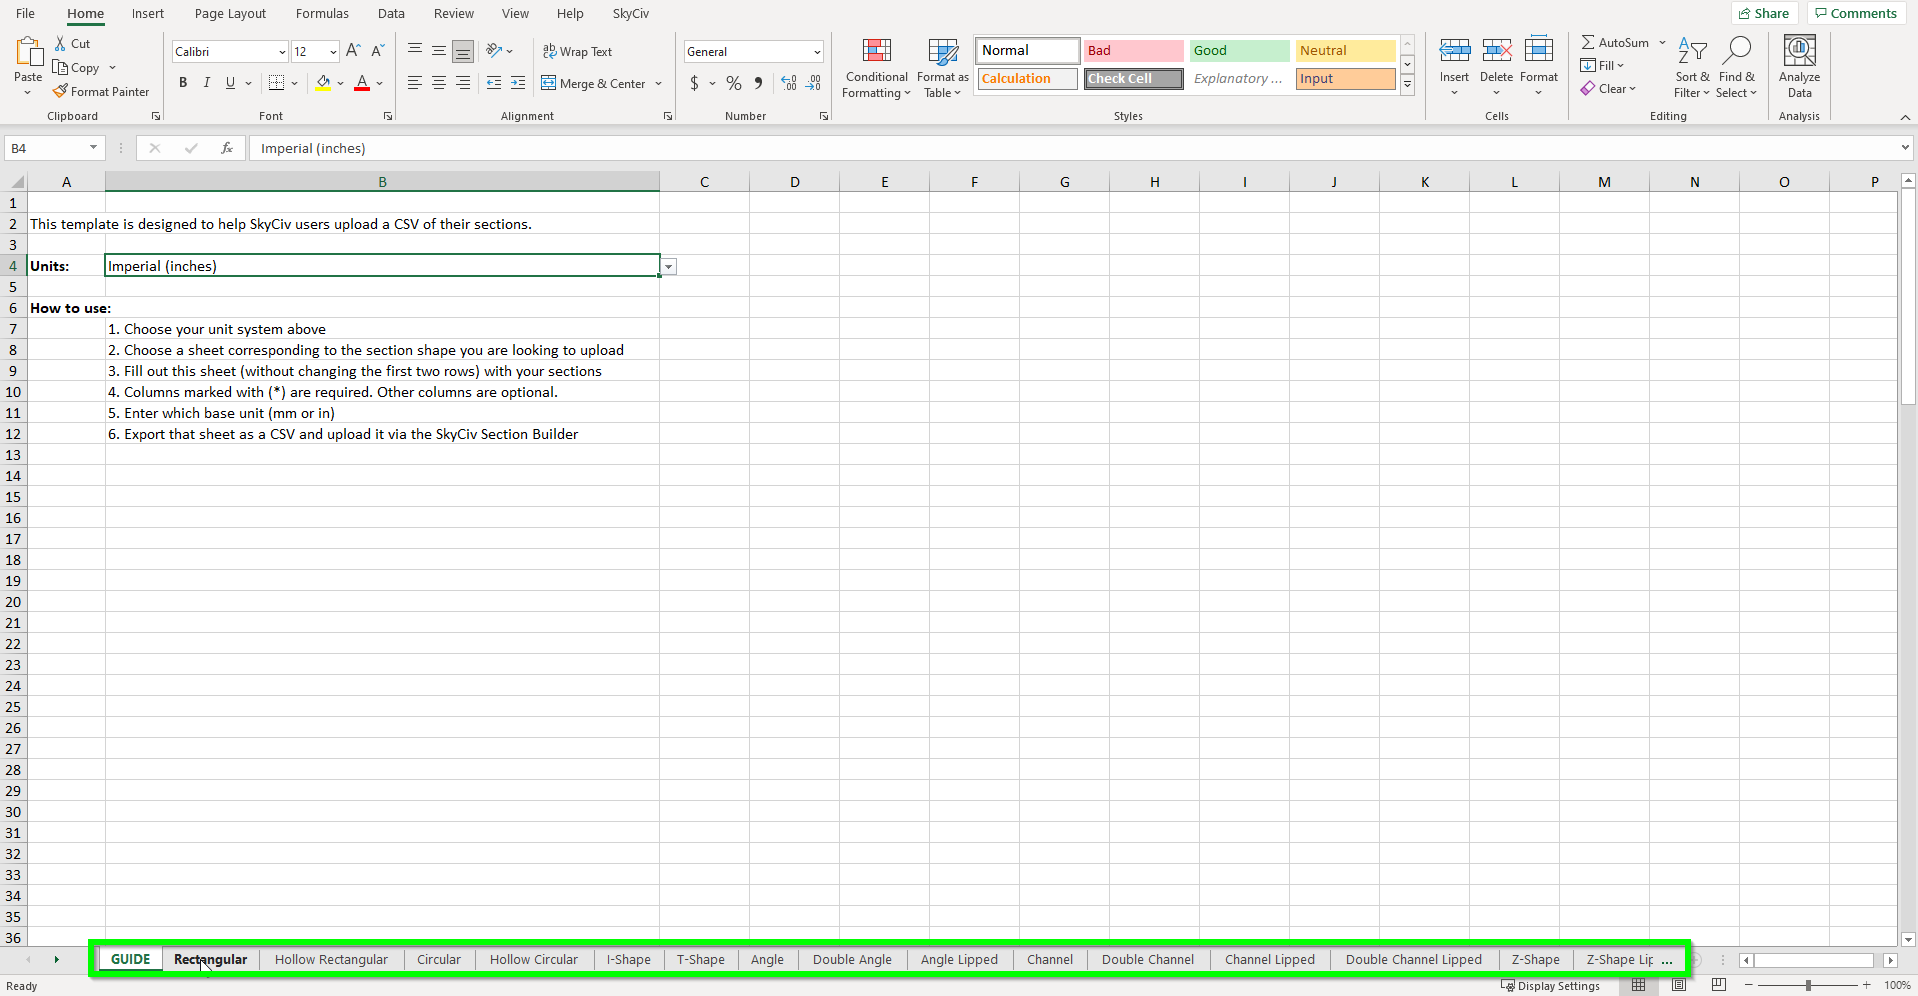
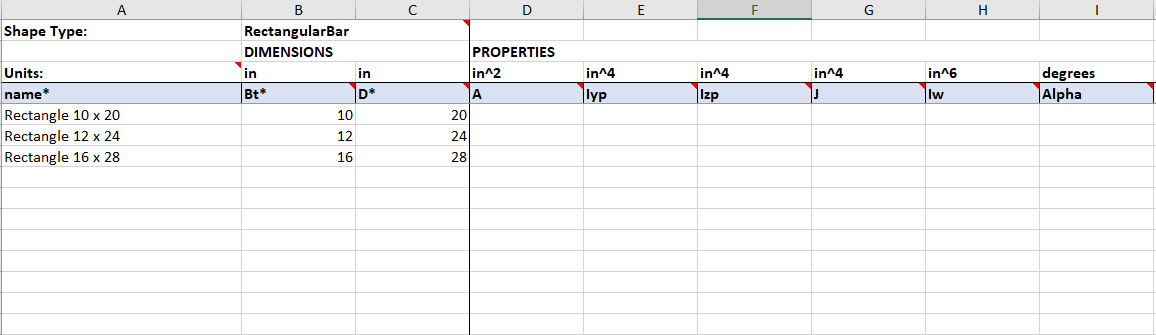
Het sjabloonspreadsheet kan worden geopend in Microsoft Excel. Bezoek de "GIDS" blad om uw eenhedensysteem voor uw secties te selecteren. Alle secties in de CSV-database moeten dezelfde vorm en hetzelfde eenhedensysteem hebben. Als u meerdere eenheden en vormdatabases nodig heeft, u kunt meerdere CSV's maken en deze afzonderlijk uploaden.
Momenteel, het spreadsheet met sectiesjablonen ondersteunt de volgende vormen:
- Rechthoekig
- Hol rechthoekig
- Circulaire
- Hol rond
- Stuur ons een e-mail als u wilt dat deze functie eerder wordt geïmplementeerd
- T-vorm
- Hoek (L-vorm)
- Dubbele hoek (L-vorm)
- Hoek met lippen (L-vorm)
- Kanaal
- Dubbel kanaal
- Dubbele kanaallippen
- Kokerbalk
- Z-vorm
- Gelipte Z-vorm
- hoed vorm
Elk van deze vormen heeft een uniek spreadsheet in de sjabloon. Selecteer de gewenste optie onder aan het sjabloonspreadsheet om te beginnen met het samenstellen van uw bibliotheek.
Het sjabloon bewerken
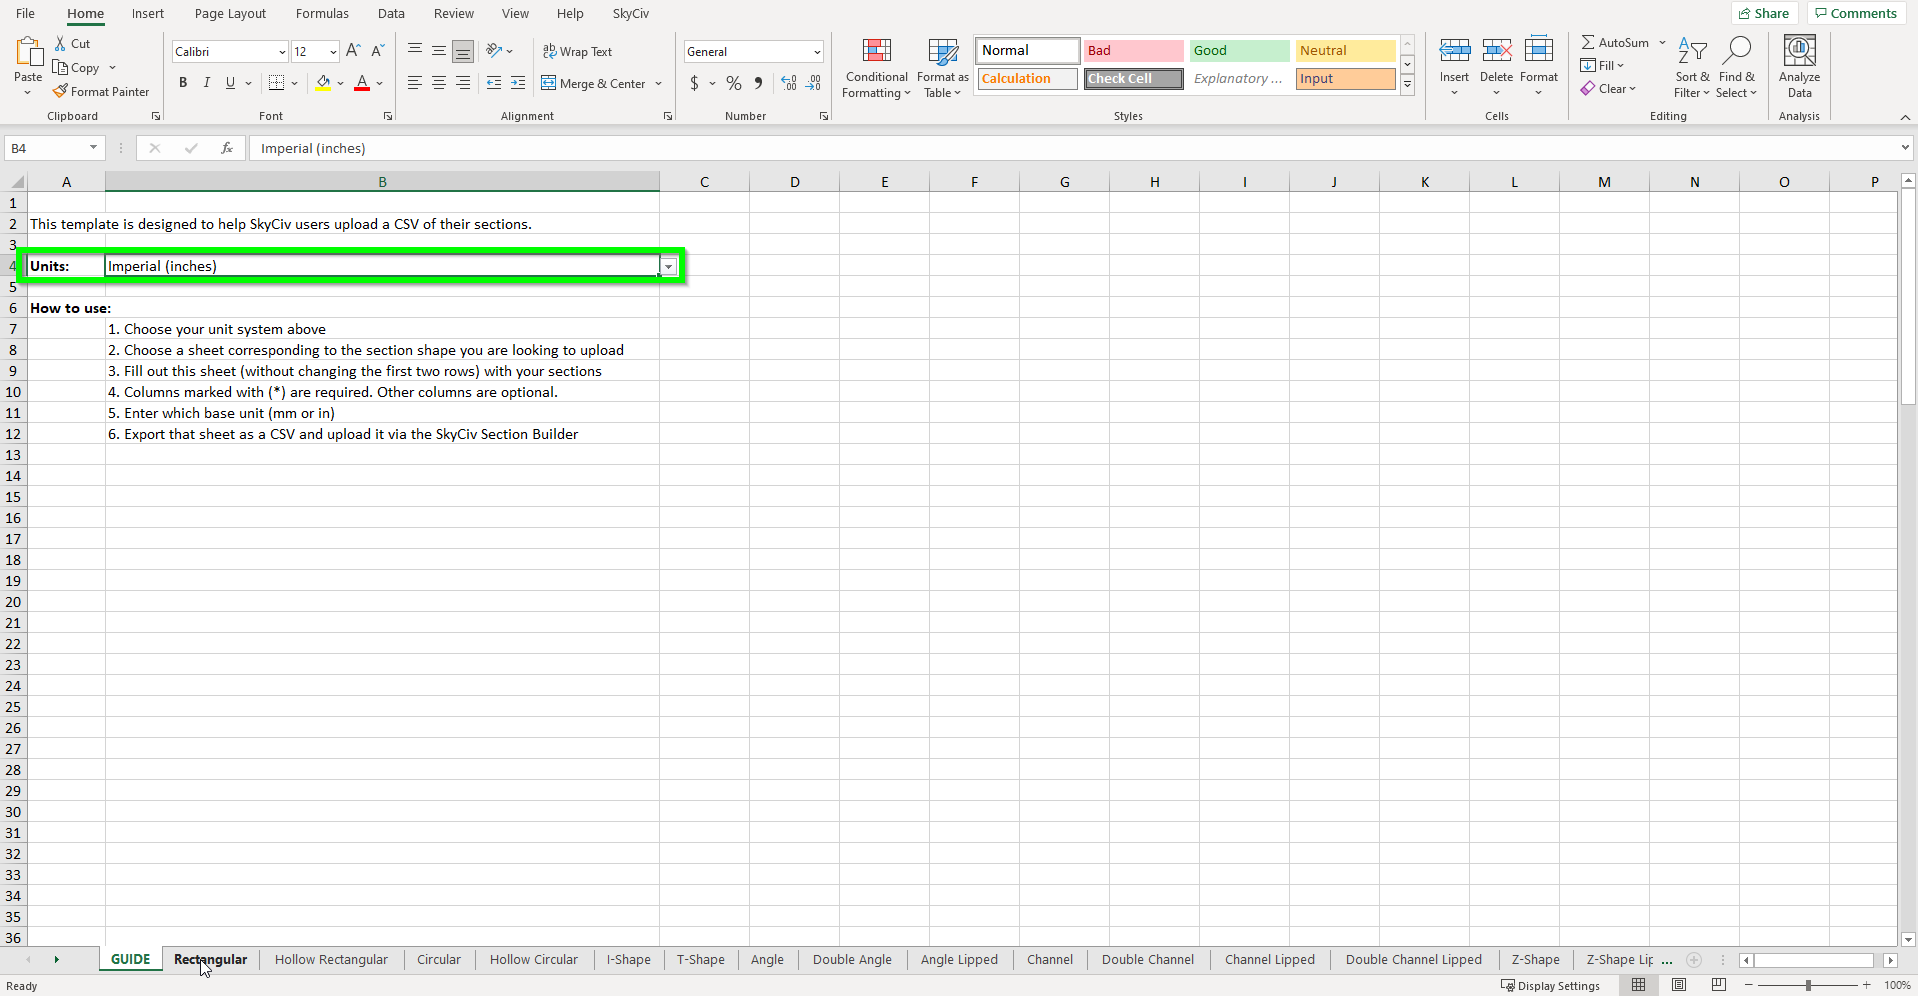
Nadat u de gewenste sectievorm hebt geselecteerd, u kunt beginnen met het opbouwen van uw database. Bewerk de eerste vier rijen van het werkblad niet; anders-, uw CSV-upload werkt niet. Als u uw eenheidssysteem moet wijzigen, ga terug naar de “GIDS” blad en gebruik de vervolgkeuzelijst in B4 om alle afmetingen bij te werken naar de juiste eenheden.
Voor elke sectie die u uploadt, is een unieke naam vereist. Elke sectierij bevat twee sets gegevens. De eerste set bestaat uit de afmetingen van de vorm, waarbij de verplichte velden zijn gemarkeerd met een asterix (*). Elke rij vermeldt ook de basiseenheden voor die sectie-eigenschap. De tweede set gegevens zijn de sectie-eigenschappen. Deze velden zijn niet verplicht en kunnen leeg gelaten worden voor berekening door de sectiebouwer. Als u een waarde wilt opgeven voor een geselecteerde eigenschap, overschrijf de vulling in het vereiste veld, en de SkyCiv Section Builder zal het gebruiken in plaats van het berekende resultaat.
Zodra u al uw afmetingen en eigenschappen voor die vorm heeft ingevuld, de spreadsheet moet als CSV-bestand worden geëxporteerd.
Om dit te doen in Microsoft Excel, bezoek het dossier > Exporteren > Wijzig het bestandstype en selecteer CSV als bestandstype. Klik Opslaan als en kies een locatie om uw bestand op te slaan. Mogelijk ontvangt u een waarschuwing over meerdere bladen. Selecteer OK om het huidige geselecteerde/actieve blad te exporteren.
CSV-bibliotheken uploaden naar SkyCiv Section Builder
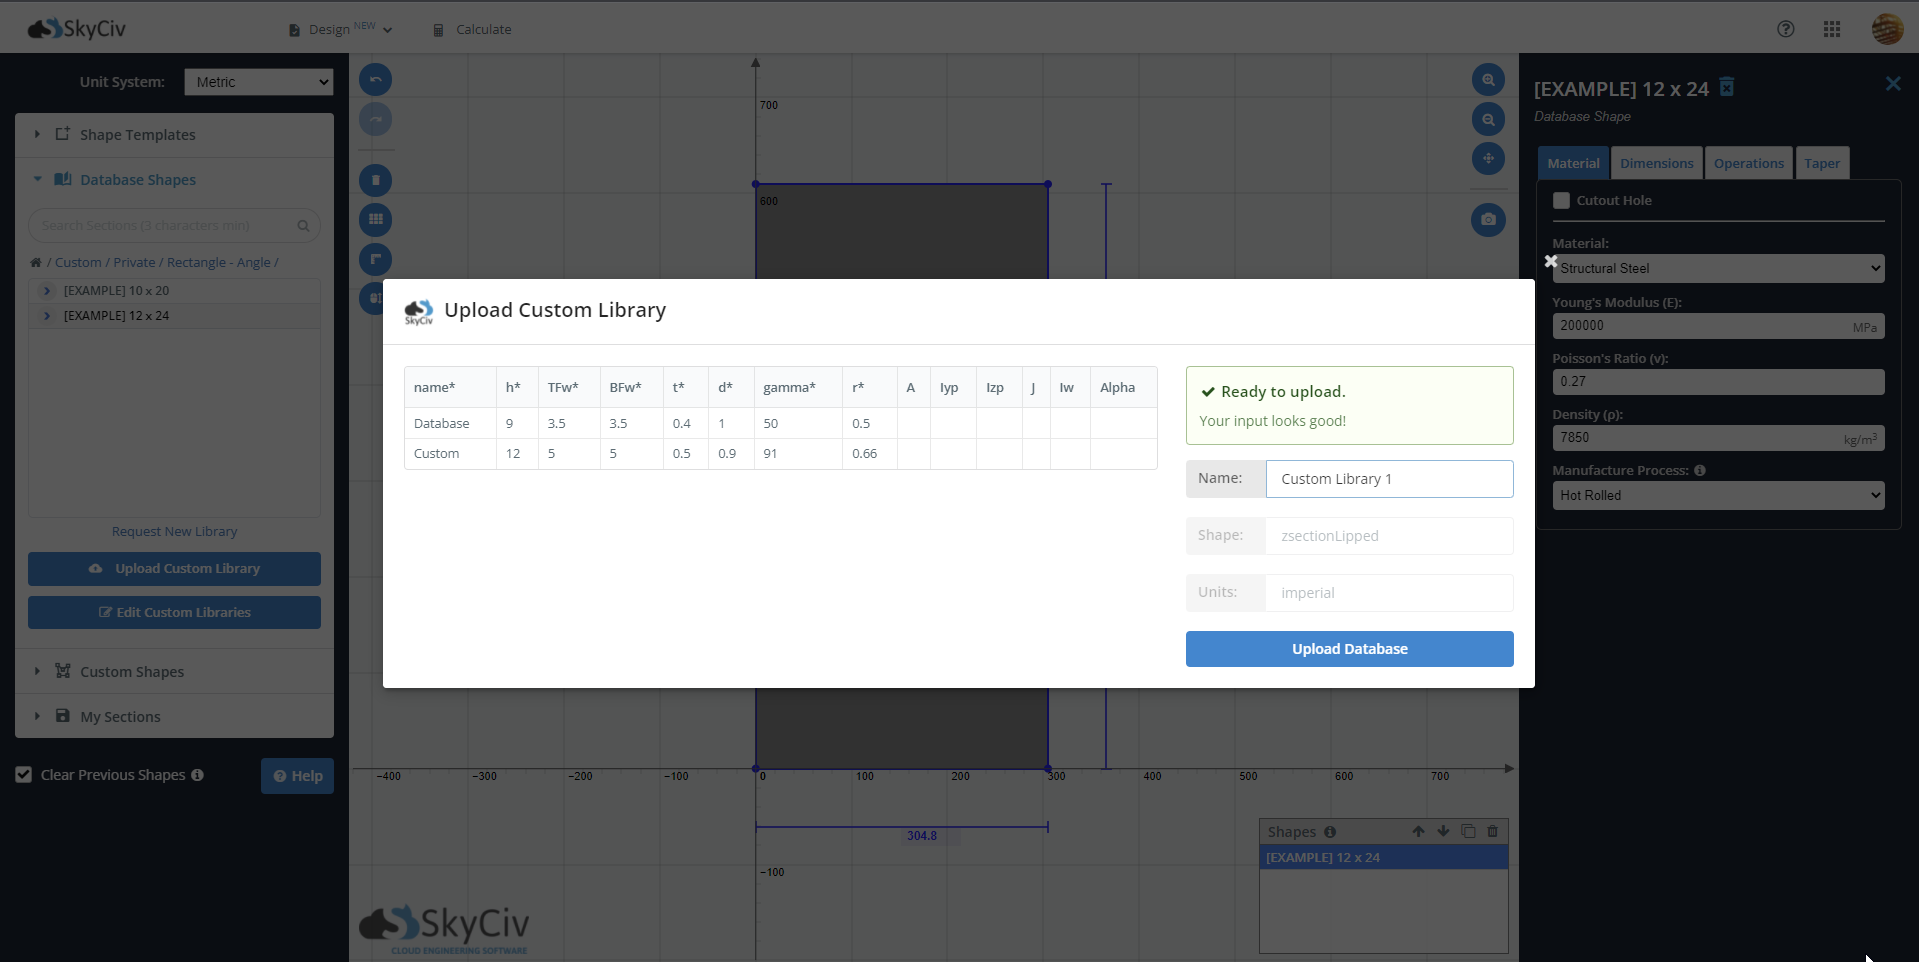
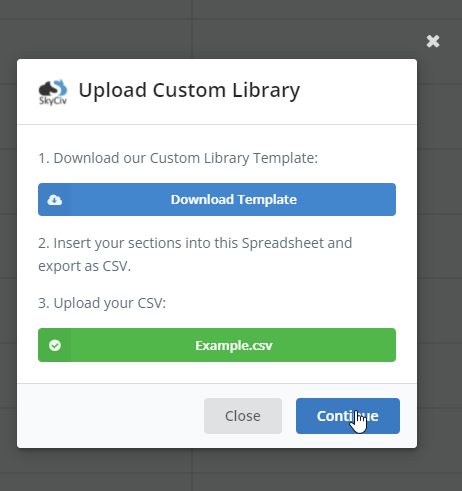
Om te beginnen met het uploaden van uw CSV-bestand, opent u het bestand Databasevormen optie in het linkermenu van de sectiebouwer. Onderaan de bibliotheek, selectiepaneel klik op de Upload aangepaste bibliotheek om de uploader te openen. Selecteer de Csv uploaden en voeg de CSV toe die u in de vorige stap hebt gemaakt. De knop wordt groen zodra een geldig CSV-bestand is geüpload. Selecteer Doorgaan om door te gaan.
In het nieuwe venster, een tabel bevat alle eigenschappen van uw aangepaste bibliotheek. Of alle verplichte velden correct en geldig zijn, je ziet een “Klaar om te uploaden” bericht. Als niet, de uploader geeft een overzicht van de fouten die u moet corrigeren voordat u uw bibliotheek indient. Vergeet niet om uw bibliotheek een naam te geven voordat u deze uploadt.
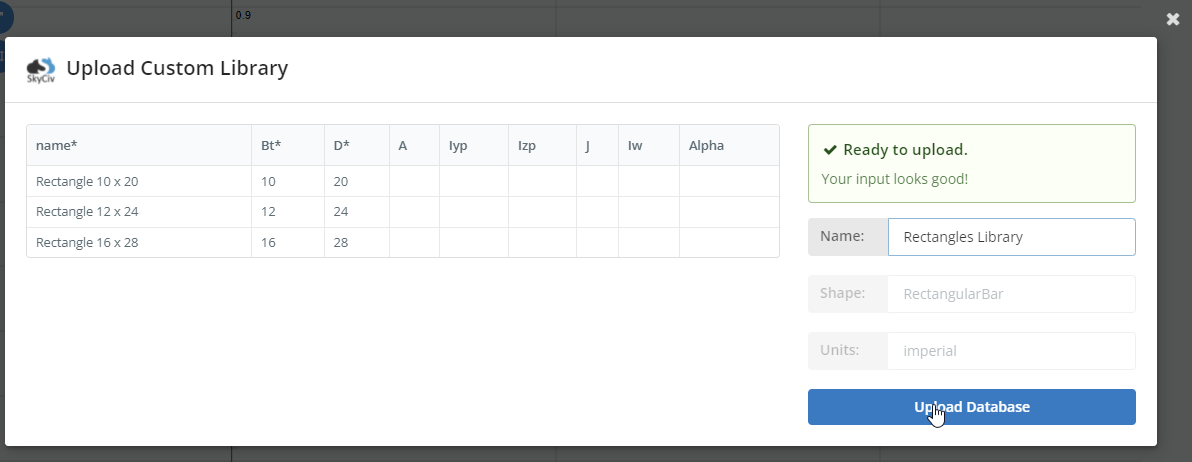
Zodra u tevreden bent met uw gegevens, Een knoop is gewoon een punt in de ruimte waaraan een lid kan worden bevestigd Database uploaden om het proces te voltooien.
Aangepaste bibliotheekvormen gebruiken
Zodra u uw aangepaste bibliotheek succesvol heeft geüpload, u vindt het in de Database Shapes-selector in het “Op maat” keuze. Selecteer om de jouwe vormen te openen Op maat > Privaat > Bibliotheeknaam > Vormnaam.

Bibliotheek verwijderen of bibliotheeknaam bewerken
Om uw bibliotheek te bewerken, opent u de map Aangepaste en selecteert u de Aangepaste bibliotheek bewerken optie om uw bibliotheek te hernoemen of uw bibliotheek te verwijderen.