Integratie tussen SkyCiv Structural 3D en Load Generator helpt de kloof tussen belastingberekening en belastingtoepassing te overbruggen. Met deze integratie, gebruikers kunnen automatisch belastingen genereren in de Load Generator-module, pas ze vervolgens rechtstreeks toe op hun model in Structural 3D. Deze functionaliteit is direct geïntegreerd in Structural 3D, U hoeft dus niet vooraf naar afzonderlijke modules te gaan. Hierop volgend, SkyCiv raadt aan om de modelleringsfase van uw constructie te voltooien voordat u zich bezighoudt met Load Generator-toepassingen, omdat het de algehele nauwkeurigheid van het proces zal vergroten.
De volgende typen door code gegenereerde belastingen zijn beschikbaar om rechtstreeks op modellen in Structural 3D te worden toegepast
- Windbelastingen
- Sneeuwladingen (evenwichtige zaak)
- Seismische belastingen (als spectrale belastingen)
Voordat we op dit artikel ingaan, SkyCiv raadt ZEER aan om de softwaredocumentatie op Modelleren in structureel 3D, Oppervlakte & Windbelastingen, en bekend zijn met het gebruik van de standalone Laad generator, omdat al deze functies relevant zijn. Deze documentatie zal zich richten op de toepassing van de belastingen met behulp van de geïntegreerde versie van de Load Generator terwijl deze in Structural 3D werkt. bijgevolg, deze documentatie gaat niet dieper in op het berekenen van elke individuele belasting, omdat ze erg afhankelijk zijn van de code die u gebruikt. Zoals genoemd, ga alstublieft door gekoppeld documentatie over de Load Generator en de geldende bouwvoorschriften, voordat u dit artikel doorneemt.
Om de geïntegreerde Load Generator te gebruiken, voltooi het modelleren van uw structuur, ga dan naar Gebiedsbelasting op het linkerinvoertabblad terwijl u in Structureel 3D werkt. Vervolgens, Klik op de “Genereer automatisch belastingen op basis van ontwerpcodes…“knop.
Notitie: Hoe eenvoudiger de structuur is, hoe eenvoudiger de geïntegreerde toepassing zal zijn. Hoe complexer het model, des te minder nauwkeurig zal de toepassing van de belastingen zijn.
Windbelastingen toepassen vanuit de belastinggenerator
Op het eerste gezicht zul je merken dat de volledige stand-alone versie van de Wind Load-generator nu aan de linkerkant van het scherm staat. Gebruikers profiteren van dezelfde functionaliteit in de geïntegreerde versie als in de standalone versie. Hier kunt u bijvoorbeeld uw berekening opslaan en site- en windbelastingrapporten afdrukken. In de geïntegreerde Load Generator, het Structurele 3D-model wordt altijd aan de rechterkant van het scherm weergegeven.
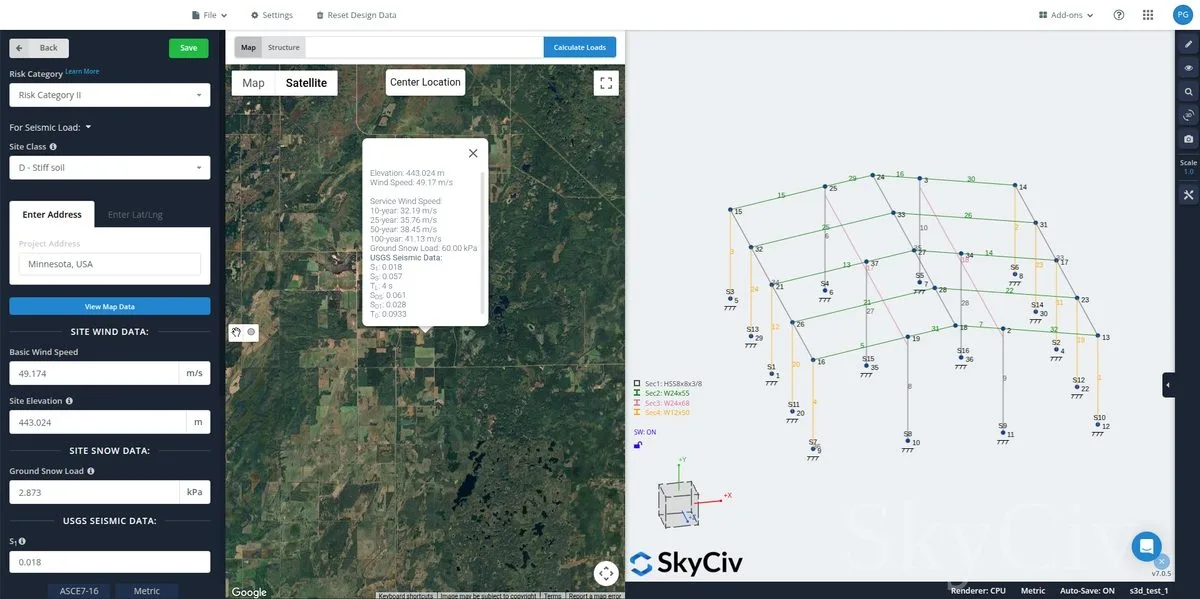
Terwijl u de invoer voor de structuurgegevens doorloopt, vooral voor gebouwen, u heeft de mogelijkheid om automatisch de afmetingen van het model te detecteren door de windoriëntatie-as te selecteren waaraan de windrichtingpijl parallel zal staan. Zodra u hiervoor een optie heeft geselecteerd, je kunt op de klikken “Detecteer afmetingen van gebouwen” knop om de gedetecteerde structuurafmetingen uit het model te vullen. Houd er rekening mee dat u deze waarden nog steeds dubbel moet controleren om er zeker van te zijn dat deze waarden correct zijn. Een optie is om afstanden in het model te meten door ertussen te klikken en te slepen 2 knooppunten.

Zodra alle belastingparameters zijn voltooid, Klik op de Ladingen genereren knop. De resultaten verschijnen op verschillende tabbladen, voor wind, sneeuw, of seismische belasting.
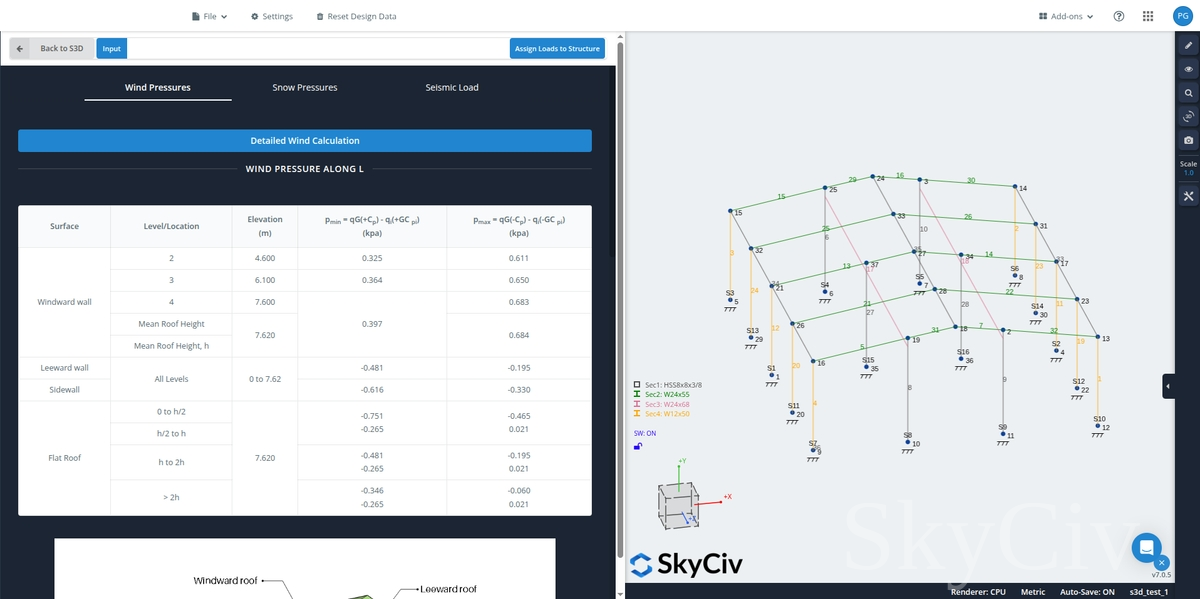

Er verschijnt een prompt waarin u wordt gevraagd of u de belastingen voor wind- en sneeuwbelastingen wilt toepassen. Voor seismische belasting, de optie is om de gegenereerde ontwerpspectra naar de spectrale belastingen van de S3D te kopiëren.
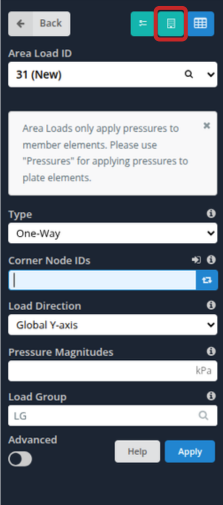
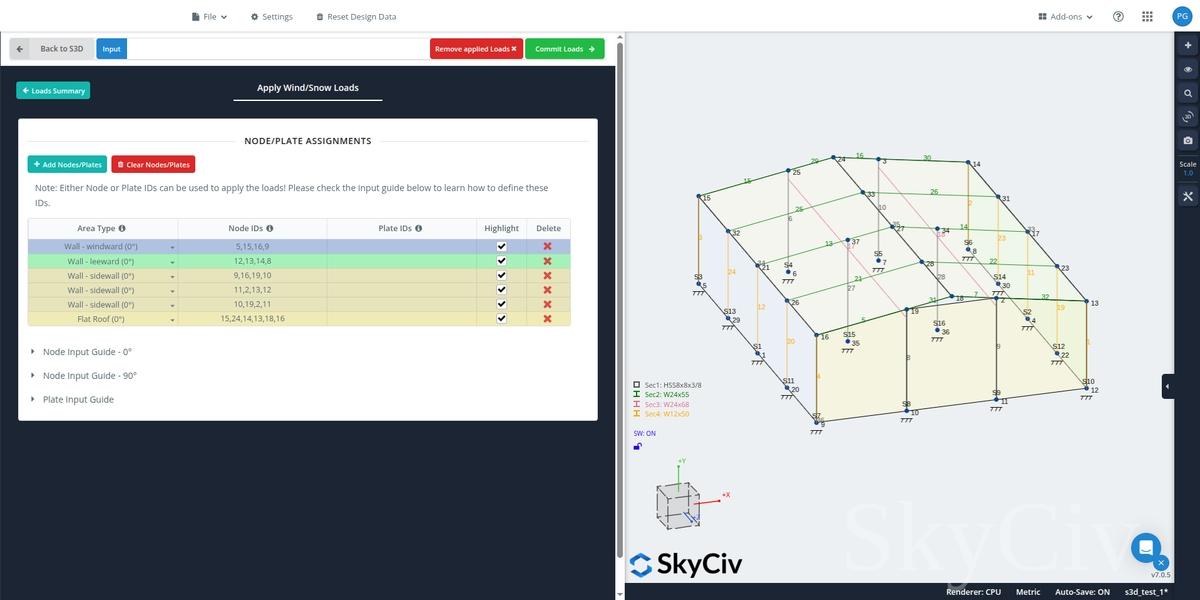
Bij het toepassen van de oppervlaktebelastingen voor wind- en sneeuwbelastingen, de knooppuntinvoergids voor een specifiek gebiedstype moet worden gevolgd om de druk correct toe te passen. Deze handleidingen worden onderaan de knooppuntinvoertabel weergegeven.
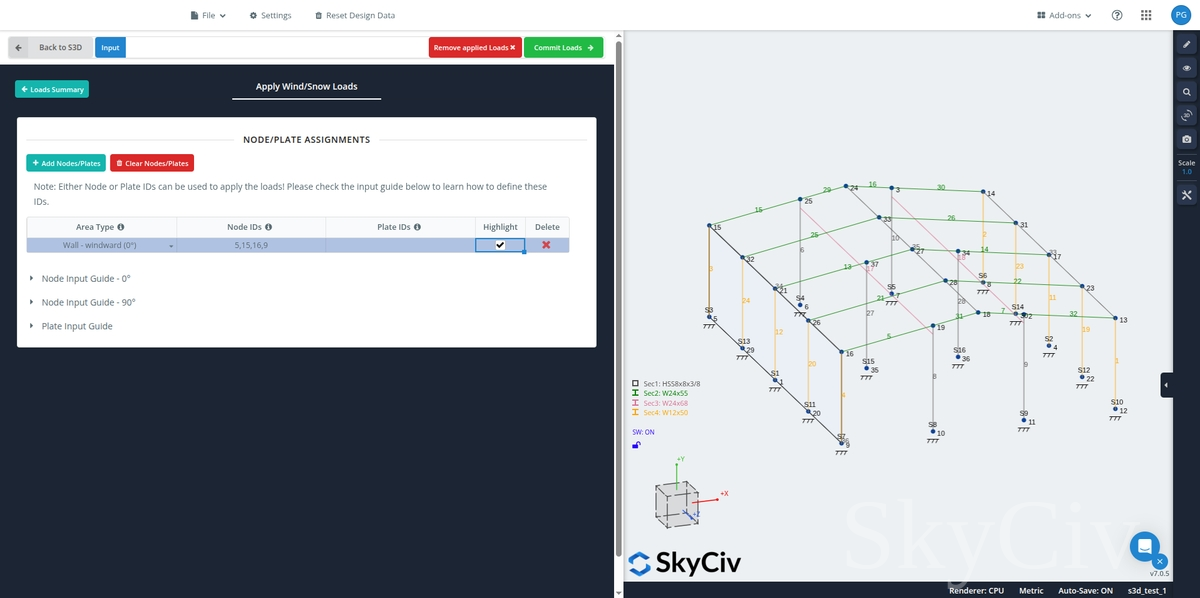
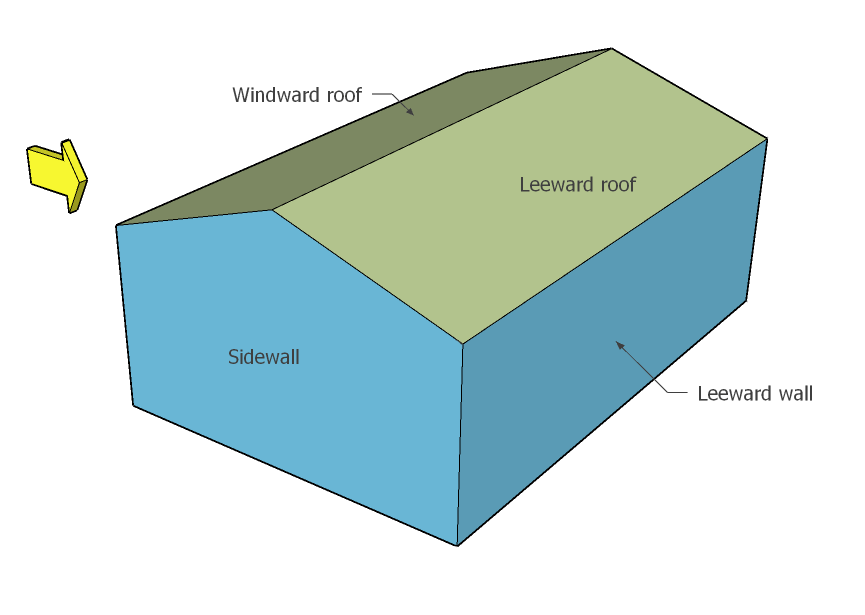
In de kolom gebiedstype, Er zijn verschillende mogelijkheden voor wand- en dakoppervlakken (voor 0 rang):
- Bovenwindse muur
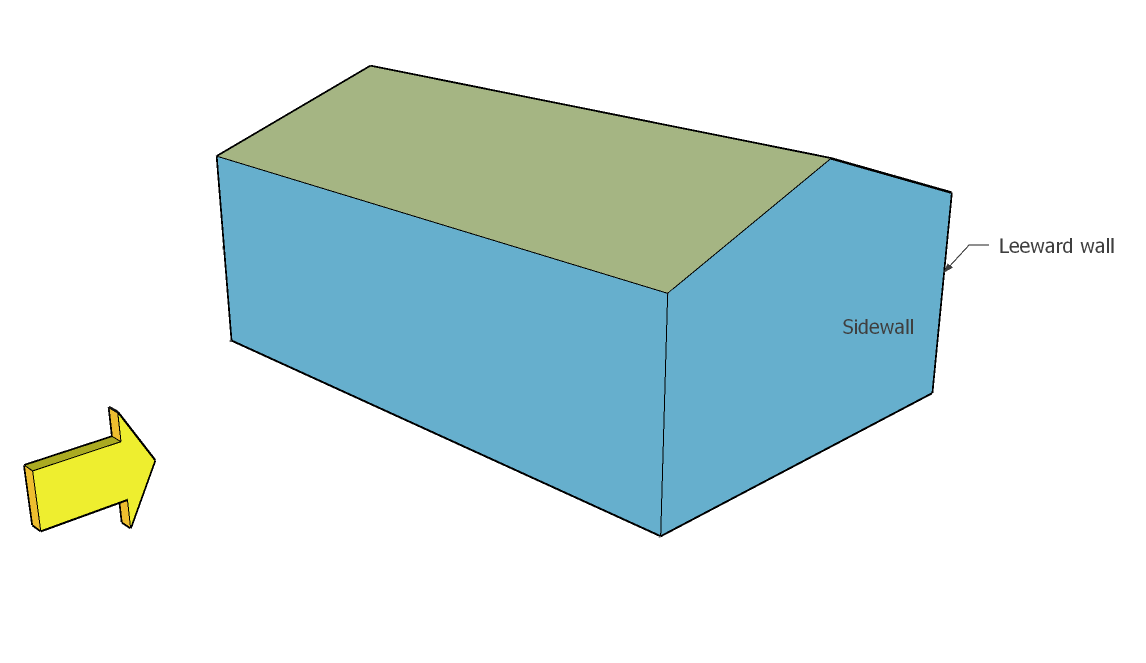
- Benedenwindse muur
- Zijwand

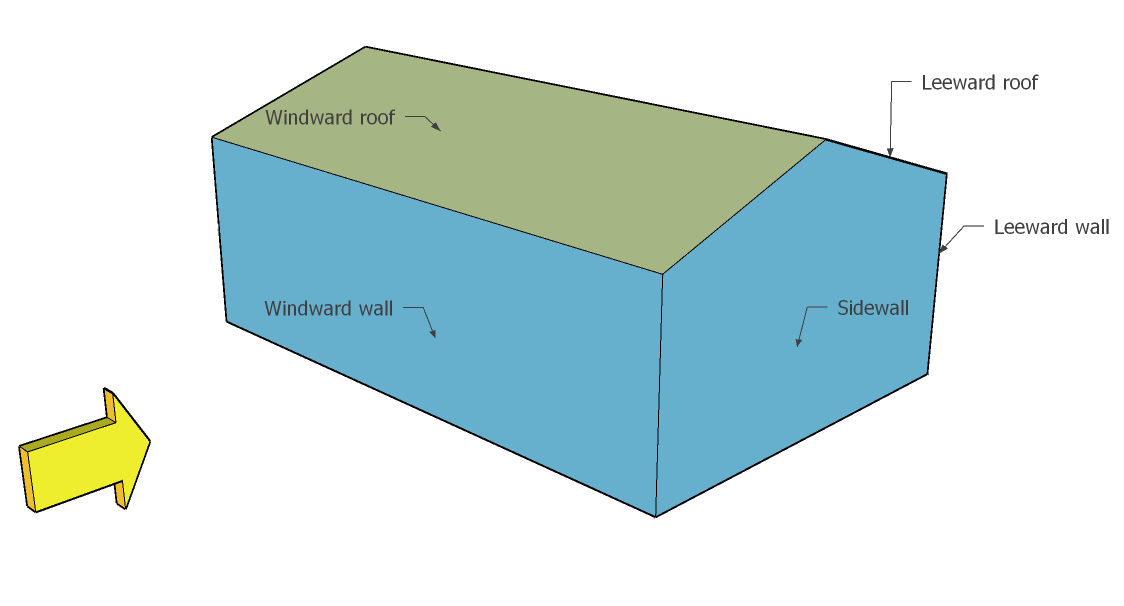
- Bovenwinds/bovenwinds dak
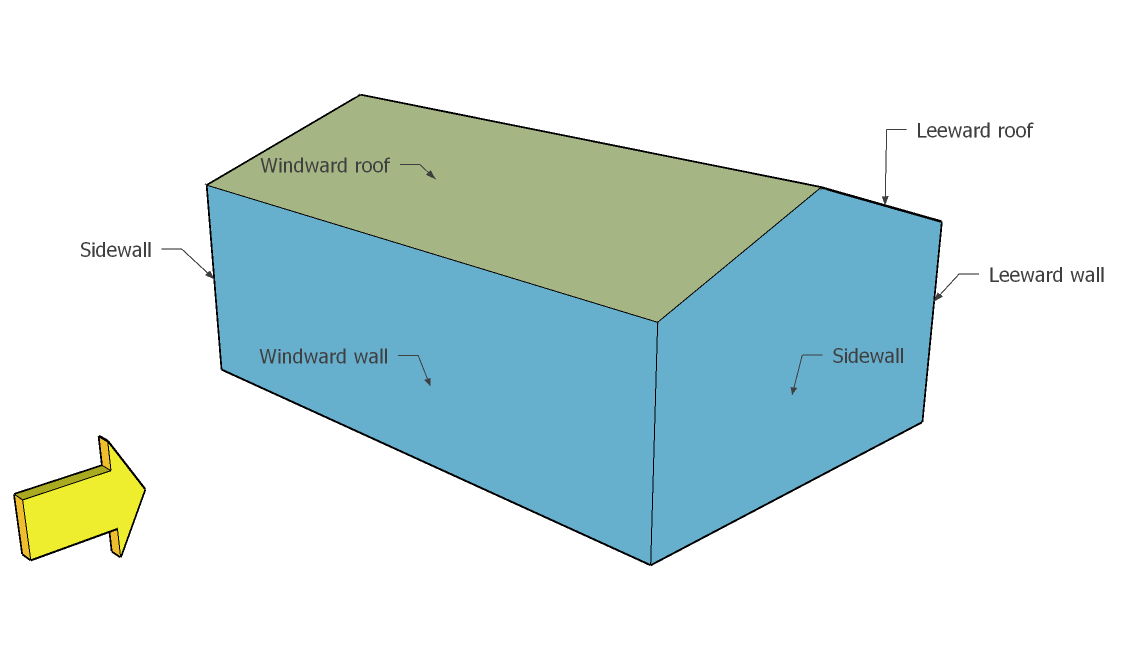
- Benedenwinds/benedenwinds dak
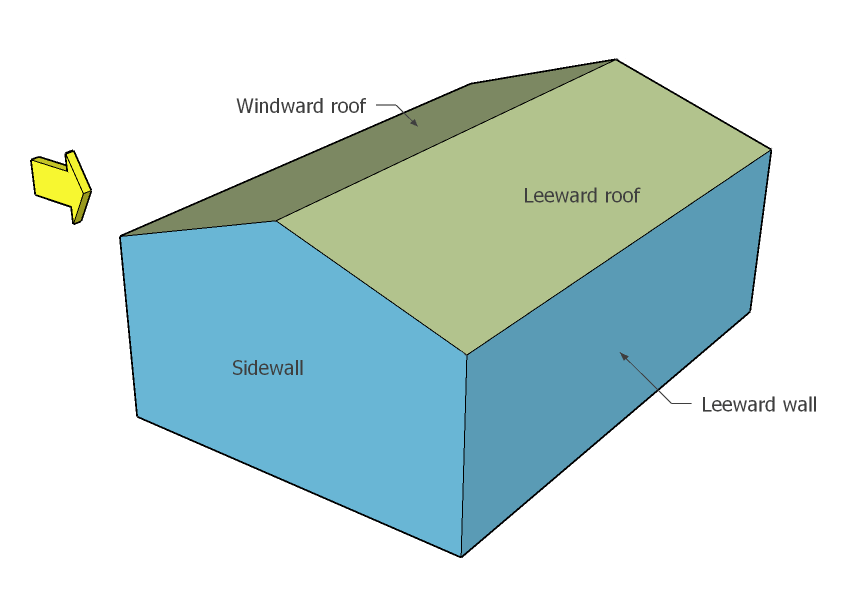
- Monohelling dak
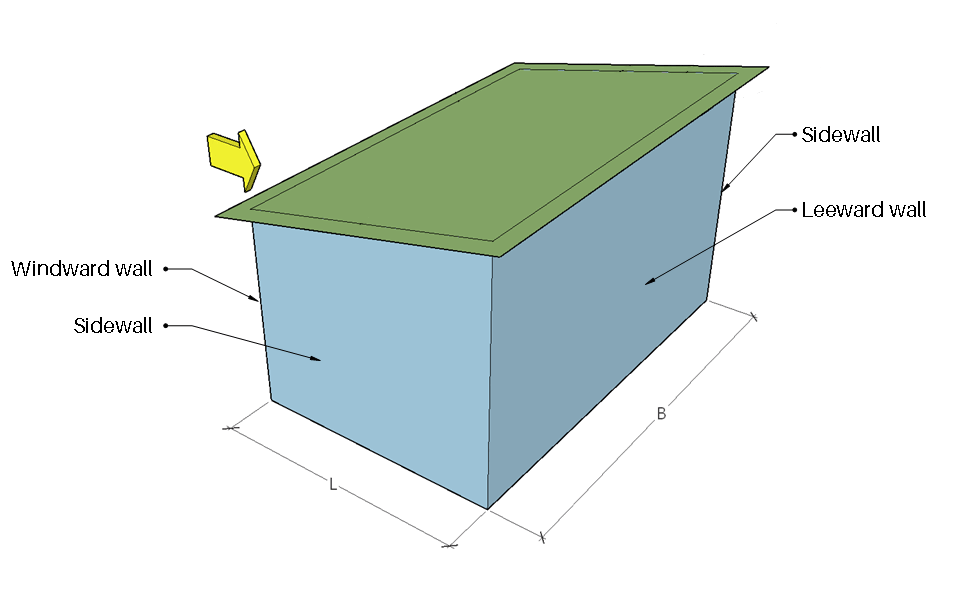
- Plat dak (dakhellingshoek kleiner dan 10 graden)

Hier zijn slechts enkele van de knooppuntgebiedtypen die moeten worden gedefinieerd in de sectie Belastingen toepassen. Over het algemeen, er wordt gesuggereerd dat de knooppunt-ID's een vierzijdig oppervlak creëren. U kunt een schatting maken van de totale oppervlakte, zoals hieronder weergegeven:
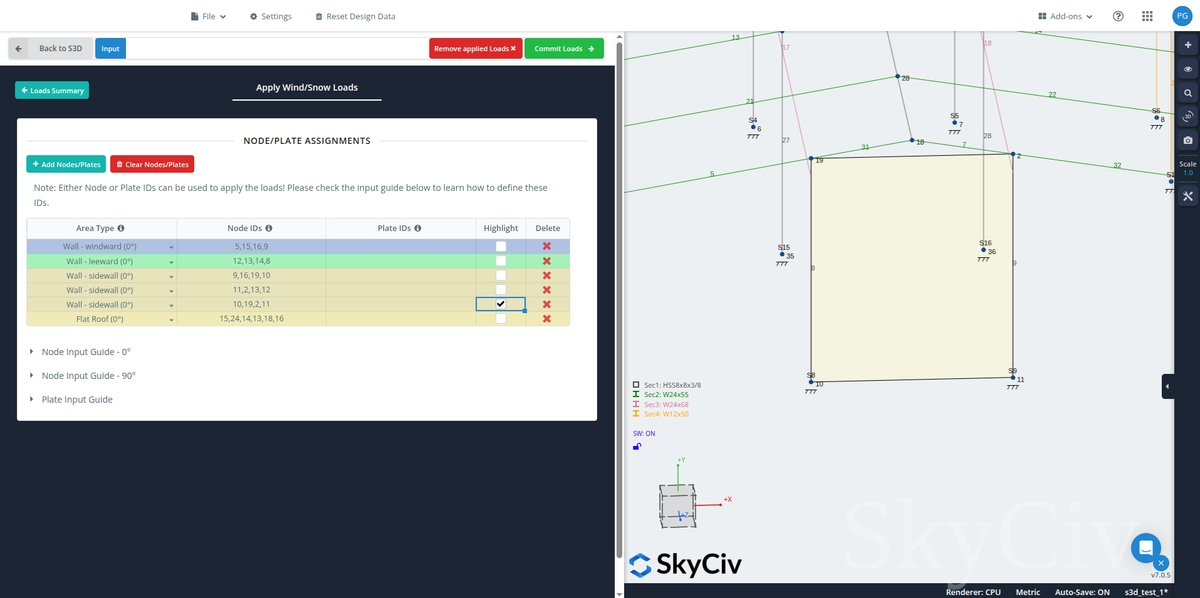
Met versie 6.1.2, gebruikers zouden nu moeten kunnen toevoegen 5 knooppunt-ID's (begrensd door een vijfzijdige veelhoek). Ook, gebruikers kunnen nu de bewerkte knooppunt-ID's van de toegepaste drukbelastingen vanuit de Load Generator in S3D synchroniseren, vooral als handmatige bewerking van de knooppuntinvoer nodig is om de variantie van de oppervlaktebelasting te corrigeren.
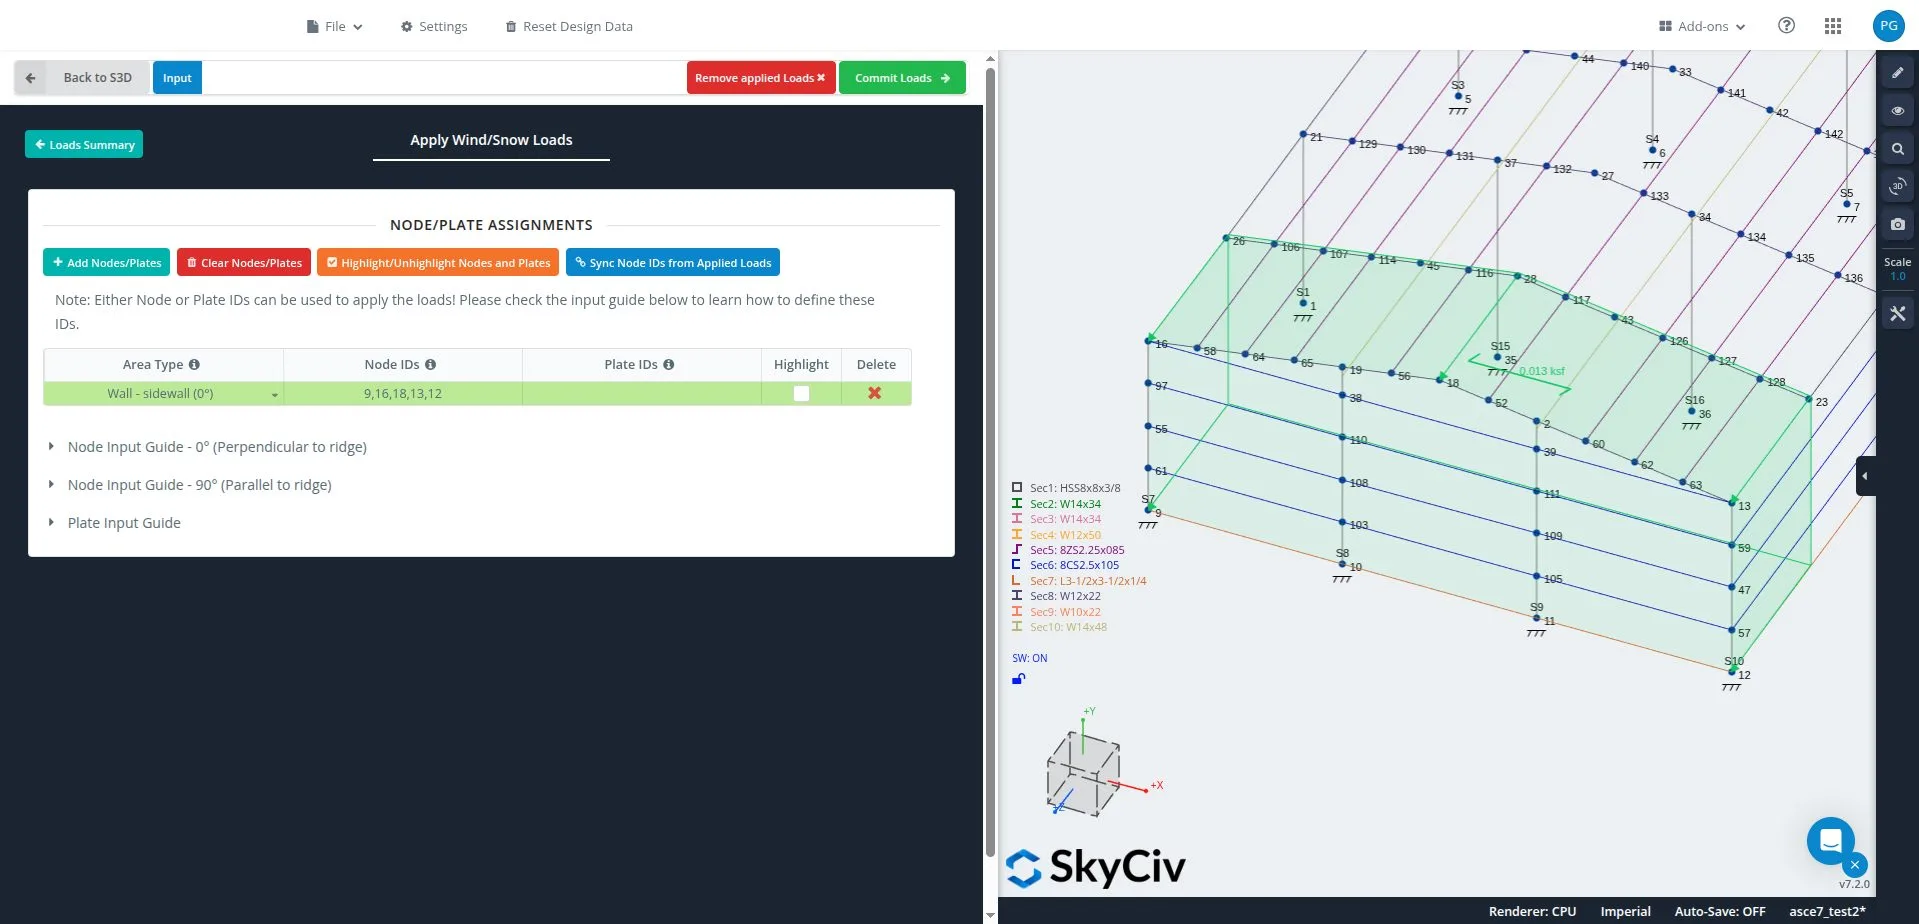
Hieronder wordt een voorbeeld van knooppuntinvoer weergegeven voor de gegeven structuur met het overeenkomstige toegewezen gebiedstype/oppervlakken:
Zodra de gebiedstypen allemaal zijn gedefinieerd, u zou de belastingen moeten kunnen toepassen door op te klikken “Leg ladingen vast” knop:
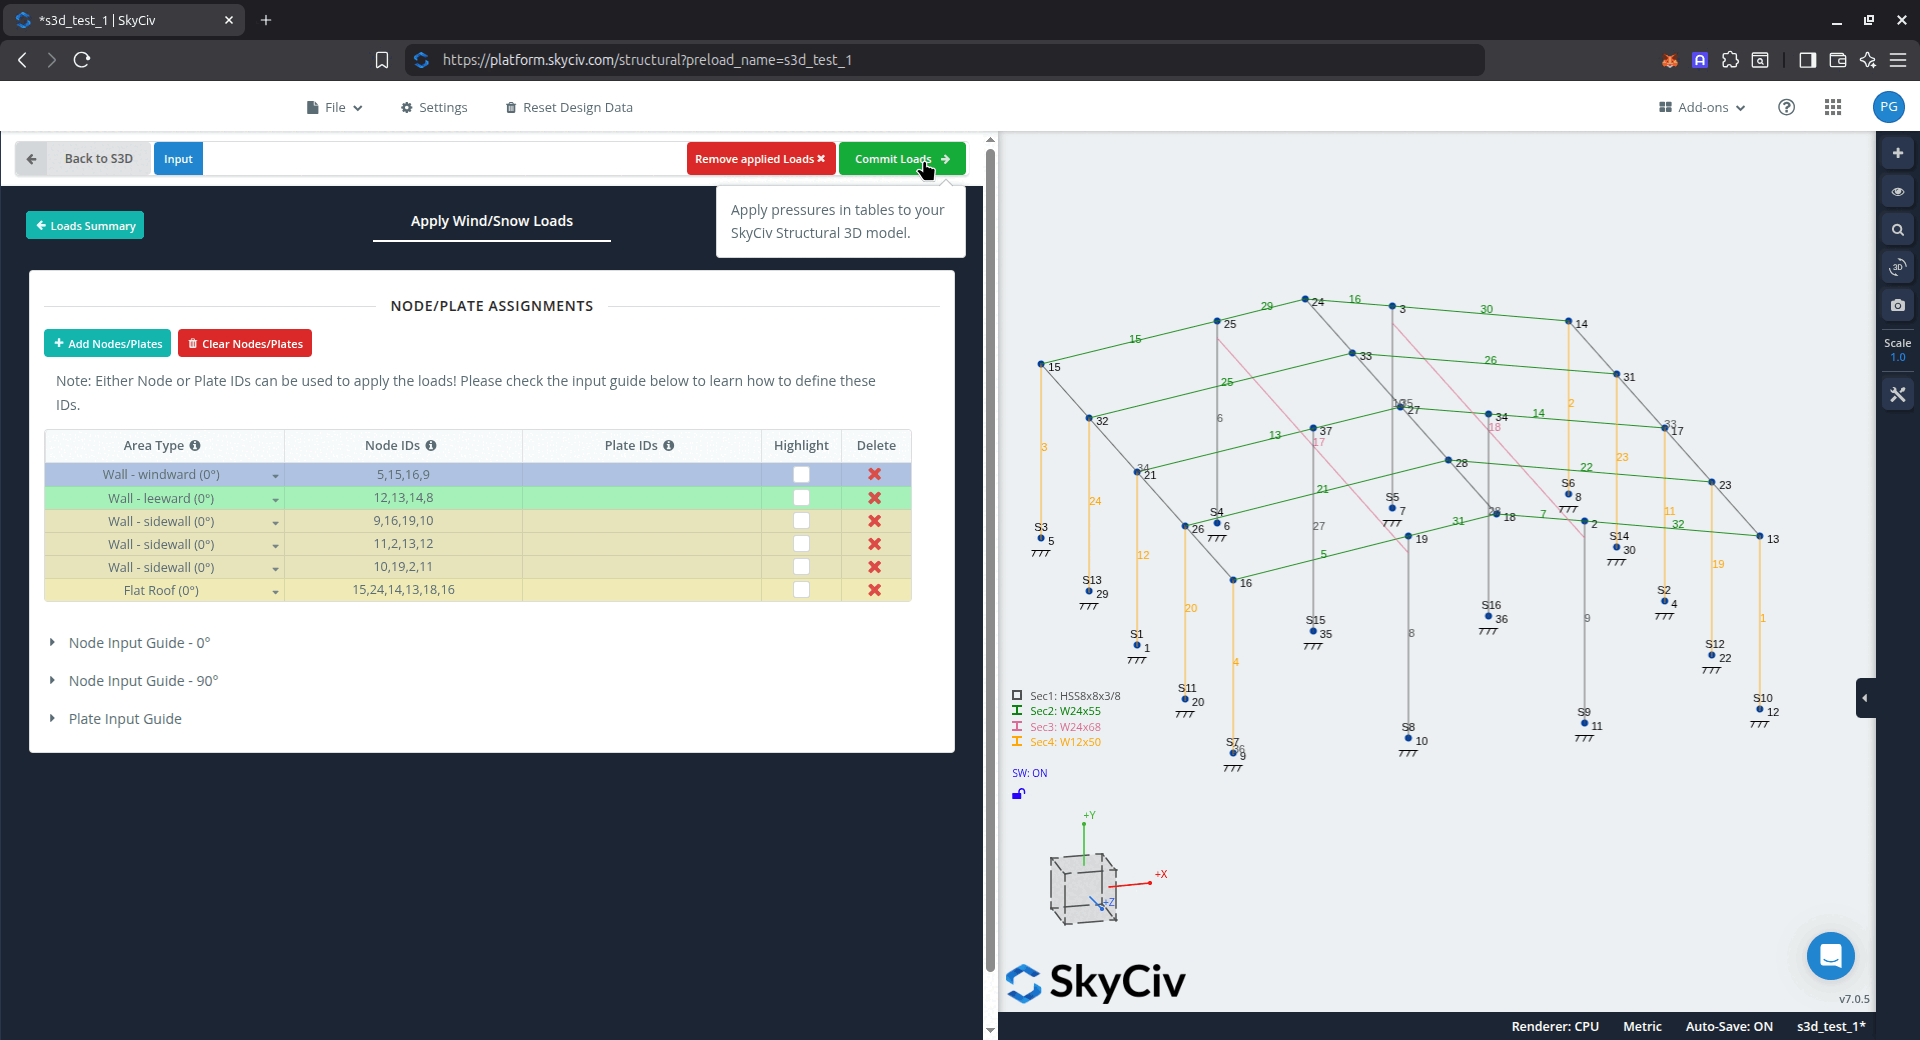
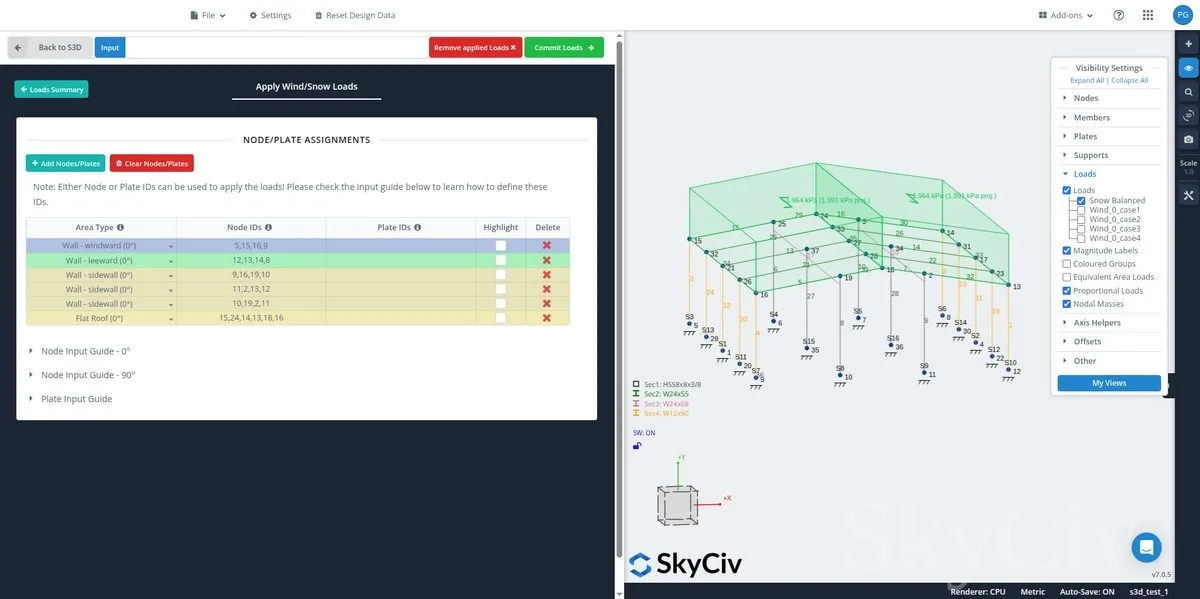
U zou moeten zien dat belastingen die konden worden gegenereerd en toegepast, direct in uw model in de 3D-modelruimte verschijnen. Elk belastinggeval wordt tegelijkertijd weergegeven, dus het kan moeilijker zijn om te zien wat er aan de hand is. Tegelijkertijd is de generator open, u kunt de verschillende belastingsgevallen in- en uitschakelen en staven in de modelruimte verbergen of isoleren met dezelfde zichtbaarheidsinstellingen en hulpmiddelen die beschikbaar zijn in Structural 3D.
Een belangrijke notitie over gegenereerde windbelastingen:
SkyCiv zeer beveelt aan het uitchecken van de Oppervlakte- en windbelastingen Softwaredocumentatieartikel voor meer diepgaande informatie over de gecreëerde oppervlaktelasten van de Belastingsgenerator.
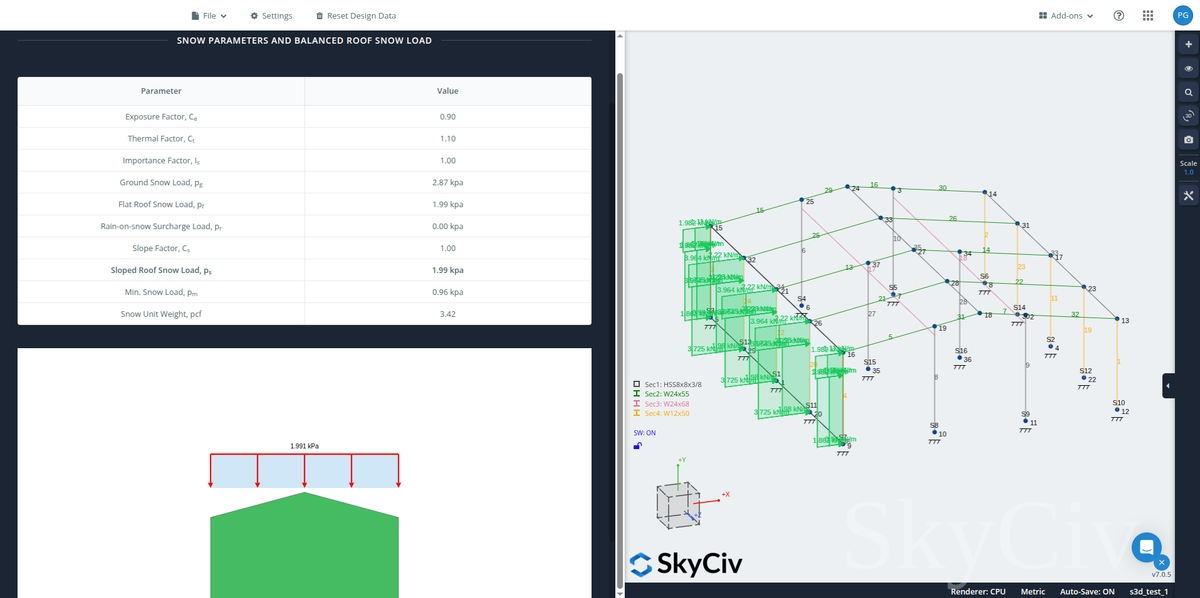
Gegenereerde sneeuwbelastingen toepassen
Bij het gebruik van de SkyCiv Load Generator in de S3D, het gebalanceerde/ongedrift geval zal worden toegepast op basis van het geselecteerde dakprofiel, zolang de typen dakoppervlakken zijn gedefinieerd in de knooppuntinvoertabel. Merk op dat deze belasting wordt toegepast als geprojecteerde belasting.
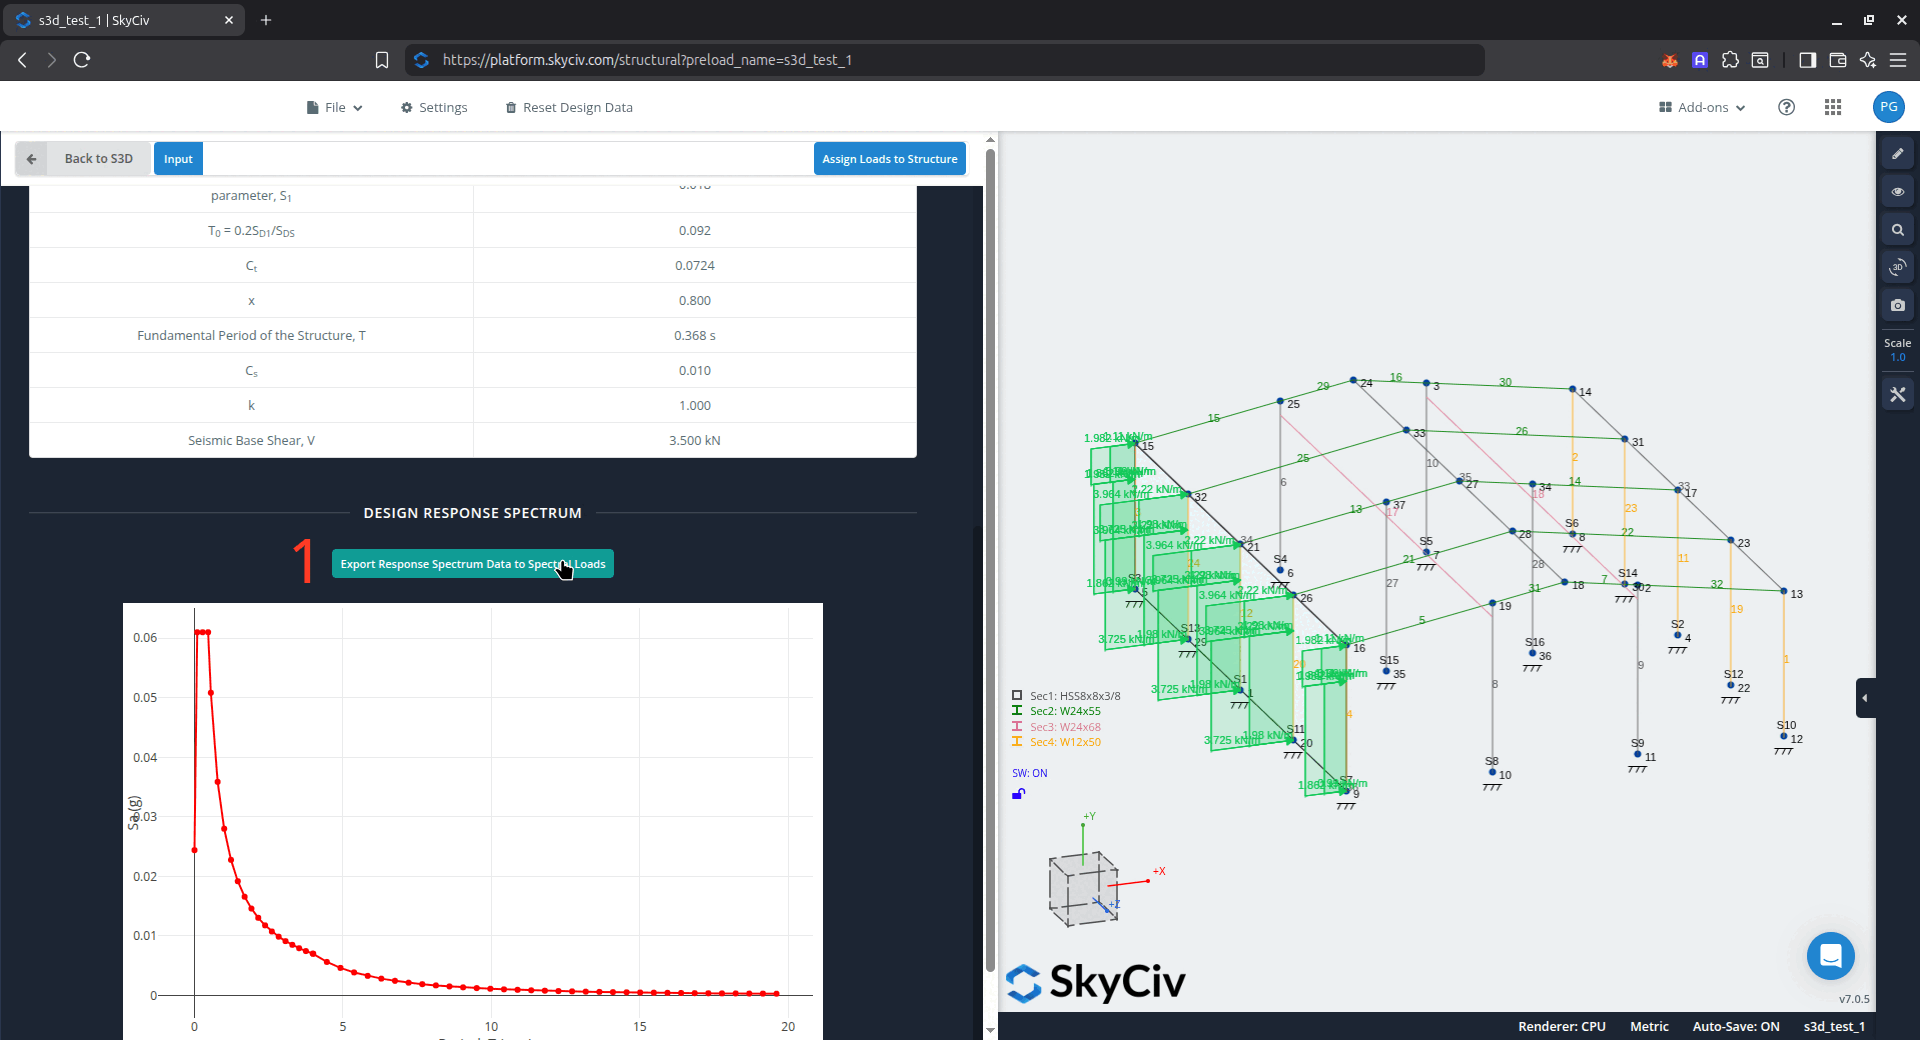
Gegenereerde seismische belastingen toepassen
Bij het toepassen van de seismische belastingen, de voorgestelde methode is om het gegenereerde ontwerpspectrum voor de constructie naar onze spectrale belastingen te exporteren. Klik gewoon op de “Exporteer responsspectrumgegevens naar spectrale belastingen” knop!
Belastingen wijzigen of resetten
Als u op enig moment tijdens de toepassing van deze gegenereerde belastingen de onderliggende parameterwaarden wilt wijzigen, of opnieuw beginnen, Dat mag u doen. Om de belastingen te wijzigen of te resetten, ga naar Gebiedsbelasting > Laad generator alsof je de belastingen in de eerste plaats zou gaan toepassen, en je zou dit bericht moeten zien:
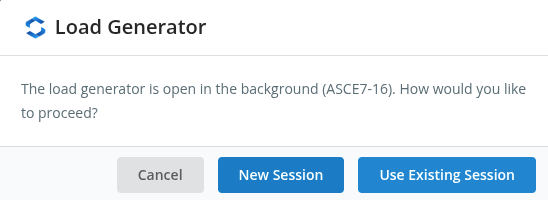
- Opnieuw beginnen, druk op de Nieuwe sessie knop.
- Om de waarden voor eerder berekende belastingen aan te passen, druk op de Gebruik bestaande sessie knop.
Beide opties brengen u terug naar de geïntegreerde belastinggeneratorpagina.