的 运作方式 右侧工具栏中的组包含用于修剪的几何编辑工具, 延伸, 分裂, 加盟, 缩放比例, 和属性匹配.
大多数操作适用于选定的几何体. 使用主动 折断 精确拾取和目标点的设置.
运作方式
操作工具被分组到右侧栏中的下拉堆栈中. 单击类别按钮激活当前工具, 或打开迷你工具栏以选择同一堆栈中的另一个工具.
匹配属性
将样式和属性属性从一个对象复制到其他对象
的 匹配属性 命令将源对象的属性应用于兼容的目标对象.
一步一步
- 1选择要从中复制其属性的源对象.
- 2请点击 匹配属性 激活画笔模式.
- 3单击兼容的目标元素即可立即应用属性.
- 4继续点击, 或使用栅栏或窗口选择多个目标.
- 5按 Esc键 退出画笔模式.
提示: 匹配属性复制视觉属性,例如颜色, 线宽, 线条样式, 和层. 仅应用与目标对象类型兼容的属性.
拉紧
使用交叉窗口或套索移动选定的顶点
拉紧 移动顶点,同时保留连接几何体周围的拓扑.
[__插入图像__]
一步一步
- 1启用 拉紧.
- 2使用从右到左交叉窗口或套索选择顶点.
- 3拖动中心手柄进行自由移动, 或用于约束移动的 X/Y 手柄.
提示: 仅移动交叉选择内的顶点; 连接到选区之外的顶点的线会被拉伸以保持连接.
延长线
延长一条线,直到与目标线或点相交
延长线 延长选定的线以满足目标边界. 该线沿其现有方向延伸,直到与选取的目标相交.
一步一步
- 1启用 延长线.
- 2单击要延伸的线 (接近尾声时你想要成长).
- 3单击要延伸到的目标线或点.
提示: 单击要延长的线的末端附近 – 工具从最近的端点向目标方向延伸.
修剪
删除由切削刃定义的直线或圆弧段
修剪 使用其他几何体作为切削刃删除直线或圆弧的部分. 首先选择切削刃, 确认他们, 然后单击或围住要删除的片段.
一步一步
- 1启用 修剪.
- 2选择切削刃几何形状 (线, 弧线, 界).
- 3按 通过去 要么 空格键 确认切削刃.
- 4单击或围住要删除的段.
提示: 确认切割边缘后,您可以使用窗口或栅栏选择同时修剪多个线段.
将线分割成线段
将一条线分成N条相等的线段
将线分割成线段 将单行分成指定数量的等长线段. 每个结果线段都是一个独立的线元素.
一步一步
- 1激活工具.
- 2单击要分割的线.
- 3输入分割数并按 通过去.
提示: 可用于沿梁创建等距支撑点或划分跨度以进行载荷分布分析.
按间隔分割线
将一行拆分为重复的固定长度间隔
按间隔分割线 将一条线分成指定固定长度的线段. 如果线长度不是间隔的整数倍,则在末尾创建余数段.
一步一步
- 1激活工具.
- 2单击要分割的线.
- 3输入间隔长度并按 通过去.
提示: 使用它以已知的间距沿连续构件创建均匀间隔的中间节点 (例如, 每一个 500 托梁布置毫米).
按线位置分割
以距其端点之一的偏移距离分割一条线
按职位划分 在距所选线一端的测量距离处插入一个断点, 在该偏移位置创建两个单独的段.
一步一步
- 1激活工具.
- 2单击一条线 (单击位置决定从哪个端点进行测量).
- 3输入偏移距离并按 通过去.
提示: 单击要测量的端点附近 – 该工具使用最近的端点作为偏移距离的参考.
交叉点处的分割线
在交叉点自动分割所有选定的线
交叉点处的分割线 查找所选线相互交叉的所有点,并在每个交叉点插入分割节点. 不需要输入值 – 操作是全自动的.
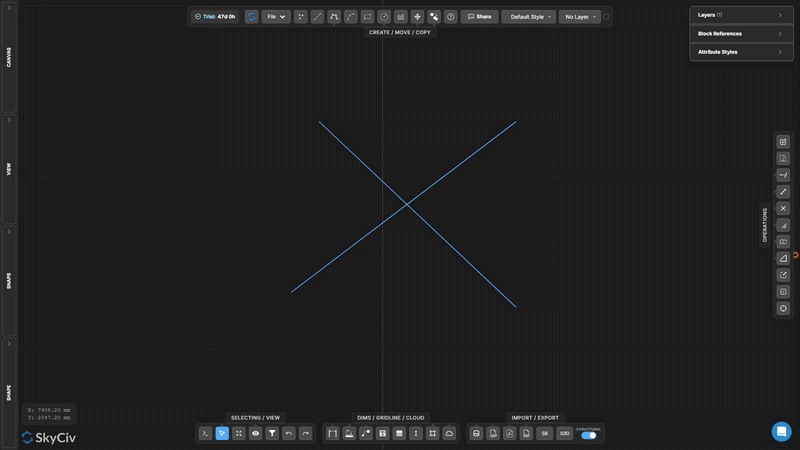
一步一步
- 1选择要处理的行.
- 2请点击 交叉点处的分割线.
- 3所有交叉路口都会被检测并自动分割.
提示: 使用前运行此命令 联合选拔 或执行依赖于拓扑的操作 – 它确保交叉线共享实际节点.
分割目标
使用单独的分割器几何体分割预先选定的目标对象
分割目标 是两阶段分割,首先标记要分割的对象 (目标), 然后分别选择几何体来分割它们 (分离器). 仅切割目标对象.
[__插入图像__]
一步一步
- 1预先选择要分割的目标对象.
- 2启用 分割目标.
- 3选择分流器几何形状.
- 4按 通过去 使用分离器在交叉点分离目标.
提示: 当您想要使用切削刃分割特定线但需要保持切削几何形状完整时,请使用分割目标 (与修剪不同, 这也修改了刀具).
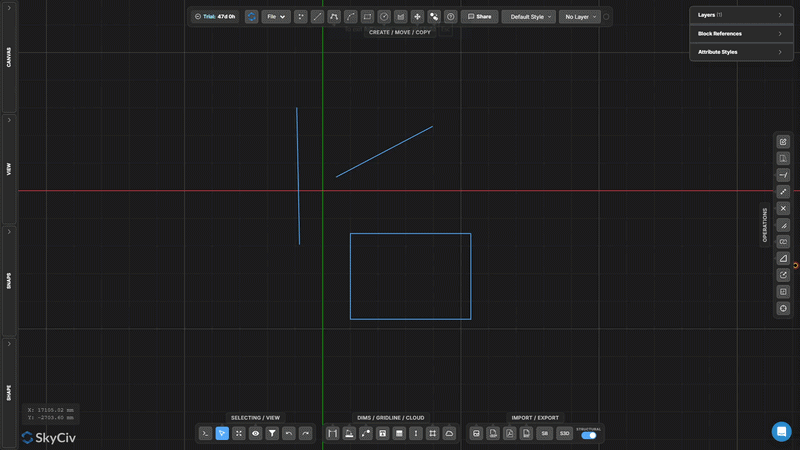
在重叠处分割
检测并分离重叠的共线线段
在重叠处分割 查找所选线中共线且相互重叠的线段, 然后将它们分开,使重叠区域变得离散, 单独可选择的几何形状.
[__插入图像__]
一步一步
- 1选择可能具有重叠共线部分的线.
- 2请点击 在重叠处分割.
- 3重叠区域被分成单独的部分.
提示: 结合与 选择重复项 识别并删除导入的 DXF 文件中多余的重叠线.
爆炸折线
将多段线分成独立的直线或圆弧段
爆炸折线 将多段折线分解为单独的独立线段. 当您需要编辑时很有用, 删除, 或仅对折线的一部分应用操作.
[__插入图像__]
一步一步
- 1选择要爆炸的折线.
- 2请点击 爆炸折线.
- 3每个片段都可以单独选择和编辑.
提示: 其逆运算为 连接直线和圆弧, 它将连接的线段合并回一条多段线.
连接直线和圆弧
将连接的直线和圆弧合并为一条多段线
连接直线和圆弧 将一系列连接的线段组合成单个连续的多段线对象. 直线和圆弧必须共享要连接的端点.
一步一步
- 1选择共享端点的直线和圆弧.
- 2请点击 连接直线和圆弧.
- 3连接的线段合并成一条连续的折线.
提示: 所有选定的段必须形成一个连续的链. 如果段有间隙, 用 对齐线端 首先使用移动点工具关闭端点.
创建圆角
用圆弧将两条线之间的尖角圆化
创建圆角 用指定半径的切线弧替换两条线之间的尖角. 原始线端被修剪以适应圆弧.
一步一步
- 1启用 创建圆角.
- 2在对话框中设置圆角半径.
- 3单击角落 (交叉区域) 要应用的两行中的.
提示: 半径必须足够小,以适合从角开始的两条线的长度. 确认前会显示实时预览.
创建倒角
在拐角处创建直斜角切割
创建倒角 在两条线之间的角上切出一条直线对角线斜角. 设置倒角距离以控制每条线从角向后修剪多远.
一步一步
- 1启用 创建倒角.
- 2在对话框中设置倒角距离.
- 3单击拐角几何体以应用倒角.
提示: 默认情况下,倒角从两条线均匀切割. 对于不对称斜角 (每边的距离不同), 在对话框中设置两个单独的倒角值.
缩放对象
从枢轴点按一个因子缩放选定的几何体
缩放对象 通过相对于所选枢轴点的统一比例因子调整所选几何体的大小. 对话框允许您选择是否注释 (方面, 文本, 领导者, 网格线, 桌子) 也被缩放.
一步一步
- 1选择要缩放的对象.
- 2请点击 缩放对象 并在对话框中配置注释比例选项.
- 3单击画布以设置比例轴 (起源) 点.
- 4输入比例因子并按 通过去 (1.0 = 没有变化, 0.5 = 一半, 2.0 = 双倍).
提示: 使用“比例选项”对话框可以控制注释尺寸是否 (方面, 文本, 领导者, 桌子) 随几何体缩放或保持当前尺寸.
秤架
创建具有可见框架的持久局部比例区域
秤架 创建具有关联比例因子的持久矩形区域. 绘制或放置在框架内的几何图形以局部比例渲染. 对于不同绘图比例的细节标注很有用.
[__插入图像__]
一步一步
- 1启用 秤架.
- 2单击第一个角, 然后对角定义框架.
- 3在输入中键入比例因子,然后按 Esc键 申请.
提示: 创建后框架仍保留在画布上. 选择并在不再需要时将其删除. 选择框架后,比例输入仍可用于以后编辑.
更新原点
移动绘图坐标原点 (0,0) 到新地点
更新原点 重新定位绘图的参考坐标系. 所有坐标值 (X, 和) 在画布中显示并在数据中导出的内容将相对于新原点重新计算.
[__插入图像__]
一步一步
- 1启用 更新原点.
- 2单击画布上的新原点位置.
- 3相对于新坐标读数立即更新 (0,0) 点.
提示: 捕捉到现有节点以获得精确的新原点. 对于结构图, 捕捉到已知的列或基准交点,以将坐标与项目参考网格对齐.
解锁
独立版 帐户
注册免费帐户并获得强大的分析 + 设计软件:
✓ 强大的分析软件
✓ 访问 90+ 设计工具
✓ asce, 作为, 在, NBCC负载生成器
✓ 钢, 木材, 具体, 铝