A Toile est une feuille de dessin unique dans un projet CAO SkyCiv. Chaque projet contient au moins un canevas, et vous pouvez en ajouter autant que nécessaire – un par étage, un par détail, ou un par feuille de dessin.
Les toiles sont gérées depuis le Toile accordéon dans la barre latérale gauche. Chaque toile stocke sa propre géométrie, annotations, et superposer les données indépendamment.
Le panneau de toile
Toute la gestion du canevas se fait depuis le Toile accordéon, trouvé dans la barre latérale gauche. Clique le Toile en-tête pour le développer. Le panneau répertorie chaque canevas du projet et fournit des contrôles pour l'ajout, commutation, renommer, réorganisation, copier, et suppression de toiles.
Le canevas actuellement actif est mis en surbrillance dans la liste. Un seul canevas est actif à la fois – tous les outils de dessin fonctionnent sur le canevas actif.
Opérations de base
Ajouter une toile
Créer un nouveau, feuille de dessin vierge dans le projet
Clique le Ajouter une nouvelle toile bouton en bas du panneau Canevas. Une nouvelle toile vierge est créée et immédiatement rendue active.
Pas à pas
1les données d'entrée pertinentes pour le signe sont préréglées lorsque vous ouvrez le Toiles accordéon dans la barre latérale gauche.
2Cliquez sur Ajouter une nouvelle toile en bas du panneau.
3Le nouveau canevas apparaît dans la liste et devient le canevas actif.
💡
Pointe: De nouvelles toiles sont nommées Toile 2, Toile 3, etc. par défaut – renommez-les immédiatement pour garder le projet organisé.
Basculer entre les toiles
Passer à une autre feuille de dessin
Cliquez n'importe où sur une ligne de canevas dans le panneau Canevas pour la rendre active.. Le canevas actuel est enregistré automatiquement avant de changer, donc aucune donnée n'est perdue.
💡
Pointe: La ligne de canevas active est mise en surbrillance dans la liste. Toute sélection sur le canevas précédent est effacée lorsque vous changez.
Renommer une toile
Donnez à un canevas un nom significatif pour une navigation plus facile
Cliquez directement dans le champ de nom d'une ligne de canevas pour le modifier en ligne. Tapez le nouveau nom et appuyez sur Entrer ou cliquez pour confirmer. Les noms de canevas doivent être uniques au sein du projet – les doublons sont automatiquement résolus.
💡
Pointe: Utilisez des noms descriptifs comme Plan du rez-de-chaussée, Détail du toit, ou Section A-A pour que les projets multi-canaux restent navigables.
Copie (Dupliquer) une toile
Créer une copie exacte d'un canevas existant
Clique le icône en double (deux carrés qui se chevauchent) sur n'importe quelle ligne de toile. Une copie complète de cette toile – y compris toute la géométrie, annotations, et affectations de couches – est inséré directement après lui dans la liste.
💡
Pointe: La copie est un moyen rapide de créer un nouveau niveau d'étage partageant la même grille de poteaux. – dupliquer, puis modifiez uniquement ce qui change.
Supprimer une toile
Supprimer définitivement un canevas et tout son contenu
Clique le icône de poubelle rouge sur une ligne de canevas et confirmez l'invite. La suppression est définitive et supprime toute la géométrie, annotations, et superposez les données sur ce canevas. Une boîte de dialogue de confirmation s'affiche par défaut – Chèque “Ne demande plus” pour l'ignorer à l'avenir.
⚠️
Remarque: L'icône de la corbeille est désactivée lorsqu'il ne reste qu'un seul canevas – un projet doit toujours avoir au moins une toile. La suppression ne peut pas être annulée.
Réorganiser les toiles
Changer la position d'un canevas dans la liste
Utilisez le haut et flèche vers le bas boutons sur chaque ligne de canevas pour la déplacer plus tôt ou plus tard dans la liste. Les boutons fléchés ne sont visibles que lorsque le panneau est en Hiérarchie commande – ils sont cachés quand Trier par altitude est actif (l'ordre d'élévation est contrôlé par la valeur d'élévation, pas de position manuelle).
💡
Pointe: Si les boutons fléchés sont manquants, basculer Trier par altitude désactivé pour revenir au mode hiérarchie où la commande manuelle est disponible.
Élévation et ordre de tri
Lorsqu'un projet représente une structure à plusieurs étages, chaque toile peut se voir attribuer un élévation valeur qui le place à la bonne hauteur dans le modèle structurel 3D (Exportation S3D). La liste des canevas peut être triée soit par ces valeurs d'élévation, soit dans un ordre manuel personnalisé..
Trier par altitude
Basculer entre l'ordre d'élévation et l'ordre hiérarchique personnalisé
Ce logiciel Trier par altitude la bascule en bas du panneau Canevas permet de basculer entre deux modes d'affichage:
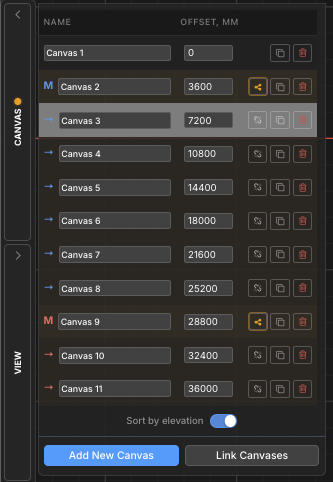
Trier par altitude (sur): Les toiles sont classées de l'altitude la plus basse à la plus élevée.. Un Décalage une colonne apparaît indiquant la valeur d'élévation de chaque toile. Cet ordre reflète la façon dont les toiles seront empilées lors de l'exportation du modèle 3D S3D..
Hiérarchie (désactivé): Les canevas apparaissent dans un ordre personnalisé que vous contrôlez avec les boutons fléchés haut/bas. Groupes de canevas (maître/enfant) montrer leur hiérarchie en retrait ici.
💡
Pointe: Les canevas sans élévation attribuée apparaissent en bas de la liste en mode élévation, triés par leur index interne.
Élévation de la toile
Attribuer une valeur de hauteur utilisée lors de l'exportation vers le modèle structurel 3D
Quand Trier par altitude est allumé, un Décalage la colonne apparaît. Les toiles sans élévation montrent un + bouton – cliquez dessus pour en attribuer un. Les toiles avec une élévation affichent un champ numérique modifiable.
La valeur d'élévation détermine la hauteur de chaque étage dans l'exportation structurelle 3D.. L'unité correspond à l'unité de longueur du projet (mm, cm, m, pi, in).
Pas à pas
1Activer Trier par altitude pour afficher la colonne Décalage.
2Clique le + bouton à côté de n’importe quelle toile pour lui attribuer une élévation.
3Tapez la valeur d'élévation et appuyez sur Entrer pour confirmer. La liste est retriée automatiquement.
💡
Pointe: Attribuer une élévation 0 à la toile du rez-de-chaussée. Les valeurs suggérées pour les nouveaux canevas sont automatiquement définies sur 3000 mm au-dessus de la plus haute élévation existante.
Groupes de canevas (Maître / Enfant)
Lorsque plusieurs niveaux d’étage partagent la même disposition structurelle (par exemple. grilles de colonnes identiques sur plusieurs étages), vous pouvez les lier dans un groupe de toile. Une toile devient la Maître et les autres deviennent Enfants.
Les modifications structurelles apportées au maître peuvent être propagé à tous les enfants en un clic, synchroniser les étages répétés sans copier manuellement la géométrie.
Dans la liste des toiles, le maître est étiqueté M et les enfants sont étiquetés Faire glisser de gauche à droite sélectionnera tout ce que la zone de sélection touche, tous deux colorés avec une couleur d'accent de groupe partagée.
Lier des canevas dans un groupe
Désignez un canevas principal et associez-y des canevas enfants
Cliquez sur Liens vers les toiles en bas du panneau Canevas pour ouvrir l'assistant de liaison. Sélectionnez quelle toile sera la maître et quelles toiles seront ses enfants. Confirmez pour créer le groupe.
Pas à pas
1les données d'entrée pertinentes pour le signe sont préréglées lorsque vous ouvrez le Toiles panneau et cliquez sur Liens vers les toiles.
2Choisissez le toile maîtresse du sorcier.
3Sélectionnez un ou plusieurs toiles d'enfant pour y faire un lien.
4Confirmez pour créer le groupe. Ce logiciel M / Faire glisser de gauche à droite sélectionnera tout ce que la zone de sélection touche les étiquettes et la couleur d'accent apparaissent dans la liste.
💡
Pointe: Dans Hiérarchie vue, Les groupes principaux peuvent être réduits et développés à l'aide du triangle à côté de la ligne du canevas principal..
Propager les changements structurels
Transmettre les mises à jour structurelles du canevas principal à tous les enfants liés
Lorsque la géométrie structurelle d'un canevas principal change, un reflet ambre apparaît sur la ligne principale et ses enfants pour signaler que le groupe est désynchronisé. Clique le bouton propager (icône de partage) sur la ligne principale et confirmez pour transmettre les données structurelles mises à jour à tous les canevas enfants.
⚠️
Remarque: La propagation écrase les données structurelles sur les canevas enfants. Cette action ne peut pas être annulée. Contenu non structurel sur les enfants (annotations, dimensions, nuages de révision) est préservé.
Supprimer un enfant d'un groupe
Détachez un canevas enfant afin qu'il ne reçoive plus de mises à jour propagées
Clique le icône de chaîne brisée sur une ligne de canevas enfant et confirmez l'invite. Le canevas est supprimé du groupe maître et devient un canevas indépendant. Sa géométrie existante est conservée – il cesse simplement de recevoir les futures mises à jour propagées du maître.
💡
Pointe: Supprimer un enfant ne supprime ni ne modifie son contenu – cela ne fait que rompre le lien avec le maître. Vous pouvez le reconnecter à tout moment en utilisant Liens vers les toiles.