Obtenez les sections les plus optimisées pour vos conceptions, en un seul clic.
Le concepteur de conception de membres SkyCiv fait gagner du temps aux utilisateurs, en ajoutant la vérification de chaque section possible dans une base de données donnée et en choisissant la forme avec la plus petite section transversale et le meilleur rapport d'utilité. Actuellement, le concepteur prend en charge tous les codes de conception SkyCiv (AISC, NDS, AISI, AS, CSA, BS, Eurocode et plus…). Il existe quelques critères pour que le Designer fonctionne correctement:
- La Section doit être chargée depuis une bibliothèque dans le Section Builder
- La conception des membres Vérifier la fonction doit pouvoir s'exécuter
Le Designer existe sur tous nos aciers, logiciel de conception d'éléments en bois et formés à froid via SkyCiv Structural 3D, SkyCiv Beam et notre logiciel de conception autonome. Vous voulez une présentation vidéo complète? Visitez notre exemple de tutoriel sur cette fonctionnalité.
Lancement du concepteur
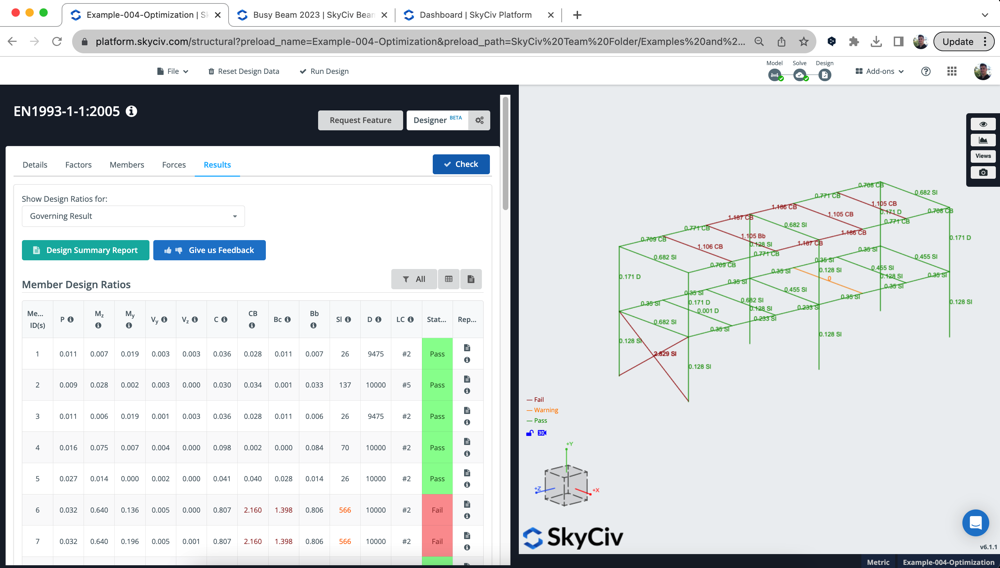
Pour lancer la conception de membres Designer, vous devrez d'abord ouvrir le module Member Design pour lequel vous concevez votre structure.. Dans cet exemple, nous effectuons un contrôle de l'acier Eurocode. Une fois le module ouvert, cliquez simplement sur le Designer bouton dans le coin supérieur droit du module. Dans le modèle ci-dessous, nous utilisons un modèle en acier, qui a clairement des membres défaillants de l'Eurocode, voyons si nous pouvons les faire passer:
Paramètres modaux
Les utilisateurs disposent d'un certain nombre de commandes et de paramètres disponibles, y compris un ratio d’utilité ciblé, Limites de hauteur/largeur de section et quelles sections vous souhaitez concevoir. En cliquant sur le Designer bouton, les options suivantes apparaîtront:
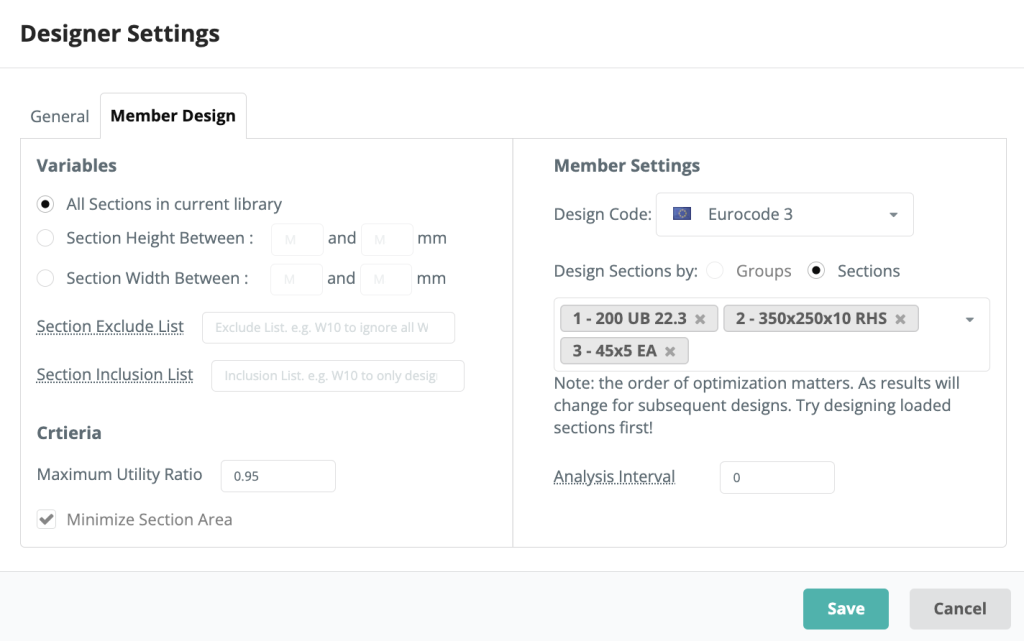
variables
Les utilisateurs ont la possibilité de choisir entre toutes les sections de la bibliothèque, une gamme de hauteurs ou de largeurs de section. Ces options détermineront quelles sections, le concepteur examine lors de la sélection de la section la plus optimisée
Critères
Les utilisateurs peuvent saisir leur propre rapport d'utilité maximal pour le concepteur, cela signifierait que tout résultat avec un UR supérieur à celui spécifié ne sera pas considéré comme un choix valide.
Paramètres des membres
Dans cette zone du modal des paramètres, les utilisateurs peuvent sélectionner leur code de conception comme ils le feraient normalement dans le module Member Design. Le modal importera également les sections concevables dans ce module, mais l'utilisateur a le contrôle d'ajouter/supprimer les sections qu'il souhaite concevoir. Le concepteur concevra une seule section à la fois.
Ce logiciel intervalle d'analyse est un paramètre important, et indiquera au logiciel à quelle fréquence réexécuter le solveur FEA. Par défaut, il est défini sur 0 – ce qui signifie que nous utiliserons les mêmes forces internes lors du test de chaque section. C'est généralement ok, depuis le moment de flexion, la force de cisaillement et les résultats axiaux ne changeront pas trop lors du changement de section. Par contre, les résultats de déflexion changeront et peuvent affecter les résultats – car nous utilisons une section plus légère, le résultat de la déflexion devra être mis à jour à mesure que le poids propre sera réduit.
Les utilisateurs peuvent ainsi augmenter la fréquence à laquelle le solveur est exécuté entre les sections de test.. Le seul inconvénient ici est que cela ralentira le processus., puisque le solveur FEA doit s'exécuter entre les changements de section. Par exemple, si vous définissez l'intervalle comme 1, il se résoudra entre chaque test de section.
Le processus du concepteur
Le concepteur fonctionne de la manière suivante:
- Exécute une analyse / conception initiale pour s'assurer que la configuration du modèle est correcte et pour déterminer les résultats actuels
- Commence à tester la première section:
- Classe toutes les sections de la bibliothèque spécifiée dans l'ordre d'une zone transversale
- Modifie une section dans le modèle et réduit l'analyse (en fonction de la intervalle d'analyse réglage)
- Avec les nouvelles résultats de l'analyse (la capacité en flexion, Déflexion etc.) Nous testons la section suivante de la bibliothèque
- Stockez les résultats et exécutez la prochaine analyse
- Pour la vitesse et les performances, Tous les tests inutiles seront ignorés. Ce sont si (a) le dernier 5 Les tests ont produit de moins bons résultats ou (b) Nous avons déjà trouvé le meilleur rapport utilitaire possible (c) Nous échouons par un grand nombre, Nous sauterons 5 les sections
- Commencez sur la section suivante, avec les sections mises à jour des itérations précédentes mené à bien
C'est pourquoi l'ordre des sections est important, puisque nous mettrons à jour le modèle au fur et à mesure si vous vous retrouvez avec des éléments plus légers des optimisations de la section précédente, ils affecteront les résultats dans les optimisations de section ultérieures. Si ça aide, Les utilisateurs peuvent examiner le journal de ce que le concepteur a fait sous Afficher le journal Quand les résultats reviennent.
Considérez le cas où les colonnes sont optimisées en premier. Ils peuvent passer, Mais alors que vous commencez à concevoir les poutres au-dessus (peut-être les rendre plus épais / plus lourds) puis quand vous retournez pour revérifier les colonnes, Ils peuvent échouer. Par contre, les optimiser dans l'ordre opposé, ne devrait pas avoir ce problème.
Résultats
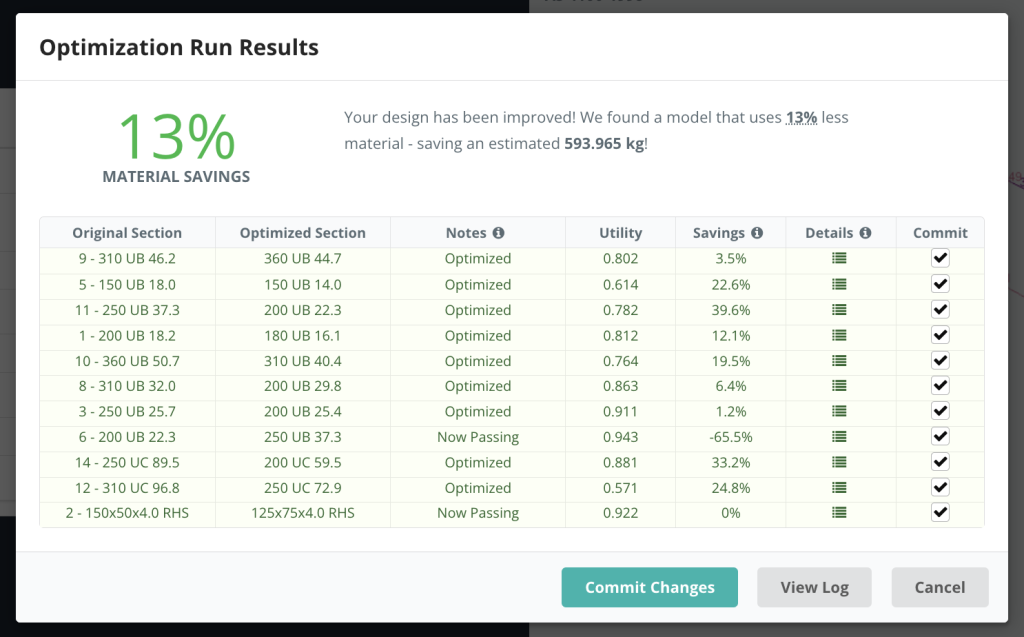
Les résultats de chaque section s'afficheront dans une popup, résumer la section sélectionnée, c’est le rapport d’utilité et les options d’engagement. Dans l'exemple ci-dessous, tout 3 les sections du modèle ont été optimisées:
Nous pouvons examiner de plus près toutes les analyses et leurs résultats en cliquant sur l'icône sous Itérations. Cela affichera la liste détaillée suivante des exécutions. Par exemple, section de sélection 2 (HSS) montrera ce qui suit:
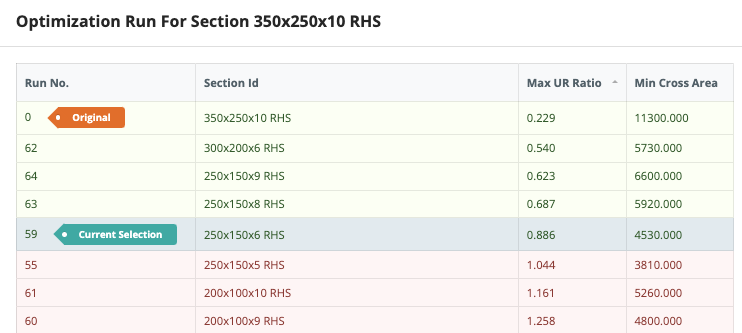
De là, nous pouvons trier par Max UR, zone transversale et SFO (un indice pondéré) qui affichera le meilleur résultat en fonction de vos critères prédéterminés (dans les paramètres). Cela permet aux utilisateurs de revoir les exécutions d'optimisation pour s'assurer que la bonne section a été sélectionnée.. Dans l'exemple ci-dessus, nous fixons un ratio d'utilité maximum de 0.95 et un désir de minimiser la surface de la section transversale. Il a considérablement réduit la superficie et sélectionné une section qui répond toujours à ces critères de conception..
Engagement de vos résultats
Une fois que vous êtes satisfait des résultats, tu peux frapper et Y se rapporte à l'axe y et cliquez Valider les modifications d'accepter ces sections. Le logiciel validera ces formes dans le module Conception, et votre modèle structurel. Le logiciel réexécutera également votre vérification de conception pour vous donner les résultats les plus à jour.. Donc dans notre exemple ci-dessus, après avoir validé, nous pouvons voir que les sections fonctionnent toutes (sauf la seule section qui était surchargée):

Changer votre section depuis le mode conception, cela signifiera que les résultats de votre analyse ne sont pas alignés avec votre modèle actuel. Pour cette raison, nous vous recommandons fortement de revenir en arrière et de résoudre votre modèle, puis de réexécuter la vérification de la conception pour vous assurer que vos résultats d'analyse et de conception sont synchronisés..
Dépannage
Si vous ne parvenez pas à exécuter Designer, tu devrais vérifier ce qui suit:
- Vos sections sont-elles chargées à partir de la base de données de sections SkyCiv? Les sections doivent être chargées à partir de la base de données Section Builder, de cette façon, le Designer sait quel catalogue de sections tester
- Pouvez-vous exécuter une conception de membres “Vérifier”? Cela confirmera que les sections sont toutes concevables et que votre modèle est correctement configuré.. Puisque le concepteur parcourt ce, il devra fonctionner pour votre modèle de base pour fonctionner
- Avez-vous des éléments particuliers (cônes, membres rigides)? L'interface utilisateur devrait empêcher cela, mais dans certains cas cela peut quand même passer à travers. Veuillez supprimer ces éléments spéciaux du modal des paramètres et réessayer d'exécuter le concepteur.
- Vérifiez que vos matériaux correspondent au code de conception testé. Encore une fois, cela devrait être bloqué par l'interface utilisateur, mais dans certains cas, cela peut se produire. Revenez à votre modèle et vérifiez que ces sections correspondent au code de conception que vous essayez d'exécuter. Par exemple, Les NDS doivent avoir des matériaux NDS appropriés ou l'AISC doit avoir un matériau en acier attribué à la section..
- Votre modèle est-il un système d'unités opposé au système d'unités standard de conception? Nous vous recommandons d'exécuter les codes de conception américains en impérial et AS,EN,BS,CSA, etc.. normes toutes en métrique