El Crear, Moverse, y Copiar Los grupos de barras de herramientas contienen los comandos principales de dibujo y edición para SkyCiv CAD.. Active cualquier herramienta haciendo clic en su botón de la barra de herramientas o presionando su método abreviado de teclado, luego interactúa con el lienzo para colocar o transformar la geometría.
Todas las herramientas de creación y copia respetan el activo puntos de referencia ajustes para la colocación de precisión.
Crear
El Crear El grupo de barras de herramientas proporciona todas las herramientas de dibujo de geometría.. Active una herramienta haciendo clic en su botón o presionando su método abreviado de teclado, luego haga clic en el lienzo para colocar la geometría. Todas las herramientas de creación respetan lo activo. puntos de referencia ajustes.
Crear punto
Coloque puntos de referencia individuales en el lienzo.
PAG
El Crear punto La herramienta coloca puntos de coordenadas individuales en el lienzo.. Los puntos actúan como anclajes precisos a los que otra geometría puede unirse, y son útiles como marcadores de referencia en dibujos estructurales..
[__INSERTAR_IMAGEN__]
Paso a paso
- 1Haz clic Crear punto en la barra de herramientas (o presione PAG) para activar el modo de creación de puntos.
- 2Haga clic en cualquier lugar del lienzo para colocar un punto en esa ubicación.
- 3Alternativamente, escriba las coordenadas en
X,Yformato (ej.100,200) y presione Ingresar. - 4Continúe haciendo clic o escribiendo coordenadas para colocar puntos adicionales en la misma sesión..
- 5Presiona Esc para salir del modo de creación de puntos.
Consejo: Las instantáneas alinean automáticamente los puntos con las intersecciones de la cuadrícula, puntos finales existentes, puntos medios, y otras características geométricas. Puedes colocar tantos puntos como necesites antes de presionar Esc.
Crear línea
Dibuja un segmento de línea recta entre dos puntos.
L
El Crear línea La herramienta dibuja segmentos de línea recta individuales.. Cada par de clics define una línea. Esta es la herramienta de dibujo más fundamental en SkyCiv CAD y se usa ampliamente en dibujos estructurales y arquitectónicos..
[__INSERTAR_IMAGEN__]
Paso a paso
- 1Haz clic Crear línea (o presione L) para activar el modo de creación de líneas.
- 2Haga clic en el lienzo para configurar el punto de partida.
- 3Mueve el ratón – una vista previa en vivo de la línea sigue al cursor.
- 4Haga clic para configurar el punto final, o escriba un valor de longitud y presione Ingresar para una distancia precisa.
- 5Presiona Esc salir.
Consejo: Presiona Cambiar+Pestaña para alternar entre cartesiano (X, Desplazamiento Y) y Polar (longitud, ángulo) modos de entrada para un control dimensional preciso.
Crear polilínea
Dibuja una cadena de segmentos de línea conectados como un solo objeto.
Ctrl+L
El Crear polilínea La herramienta dibuja una cadena continua de segmentos de línea almacenados como un solo objeto.. Las polilíneas son ideales para contornos en dibujos estructurales donde todos los segmentos deben permanecer unidos.. Esta herramienta está en un grupo desplegable – haga clic en la flecha en el botón de la barra de herramientas para revelar el Crear spline variante.
[__INSERTAR_IMAGEN__]
Paso a paso
- 1Haz clic Crear polilínea (o presione Ctrl+L) para activar el modo polilínea.
- 2Haga clic en el lienzo para configurar el primer vértice.
- 3Continúe haciendo clic para agregar vértices conectados adicionales – cada clic extiende la polilínea.
- 4Presiona Esc para terminar. La polilínea se almacena como una única forma continua..
Consejo: para crear un cerrado polilínea, ajuste el clic final en el primer vértice. Las instantáneas alinean cada vértice con las intersecciones de la cuadrícula y la geometría existente.
Crear spline
Dibuja una línea curva suave a través de una serie de puntos de control.
SP
El Crear spline la herramienta dibuja suavemente, Líneas continuamente curvas definidas por una serie de puntos de control.. Útil para curvas orgánicas., alineaciones de carreteras, o cualquier geometría que requiera una curvatura suave. Encontrado en el Polilínea grupo desplegable.
[__INSERTAR_IMAGEN__]
Paso a paso
- 1Expanda el menú desplegable Polilínea y haga clic Crear spline (o presione SP).
- 2Haga clic en el lienzo para configurar el primer punto de control.
- 3Continúe haciendo clic para colocar puntos de control adicionales. – la curva se actualiza en vivo.
- 4Presiona Esc para terminar el spline.
Consejo: Utiliza el Formas Panel de opciones para controlar la tensión spline y el comportamiento de interpolación.. Las instantáneas alinean los puntos de control con las intersecciones de la cuadrícula y la geometría existente.
Crear arco
Dibuja un arco circular definido por dos puntos base y una altura de elevación.
A
El Crear arco La herramienta dibuja un arco circular definido por dos puntos base y una altura de elevación. – la distancia perpendicular desde el punto medio de la cuerda hasta el pico del arco. Comúnmente utilizado para vigas curvas., aberturas arqueadas, y elementos estructurales redondeados.
[__INSERTAR_IMAGEN__]
Paso a paso
- 1Haz clic Crear arco (o presione A) para activar el modo arco.
- 2Haga clic en el lienzo para configurar el primer punto base.
- 3Escribe la duración de un acorde y presiona Ingresar, o haga clic para configurar el segundo punto base.
- 4Escriba el altura de subida y presione Ingresar, o mueva el mouse y haga clic para configurarlo visualmente.
- 5El arco se crea con las dimensiones especificadas..
Consejo: Puede mezclar libremente valores escritos y clics del mouse – escriba la longitud de la cuerda con precisión, luego haga clic en la subida visualmente. Utiliza el Formas panel para ajustar el recuento de segmentos de arco y otras propiedades de la curva.
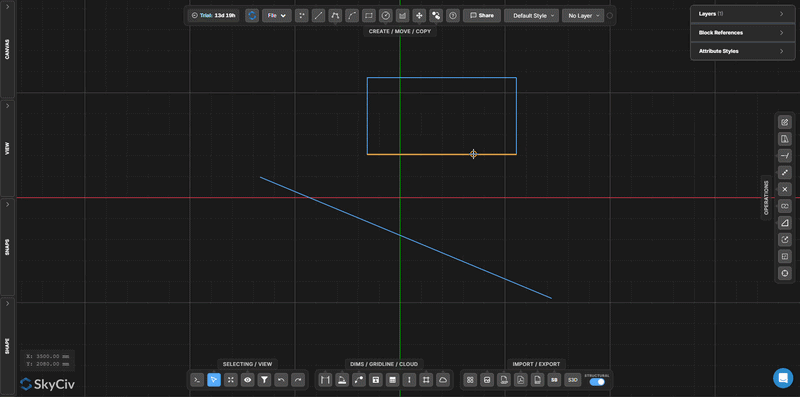
Crear rectángulo
Dibuja un rectángulo alineado con el eje definiendo dos esquinas opuestas
R
El Crear rectángulo La herramienta dibuja un rectángulo alineado con el eje definiendo dos esquinas diagonalmente opuestas.. El resultado es una polilínea cerrada con cuatro esquinas en ángulo recto. – útil para planos de planta, contornos de la placa, y secciones estructurales.
[__INSERTAR_IMAGEN__]
Paso a paso
- 1Haz clic Crear rectángulo (o presione R) para activar el modo rectángulo.
- 2Haga clic en el lienzo para configurar el primera esquina.
- 3Mueve el ratón – una vista previa del rectángulo en vivo sigue al cursor.
- 4Haga clic para configurar el esquina opuesta y completa el rectángulo.
Consejo: Los encajes alinean ambas esquinas con las intersecciones de la cuadrícula y la geometría existente. Para ingresar dimensiones exactas, escriba el ancho y el alto usando la entrada de coordenadas después de establecer la primera esquina.
Crear círculo
Dibuja un círculo colocando un punto central y estableciendo un radio
C
El Crear círculo El botón de la barra de herramientas abre un grupo desplegable con tres variantes.: círculo estándar, circular por 4 arcos, y n-polígono. El círculo estándar coloca un círculo completo de 360° definido por un punto central y un radio..
[__INSERTAR_IMAGEN__]
Paso a paso
- 1Haz clic Crear círculo (o presione C).
- 2Haga clic en el lienzo para configurar el punto central.
- 3Mueva el mouse hacia afuera para obtener una vista previa del radio..
- 4Escriba un valor de radio y presione Ingresar para un tamaño exacto, o haga clic para confirmar visualmente.
Consejo: Utiliza el Formas panel para establecer el recuento de segmentos circulares. Los encajes alinean el centro con las intersecciones de la cuadrícula y otras características geométricas..
Crear círculo por 4 Arcos
Dibuja un círculo construido a partir de cuatro segmentos de arco conectados.
El Crear círculo por 4 Arcos variante construye un círculo a partir de cuatro segmentos de arco conectados. Útil cuando las herramientas posteriores necesitan trabajar con el círculo como entidades de arco distintas en lugar de un único objeto circular.. Encontrado en el Círculo grupo desplegable.
[__INSERTAR_IMAGEN__]
Paso a paso
- 1Expanda el menú desplegable Círculo y haga clic Crear círculo por 4 Arcos.
- 2Haga clic en el lienzo para configurar el punto central.
- 3Mueva el mouse para obtener una vista previa del radio..
- 4Escriba un valor de radio y presione Ingresar, o haga clic para confirmar el tamaño.
- 5El círculo resultante se compone de cuatro segmentos de arco unidos en los puntos cardinales..
Consejo: Esta herramienta es particularmente útil para flujos de trabajo de exportación DXF/DWG que esperan entidades de arco individuales en lugar de un único objeto circular.. Utiliza el Formas panel para controlar las propiedades del segmento de arco.
Crear n-polígono
Dibuja un polígono regular con un número de lados configurable
El Crear n-polígono La herramienta dibuja un polígono regular con cualquier número de lados., colocado por punto central y radio circunscrito. Encontrado en el Círculo grupo desplegable. La forma resultante se almacena como una polilínea cerrada..
[__INSERTAR_IMAGEN__]
Paso a paso
- 1Abre el Formas panel y configure el valor deseado numero de lados (defecto: 6).
- 2Expanda el menú desplegable Círculo y haga clic Crear n-polígono.
- 3Haga clic en el lienzo para configurar el punto central.
- 4Mueva el mouse hacia afuera para obtener una vista previa del tamaño del polígono..
- 5Escriba un valor de radio y presione Ingresar, o haga clic para confirmar.
Consejo: Establezca el número de lados en el Formas “Construcción de madera laminada con espigas antes de activando la herramienta – el recuento no se puede cambiar a mitad de la ubicación. Los encajes alinean el centro con las intersecciones de la cuadrícula y la geometría existente.
Crear sombreado
Rellenar una región cerrada con un patrón de sombreado repetido
H
El Crear sombreado La herramienta rellena una región de límite cerrada con un patrón de sombreado repetido.. Los sombreados se utilizan ampliamente en dibujos estructurales y arquitectónicos para indicar secciones de materiales. – hormigón, viga en Acero, tierra, y más.
[__INSERTAR_IMAGEN__]
Paso a paso
- 1Haz clic Crear sombreado (o presione H) para activar el modo de sombreado.
- 2Haga clic dentro de un región límite cerrada en el lienzo – el límite se detecta automáticamente.
- 3El patrón de sombreado llena la región detectada..
Consejo: El límite debe estar completamente cerrado para que funcione la detección automática.. Utiliza el Formas panel para seleccionar el estilo del patrón, escala, y ángulo antes de colocación.
Moverse
El Moverse El grupo de barras de herramientas reposiciona los objetos seleccionados.. Todas las herramientas de movimiento requieren una selección primero – utilizar el Herramientas de selección para seleccionar objetos, luego active la operación deseada desde el menú desplegable Mover.
Movimiento relativo
Traducir objetos seleccionados por un vector definido por dos puntos seleccionados
M
El Movimiento relativo La herramienta traduce los objetos seleccionados mediante un vector de desplazamiento. – elige un punto base, luego seleccione o escriba un destino para desplazar todos los objetos seleccionados con el mismo desplazamiento. Equivalente al comando MOVE de AutoCAD.
[__INSERTAR_IMAGEN__]
Paso a paso
- 1Selecciona los objetos a mover.
- 2Haz clic Movimiento relativo (o presione M).
- 3Haga clic en cualquier parte del lienzo para configurar el punto base del vector de movimiento.
- 4Mueve el ratón – una vista previa en vivo muestra los objetos desplazados.
- 5Haga clic para colocar, o escriba una distancia exacta y presione Ingresar.
Consejo: Presiona Cambiar+Pestaña para cambiar entre cartesiano (X, Y) y Polar (longitud, ángulo) modos de entrada para un control preciso del desplazamiento.
Girar
Rotar objetos seleccionados alrededor de un punto central en un ángulo específico
Ctrl+R
El Girar La herramienta gira los objetos seleccionados alrededor de un punto central elegido.. Gire arrastrando de forma interactiva o escriba un ángulo exacto en grados. Equivalente al comando GIRAR de AutoCAD.
[__INSERTAR_IMAGEN__]
Paso a paso
- 1Seleccione los objetos a rotar.
- 2Haz clic Girar (o presione Ctrl+R).
- 3Haga clic en el lienzo para configurar el punto central de rotación.
- 4Mueva el mouse para obtener una vista previa del ángulo de rotación..
- 5Haga clic para confirmar, o escriba un ángulo en grados y presione Ingresar.
Consejo: Los encajes alinean el centro de rotación con las intersecciones de la cuadrícula y la geometría clave. Cuando conoce un borde o dirección específica que debe alinearse con un nuevo ángulo, usar Rotación relativa en lugar de evitar el cálculo manual del ángulo.
Rotación relativa
Rotar objetos alineando una dirección de referencia con una nueva dirección de destino
Rotación relativa (Rotación de referencia) le permite rotar una selección especificando una existente de dirección y una nueva objetivo dirección. Ideal cuando sabes que un borde o línea específica debe alinearse con un ángulo o punto objetivo – no se necesita aritmética manual de ángulos.
[__INSERTAR_IMAGEN__]
Paso a paso
- 1Seleccione los objetos a rotar.
- 2Haz clic Rotación relativa en el menú desplegable Mover.
- 3Haga clic para configurar el punto central de rotación.
- 4Haga clic en punto de referencia para definir la corriente (de) dirección.
- 5Mueve el ratón – una vista previa muestra el ángulo sin rotar aún los objetos.
- 6Haz clic en el botón punto objetivo para completar la rotación, o escriba un ángulo y presione Ingresar.
Consejo: Utilice Rotación relativa cuando sepa qué dirección existente debe alinearse con una nueva dirección. Para rotaciones simples de ángulo absoluto, usar Girar.
Alinear
Mover y rotar una selección para que dos puntos de origen coincidan con dos puntos de destino
El Alinear movimientos de herramienta y rota una selección en una sola operación haciendo coincidir dos puntos de origen en la selección con dos puntos de destino en el dibujo. Particularmente poderoso para colocar componentes en su lugar cuando tiene dos ubicaciones de referencia conocidas.
Paso a paso
- 1Seleccione los objetos a alinear.
- 2Haz clic Alinear en el menú desplegable Mover.
- 3Haz clic punto fuente 1 (en la selección), luego punto de destino 1 (en el lienzo).
- 4Haz clic punto fuente 2 (en la selección), luego pasar a punto de destino 2.
- 5Haga clic para completar – la selección se traslada y gira simultáneamente para que ambos pares de puntos coincidan.
Consejo: Alinear mueve el punto de origen 1 al punto de destino 1, luego gira toda la selección para que el punto de origen 2 se alinea con el punto de destino 2. Utilice instantáneas para seleccionar puntos exactos en la geometría existente.
Espejo
Reflejar objetos seleccionados a través de una línea de espejo definida por el usuario
MI
El Espejo La herramienta refleja los objetos seleccionados a través de un eje de espejo definido por dos puntos.. Los objetos originales son reemplazados por sus homólogos reflejados.. Para conservar los originales, usar Copia espejo en lugar de.
[__INSERTAR_IMAGEN__]
Paso a paso
- 1Seleccione los objetos a reflejar.
- 2Haz clic Espejo (o presione MI) en el menú desplegable Mover.
- 3Haga clic para configurar el punto de partida de la línea del espejo.
- 4Haga clic para configurar el punto final de la línea del espejo.
- 5La selección se refleja en el eje definido..
Consejo: La línea del espejo puede estar en cualquier ángulo.. Ajustar a la geometría existente para obtener un eje preciso. Usar Copia espejo cuando necesita conservar tanto el resultado original como el reflejado.
Copiar
El Copiar El grupo de la barra de herramientas crea duplicados de los objetos seleccionados. – por desplazamiento, reflejar, formación, compensar, o rotación. Seleccione los objetos primero, luego active la operación de copia deseada desde el menú desplegable Copiar.
Copia relativa
Copie los objetos seleccionados y desplace la copia por un vector definido por el usuario
El Copia relativa La herramienta duplica los objetos seleccionados y coloca la copia en un desplazamiento definido seleccionando un punto base y un destino.. El flujo de trabajo es idéntico a Movimiento relativo – pero los originales permanecen en su lugar.
[__INSERTAR_IMAGEN__]
Paso a paso
- 1Seleccione los objetos a copiar.
- 2Haz clic Copia relativa en el menú desplegable Copiar.
- 3Haga clic en cualquier parte del lienzo para configurar el punto base.
- 4Mueve el ratón – una vista previa en vivo de la copia sigue al cursor.
- 5Haga clic para colocar la copia., o escriba una distancia exacta y presione Ingresar.
Consejo: Presiona Cambiar+Pestaña para alternar entre cartesiano y Polar modos de entrada. Puede colocar varias copias si continúa haciendo clic – cadera-copia-jack-vigas Esc salir.
Copia espejo
Cree un duplicado reflejado manteniendo los objetos originales.
ML
Copia espejo crea un duplicado reflejado de los objetos seleccionados a través de un eje definido por el usuario, dejando los originales en su lugar. Utilice esto en lugar de Espejo cuando necesitas tanto el original como su reflejo.
[__INSERTAR_IMAGEN__]
Paso a paso
- 1Seleccione los objetos para copiar en espejo.
- 2Haz clic Copia espejo (o presione ML) en el menú desplegable Copiar.
- 3Haga clic para configurar el punto de partida de la línea del espejo.
- 4Haga clic para configurar el punto final de la línea del espejo.
- 5Se crea una copia reflejada. – los originales permanecen sin cambios.
Consejo: El eje del espejo puede estar en cualquier ángulo.. Ajustar a la geometría existente para definir un eje preciso. Usar Espejo si desea reemplazar los originales en lugar de conservarlos.
Copiar matriz
Distribuir copias de objetos seleccionados en un patrón de matriz lineal
Arkansas
El Copiar matriz La herramienta distribuye múltiples copias de objetos seleccionados a lo largo de una dirección vectorial.. El número de copias y la extensión total se configuran en el Formas “Construcción de madera laminada con espigas, haciéndolo ideal para elementos estructurales espaciados regularmente, como columnas, armaduras, y grupos de tornillos.
[__INSERTAR_IMAGEN__]
Paso a paso
- 1Seleccione los objetos para formar la matriz.
- 2Selecciona el recuento de copias y distancia del tramo en el Formas “Construcción de madera laminada con espigas.
- 3Haz clic Copiar matriz (o presione Arkansas) en el menú desplegable Copiar.
- 4Haga clic para configurar el punto base de la matriz.
- 5Mueve el ratón para establecer la dirección., luego haga clic para crear las copias.
Consejo: Configure el recuento y la duración de copias en el Formas panel antes de activar la herramienta. Para matrices rotacionales (patrones circulares), usar Copiar por rotación en lugar de.
Copia compensada
Cree una copia paralela de líneas o polilíneas a una distancia perpendicular especificada
O
El Copia compensada La herramienta crea un duplicado paralelo de líneas o polilíneas seleccionadas a una distancia perpendicular especificada.. Equivalente al comando DESREF de AutoCAD – comúnmente utilizado para el espesor de la pared, marcas de carril, y miembros estructurales paralelos.
[__INSERTAR_IMAGEN__]
Paso a paso
- 1Seleccione las líneas o polilíneas para compensar.
- 2Introduzca el distancia de compensación en el Formas “Construcción de madera laminada con espigas.
- 3Haz clic Copia compensada (o presione O) en el menú desplegable Copiar.
- 4La copia compensada se crea paralela al original a la distancia especificada.
Consejo: Utilice un positivo valor para desplazar hacia un lado y hacia negativo valor para el otro. La dirección es relativa a la orientación de la línea original..
Copiar por rotación
Cree múltiples copias rotadas dispuestas alrededor de un punto central
El Copiar por rotación La herramienta crea múltiples copias de objetos seleccionados en una circular. (polar) patrón alrededor de un punto central. Útil para estructuras radialmente simétricas, como grupos de pernos en una brida o miembros en una armadura circular..
[__INSERTAR_IMAGEN__]
Paso a paso
- 1Seleccionar los objetos a copiar por rotación.
- 2Selecciona el recuento de copias y ángulo de rotación total en el Formas “Construcción de madera laminada con espigas.
- 3Haz clic Copiar por rotación en el menú desplegable Copiar.
- 4Haga clic para configurar el punto central de rotación.
- 5Mueva el mouse para obtener una vista previa, luego haga clic para crear las copias.
Consejo: Para copias espaciadas uniformemente alrededor de un círculo completo, establezca el ángulo en 360° y la cuenta hasta el número deseado. Configure ambos valores en Formas antes de activar la herramienta.