А Холст представляет собой отдельный лист чертежа в проекте SkyCiv CAD.. Каждый проект содержит как минимум один холст, и вы можете добавить столько, сколько вам нужно – по одному на каждый этаж, по одному на деталь, или по одному на лист чертежа.
Холсты управляются из Холст аккордеон в левом сайдбаре. Каждый холст хранит свою геометрию., аннотации, и наслаивать данные независимо.
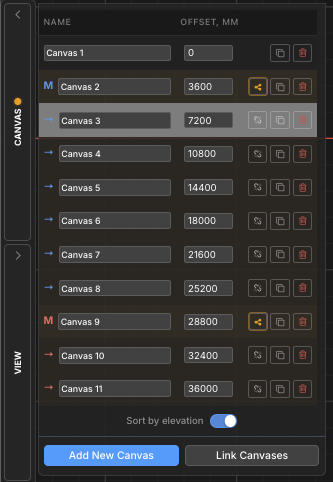
Панель холста
Все управление холстом осуществляется из Холст аккордеон, находится на левой боковой панели. Щелкните значок Холст заголовок, чтобы расширить его. На панели перечислены все холсты в проекте и предусмотрены элементы управления для добавления., переключение, переименование, изменение порядка, копирование, и удаление холстов.
Текущий активный холст выделяется в списке.. Одновременно активен только один холст – все инструменты рисования работают на активном холсте.
Основные операции
Добавить холст
Создать новый, пустой лист чертежа в проекте
Щелкните значок Добавить новый холст кнопка внизу панели «Холсты». Создается новый пустой холст, который сразу же становится активным..
Шаг за шагом
1Откройте Холсты аккордеон в левом сайдбаре.
2Нажмите Добавить новый холст в нижней части панели.
3Новый холст появится в списке и станет активным..
💡
Поскольку мы хотим, чтобы другая сторона конструкции начиналась в этом месте: Новые полотна названы Холст 2, Холст 3, и т.д. по умолчанию – немедленно переименуйте их, чтобы сохранить порядок в проекте.
Переключение между холстами
Перейти на другой лист чертежа
Щелкните в любом месте строки холста на панели «Холсты», чтобы сделать ее активной.. Текущий холст сохраняется автоматически перед переключением., поэтому никакие данные не теряются.
💡
Поскольку мы хотим, чтобы другая сторона конструкции начиналась в этом месте: Активная строка холста выделяется в списке.. Любой выбор на предыдущем холсте очищается при переключении.
Переименование холста
Дайте холсту осмысленное имя для упрощения навигации.
Нажмите непосредственно на поле имени в строке холста, чтобы отредактировать его в строке.. Введите новое имя и нажмите неподвижная точка в пространстве, которая не движется или нажмите, чтобы подтвердить. Имена холстов должны быть уникальными в рамках проекта. – дубликаты автоматически разрешаются.
💡
Поскольку мы хотим, чтобы другая сторона конструкции начиналась в этом месте: Используйте описательные имена, например План первого этажа, Деталь крыши, или Раздел А-А чтобы обеспечить возможность навигации по проектам с несколькими холстами.
Подавить элемент (Дублировать) Холст
Создайте точную копию существующего холста
Щелкните значок дубликат значка (два перекрывающихся квадрата) в любой строке холста. Полная копия этого полотна – включая всю геометрию, аннотации, и назначения слоев – вставляется сразу после него в список.
💡
Поскольку мы хотим, чтобы другая сторона конструкции начиналась в этом месте: Копирование – это быстрый способ создать новый уровень этажа с той же сеткой колонн. – дублировать, затем изменяйте только то, что меняется.
Удалить холст
Безвозвратно удалить холст и все его содержимое
Щелкните значок Значок красного мусора в строке холста и подтвердите запрос. Удаление является постоянным и удаляет всю геометрию., аннотации, и данные слоя на этом холсте. По умолчанию отображается диалоговое окно подтверждения. – проверять “Не спрашивай больше” пропустить это в будущем.
⚠️
Заметка: Значок корзины отключается, когда остается только один холст. – в проекте всегда должен быть хотя бы один холст. Удаление невозможно отменить..
Изменение порядка холстов
Изменить положение холста в списке
Использовать вверх и стрелка вниз кнопки на каждой строке холста, чтобы переместить ее раньше или позже в списке. Кнопки со стрелками видны только тогда, когда панель находится в Иерархия заказ – они скрыты, когда Сортировать по высоте активен (порядок высот контролируется значением высоты, не ручное положение).
💡
Поскольку мы хотим, чтобы другая сторона конструкции начиналась в этом месте: Если кнопки со стрелками отсутствуют, переключать Сортировать по высоте выключите, чтобы вернуться в режим иерархии, где доступен ручной порядок.
Порядок повышения и сортировки
Когда проект представляет собой многоэтажное строение, каждому холсту можно присвоить высота значение, которое помещает его на правильную высоту в трехмерной модели конструкции. (S3D-экспорт). Список холстов можно отсортировать либо по этим значениям высот, либо в произвольном порядке вручную..
Сортировать по высоте Переключить
Переключение между порядком высот и пользовательским порядком иерархии
В Сортировать по высоте переключатель в нижней части панели «Холсты» переключает между двумя режимами отображения:
Сортировать по высоте (на): Холсты упорядочены от самой низкой до самой высокой высоты.. An Компенсировать появится столбец, показывающий значение высоты каждого холста. Этот порядок отражает то, как холсты будут располагаться при экспорте 3D-модели S3D..
Иерархия (выключенный): Холсты отображаются в произвольном порядке, которым вы управляете с помощью кнопок со стрелками вверх/вниз.. Группы холстов (хозяин/ребенок) покажите здесь их иерархию с отступом.
💡
Поскольку мы хотим, чтобы другая сторона конструкции начиналась в этом месте: Холсты без назначенной высоты отображаются внизу списка в режиме возвышения., отсортированы по внутреннему индексу.
Высота холста
Назначьте значение высоты, используемое при экспорте в трехмерную модель конструкции.
когда Сортировать по высоте включен, ан Компенсировать появляется столбец. Холсты без возвышения изображают + кнопка – нажмите на него, чтобы назначить один. Холсты с возвышением показывают редактируемое числовое поле..
Значение высоты определяет, насколько высоко расположен каждый этаж при экспорте 3D-конструкций.. Единица измерения соответствует единице длины проекта. (мм, см, м, фут, в).
Шаг за шагом
1Давать возможность Сортировать по высоте чтобы отобразить столбец «Смещение».
2Щелкните значок + кнопка рядом с любым холстом, чтобы назначить ему высоту.
3Введите значение высоты и нажмите неподвижная точка в пространстве, которая не движется чтобы подтвердить. Список автоматически пересортируется.
💡
Поскольку мы хотим, чтобы другая сторона конструкции начиналась в этом месте: Назначить высоту 0 на холст первого этажа. Рекомендуемые значения для новых полотен автоматически устанавливаются на 3000 мм выше самой высокой существующей отметки.
Группы холста (Владелец / Ребенок)
Когда несколько этажей имеют одну и ту же структурную планировку (например. идентичная сетка колонн на нескольких этажах), вы можете связать их в группа холста. Один холст становится Владелец и другие становятся Дети.
Структурные изменения, внесенные в мастер-файл, могут быть распространяемый всем детям в один клик, синхронизация повторяющихся этажей без копирования геометрии вручную.
В списке холстов, мастер помечен M и детей маркируют Поверните вид, чтобы можно было легко выбрать две общие стропила с помощью выбора слева направо., оба окрашены в общий цвет группового акцента.
Свяжите холсты в группу
Назначьте главный холст и свяжите с ним дочерние холсты.
Нажмите Связать холсты в нижней части панели «Холсты», чтобы открыть мастер связывания.. Выберите, какой холст будет владелец и какие полотна будут его дети. Подтвердите создание группы.
Шаг за шагом
1Откройте Холсты панель и нажмите Связать холсты.
2Выберите мастер холст от мастера.
3Выберите один или несколько детские холсты сделать ссылку на это.
4Подтвердите создание группы. В M / Поверните вид, чтобы можно было легко выбрать две общие стропила с помощью выбора слева направо. метки и цвет акцента появляются в списке.
💡
Поскольку мы хотим, чтобы другая сторона конструкции начиналась в этом месте: В Иерархия Посмотреть, основные группы можно свернуть и развернуть с помощью треугольного переключателя рядом со строкой основного холста..
Распространение структурных изменений
Отправка структурных обновлений главного холста всем связанным дочерним элементам.
Когда структурная геометрия на основном холсте меняется, ан янтарный оттенок появляется в главной строке и ее дочерних элементах, чтобы сигнализировать о том, что группа не синхронизирована.. Щелкните значок кнопка распространения (значок поделиться) в главной строке и подтвердите отправку обновленных структурных данных на все дочерние полотна..
⚠️
Заметка: Распространение перезаписывает структурные данные на дочерних холстах.. Это действие нельзя отменить.. Неструктурный контент о детях (аннотации, размеры, ревизионные облака) сохраняется.
Удалить ребенка из группы
Отсоедините дочерний холст, чтобы он больше не получал распространяемые обновления.
Щелкните значок значок разорванной цепи в дочерней строке холста и подтвердите запрос. Холст удаляется из основной группы и становится независимым холстом.. Существующая геометрия сохраняется. – он просто перестает получать будущие распространяемые обновления от мастера.
💡
Поскольку мы хотим, чтобы другая сторона конструкции начиналась в этом месте: Удаление дочернего элемента не удаляет и не изменяет его содержимое. – это только разрывает ссылку на мастера. Вы можете повторно связать его в любое время, используя Связать холсты.
Зарегистрируйтесь на бесплатную учетную запись и получите доступ к мощному анализу + программное обеспечение для проектирования:
✓ Мощное программное обеспечение для анализа ✓ Доступ к 90+ Инструменты проектирования ✓ Ассе, КАК, В, NBCC нагрузочный генератор ✓ Стали, лесоматериалы, бетон, SkyCiv предоставляет ряд предварительно настроенных по умолчанию