Bir Tuval SkyCiv CAD projesi içindeki tek bir çizim sayfasıdır. Her proje en az bir tuval içerir, ve ihtiyacınız olduğu kadar ekleyebilirsiniz – her kat seviyesinde bir tane, detay başına bir tane, veya çizim sayfası başına bir tane.
Kanvaslar şuradan yönetilir: Tuval sol kenar çubuğunda akordeon. Her tuval kendi geometrisini saklar, ek açıklamalar, ve verileri bağımsız olarak katmanlandırın.
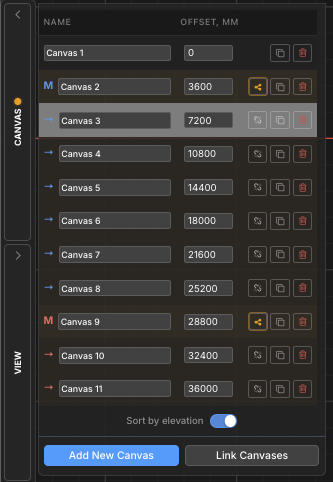
Kanvas Paneli
Tüm tuval yönetimi şuradan yapılır: Tuval akordeon, sol kenar çubuğunda bulunur. Tıkla Tuval genişletmek için başlık. Panel, projedeki her tuvali listeler ve eklemek için kontroller sağlar., anahtarlama, yeniden adlandırma, yeniden sıralama, kopyalama, ve tuvalleri silmek.
Şu anda etkin olan tuval listede vurgulanır. Aynı anda yalnızca bir tuval etkindir – tüm çizim araçları aktif tuval üzerinde çalışır.
Temel İşlemler
Kanvas Ekle
Yeni bir tane oluştur, projedeki boş çizim sayfası
Tıkla Yeni Kanvas Ekle Kanvaslar panelinin altındaki düğmesi. Yeni bir boş tuval oluşturulur ve hemen etkinleştirilir.
Adım adım
1Aç tuvaller sol kenar çubuğunda akordeon.
2Tıklayın Yeni Kanvas Ekle panelin alt kısmında.
3Yeni tuval listede görünür ve etkin tuval haline gelir.
💡
Aşağıdaki açılır pencere, aşağıdaki iki gerekli girişle birlikte gösterilecektir.: Yeni tuvallere isim verildi Tuval 2, Tuval 3, vb. varsayılan olarak – projeyi düzenli tutmak için onları hemen yeniden adlandırın.
Tuvaller Arasında Geçiş Yapın
Farklı bir teknik resim çalışma sayfasına gitme
Etkinleştirmek için Kanvaslar panelinde bir tuval satırında herhangi bir yeri tıklayın. Geçerli tuval, geçiş yapılmadan önce otomatik olarak kaydedilir, yani hiçbir veri kaybolmaz.
💡
Aşağıdaki açılır pencere, aşağıdaki iki gerekli girişle birlikte gösterilecektir.: Etkin tuval satırı listede vurgulanır. Geçiş yaptığınızda önceki tuvaldeki tüm seçimler temizlenir.
Tuvali Yeniden Adlandırın
Daha kolay gezinmek için tuvale anlamlı bir ad verin
Satır içi düzenlemek için tuval satırındaki ad alanına doğrudan tıklayın. Yeni adı yazın ve tuşuna basın. seçin veya onaylamak için tıklayın. Tuval adları proje içinde benzersiz olmalıdır – kopyalar otomatik olarak çözümlenir.
💡
Aşağıdaki açılır pencere, aşağıdaki iki gerekli girişle birlikte gösterilecektir.: Gibi açıklayıcı adlar kullanın Zemin Kat Planı, Çatı Detayı, veya Bölüm A-A çoklu tuval projelerinde gezinilebilir tutmak için.
Öğeleri bastırmak, üyeleri döndürmenin hızlı ve kolay bir yoludur (Kopyalamak) bir tuval
Mevcut bir tuvalin tam bir kopyasını oluşturun
Tıkla yinelenen simge (örtüşen iki kare) herhangi bir tuval satırında. O tuvalin tam kopyası – tüm geometri dahil, ek açıklamalar, ve katman atamaları – listede hemen sonrasına eklenir.
💡
Aşağıdaki açılır pencere, aşağıdaki iki gerekli girişle birlikte gösterilecektir.: Kopyalama, aynı sütun ızgarasını paylaşan yeni bir kat seviyesi oluşturmanın hızlı bir yoludur – çiftleme, sonra yalnızca değişenleri değiştirin.
Kanvas Silme
Bir tuvali ve tüm içeriğini kalıcı olarak kaldırma
Tıkla kırmızı çöp kutusu simgesi tuval satırına tıklayın ve istemi onaylayın. Silme işlemi kalıcıdır ve tüm geometriyi kaldırır, ek açıklamalar, ve verileri bu tuval üzerine katmanlayın. Varsayılan olarak bir onay iletişim kutusu gösterilir – net sonuç çıktısı ve harita/yükseklik “Bir daha sorma” gelecekte bunu atlamak.
⚠️
Not: Yalnızca bir tuval kaldığında çöp kutusu simgesi devre dışı bırakılır – bir projede her zaman en az bir tuval bulunmalıdır. Silme işlemi geri alınamaz.
Kanvasları Yeniden Sırala
Listedeki tuvalin konumunu değiştirme
Kullan yukarı ve aşağı ok listede daha önceye veya sonraya taşımak için her tuval satırındaki düğmeler. Ok düğmeleri yalnızca panel açıkken görünür Hiyerarşi sipariş – ne zaman gizlenirler Yüksekliğe göre sırala aktif (yükseklik sırası yükseklik değeri tarafından kontrol edilir, manuel konum değil).
💡
Aşağıdaki açılır pencere, aşağıdaki iki gerekli girişle birlikte gösterilecektir.: Ok düğmeleri eksikse, aç / kapat Yüksekliğe göre sırala manuel sıralamanın mümkün olduğu hiyerarşi moduna dönmek için kapalı.
Yükseklik ve Sıralama Düzeni
Bir proje çok katlı bir yapıyı temsil ettiğinde, her tuvale bir atanabilir yükseklik 3 boyutlu yapısal modelde onu doğru yüksekliğe yerleştiren değer (S3D dışa aktarma). Kanvas listesi bu yükseklik değerlerine göre veya özel bir manuel sıralamaya göre sıralanabilir.
Yüksekliğe Göre Sırala Geçişi
Yükseliş sırası ile özel hiyerarşi sırası arasında geçiş yapın
NS Yüksekliğe göre sırala Kanvaslar panelinin altındaki geçiş iki görüntüleme modu arasında geçiş yapar:
Yüksekliğe göre sırala (açık): Kanvaslar en alçaktan en yükseğe doğru sıralanır. Bir Telafi etmek her tuvalin yükseklik değerini gösteren sütun görünür. Bu sıra, S3D 3D model dışa aktarımında tuvallerin nasıl istifleneceğini yansıtır.
Hiyerarşi (kapalı): Kanvaslar, yukarı/aşağı ok düğmelerini kullanarak kontrol edebileceğiniz özel bir sırada görünür. Kanvas grupları (usta/çocuk) girintili hiyerarşilerini burada göster.
💡
Aşağıdaki açılır pencere, aşağıdaki iki gerekli girişle birlikte gösterilecektir.: Atanan yüksekliği olmayan tuvaller, yükseklik modunda listenin altında görünür, dahili indekslerine göre sıralanmış.
Kanvas Yüksekliği
3B yapısal modele dışa aktarırken kullanılan bir yükseklik değeri atayın
Ne zaman Yüksekliğe göre sırala açık, bir Telafi etmek sütun görünür. Yüksekliği olmayan tuvaller bir + buton – birini atamak için tıklayın. Yüksekliği olan tuvaller düzenlenebilir bir sayı alanını gösterir.
Yükseklik değeri, 3B yapısal dışa aktarımda her katın ne kadar yükseğe yerleştirileceğini belirler. Birim, proje uzunluk birimiyle eşleşir (mm, santimetre, m, ft, içinde).
Adım adım
1Olanak vermek Yüksekliğe göre sırala Uzaklık sütununu göstermek için.
2Tıkla + herhangi bir tuvale bir yükseklik atamak için yanındaki düğme.
3Yükseklik değerini yazın ve tuşuna basın. seçin onaylamak. Liste otomatik olarak yeniden sıralanır.
💡
Aşağıdaki açılır pencere, aşağıdaki iki gerekli girişle birlikte gösterilecektir.: Yükseklik ata 0 zemin kattaki tuvale. Yeni tuvaller için önerilen değerler otomatik olarak şu şekilde ayarlanır: 3000 mevcut en yüksek yüksekliğin mm üzerinde.
Kanvas Grupları (Usta / Çocuk)
Birden fazla kat seviyesi aynı yapısal düzeni paylaştığında (Örneğin. birkaç kat boyunca aynı sütun ızgaraları), bunları bir bağlantıya bağlayabilirsiniz tuval grubu. Bir tuval olur Usta ve diğerleri olur Çocuk.
Master'da yapılan yapısal değişiklikler yayılan tek tıkla tüm çocuklara, geometriyi manuel olarak kopyalamadan tekrarlanan katları senkronize tutmak.
Kanvas listesinde, usta etiketlendi M ve çocuklar etiketleniyor Şimdi kalça ve ortak kirişlere sahibiz, her ikisi de ortak bir grup vurgu rengiyle renklendirilmiştir.
Kanvasları bir Gruba Bağlama
Bir ana tuval belirleyin ve alt tuvalleri buna bağlayın
Tıklayın Bağlantı Kanvasları bağlama sihirbazını açmak için Kanvaslar panelinin alt kısmında. Hangi tuvalin olacağını seçin usta ve hangi tuvaller onun olacak çocuklar. Grubu oluşturmayı onaylayın.
Adım adım
1Aç tuvaller paneli ve tıklayın Bağlantı Kanvasları.
2Seç ana tuval sihirbazdan.
3Bir veya daha fazlasını seçin çocuk tuvalleri ona bağlantı vermek.
4Grubu oluşturmayı onaylayın. NS M / Şimdi kalça ve ortak kirişlere sahibiz etiketler ve vurgu rengi listede görünür.
💡
Aşağıdaki açılır pencere, aşağıdaki iki gerekli girişle birlikte gösterilecektir.: İçinde Hiyerarşi görünüm, Ana gruplar, ana tuval satırının yanındaki üçgen geçiş düğmesi kullanılarak daraltılabilir ve genişletilebilir.
Yapısal Değişiklikleri Yaymak
Ana tuval yapısal güncellemelerini bağlantılı tüm alt öğelere aktarın
Ana tuvaldeki yapısal geometri değiştiğinde, bir kehribar rengi vurgu ana satırda ve alt öğelerinde grubun senkronize olmadığının sinyalini vermek için görünür. Tıkla yay düğmesi (paylaş simgesi) ana satıra gidin ve güncellenen yapısal verileri tüm alt tuvallere aktarmayı onaylayın.
⚠️
Not: Yayılma, alt tuvallerdeki yapısal verilerin üzerine yazar. Bu işlem geri alınamaz. Çocuklara ilişkin yapısal olmayan içerik (ek açıklamalar, boyutlar, revizyon bulutları) korunmuş.
Bir Çocuğu Gruptan Kaldırma
Artık yayılan güncellemeleri almaması için alt tuvali ayırın
Tıkla zinciri kırılmış simge bir alt tuval satırında ve istemi onaylayın. Kanvas ana gruptan kaldırılır ve bağımsız bir kanvas haline gelir. Mevcut geometrisi korunur – yalnızca ana birimden gelecekte yayılacak güncellemeleri almayı durdurur.
💡
Aşağıdaki açılır pencere, aşağıdaki iki gerekli girişle birlikte gösterilecektir.: Bir çocuğun kaldırılması onun içeriğini silmez veya değiştirmez – yalnızca ustayla olan bağlantıyı keser. kullanarak istediğiniz zaman yeniden bağlayabilirsiniz. Bağlantı Kanvasları.
Ücretsiz bir hesap için kaydolun ve güçlü analize erişin + tasarım yazılımı:
✓ Güçlü Analiz Yazılımı ✓ Erişim 90+ Tasarım Araçları ✓ EKSENLER, GİBİ, İÇİNDE, NBCC yük jeneratörü ✓ Çelik, Kereste, Somut, Bu malzemelerin, ihtiyacınız olan yapıyı modellemek için üyeleri ve plakaları temsil eden bölümlere atanması gerekir.