‘R'ye dokunarak üyeleri hızlı bir şekilde açılı veya göreceli konuma ekleyin’
Geleneksel modelleme yöntemlerine ek olarak Yapısal 3D, SkyCiv’in göreceli üye işlevi, kullanıcılara yapılarını daha hızlı ve daha kolay modellemenin başka bir yolunu sunar.
Kullanmak için akraba üye fonksiyon, Önce bir düğüm seçin ve:
a) "R" tuşuna basın, veya
b) Sağ tıklama düğümü ve seçin Akraba Üye Ekle.
Bu, aşağıda gösterildiği gibi en iyi izlemeye yardımcı olmak için model alanının etrafında hareket edebileceğim küçük bir pop-up getirecek:
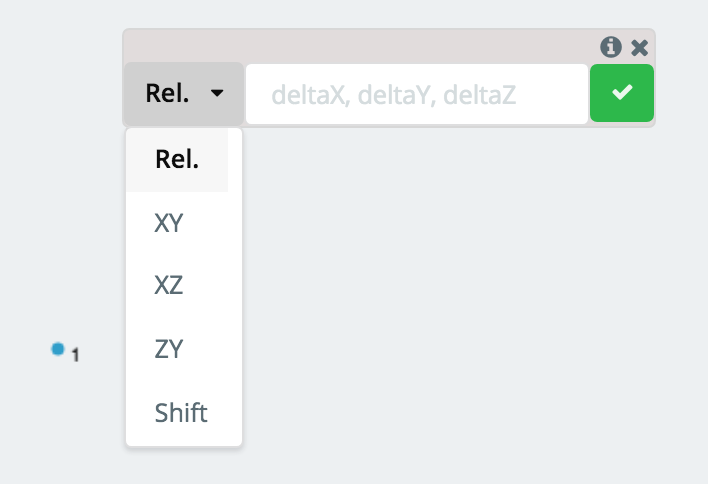
Buradan, Gerekli verileri koymak için göreceli elemanı ve giriş alanını ekleme yöntemini seçmek için açılır listeyi kullanın. İki ana yöntem var (Relat, Uzunluk/açı) göreceli üyeler eklemek için, aşağıda keşfedilecek:
Global eksen projeksiyonunu kullanarak göreceli bir üye ekleme
NS “Rel.” Yöntem, göreceli bir üye eklemek için varsayılan yöntemdir. Giriş alanında gösterilen üç değer (delilik, Deltay, Deltaz) Seçilen düğümden yeni oluşturulan düğüme konumdaki değişikliğe karşılık gelir. Bu, X'teki değişikliği bildiğinizde 3D boşlukta modelleme için özellikle yararlıdır., Y, ve bit son noktalar arasında.
Misal:
Seçilen düğümse, Düğüm Söyle 1, pozisyonda (0,1,4) Ve düğümden bir üye oluşturmak istedin 1 bir düğüme göre (10,12,8), Düğüm Söyle 2, koyarsın (10,11,4) Değerler olarak (delilik, Deltay, Deltaz). Yeni düğüme projeksiyon noktalı bir çizgi olarak gösterilecek:
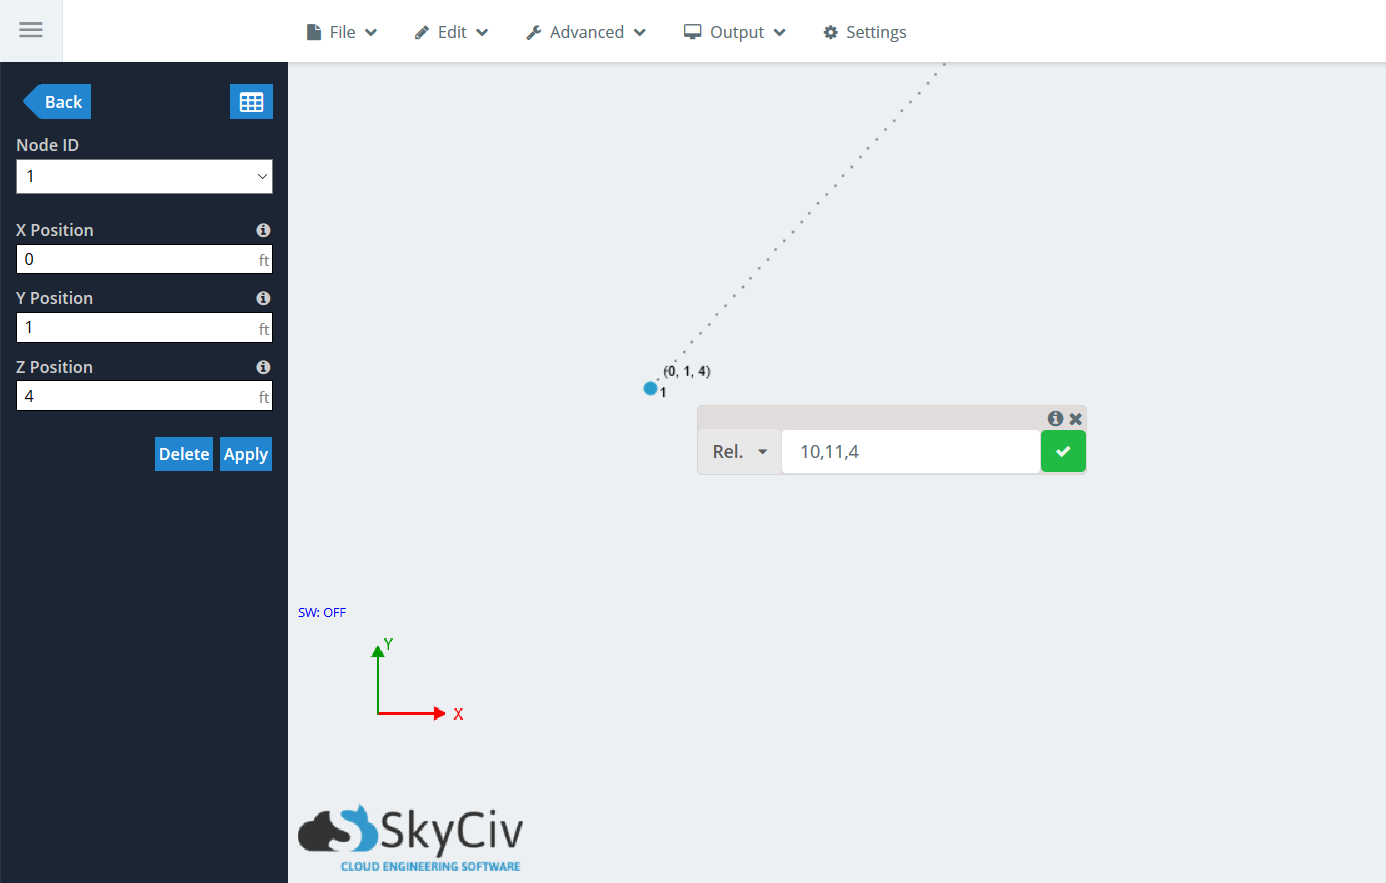
Yeşil onay işaretini tıklayın, veya vur seçin, Üyenin neslini kabul etmek. Göreceli üye penceresi, üst üste birden fazla üyeyi zincirleyebilmeniz için kalır.. Başka bir üye üretmeyi seçerseniz, Origin düğümü düğüm olacak 2, Böylece delta değerleri buna göre olacak, Düğüm Değil 1.
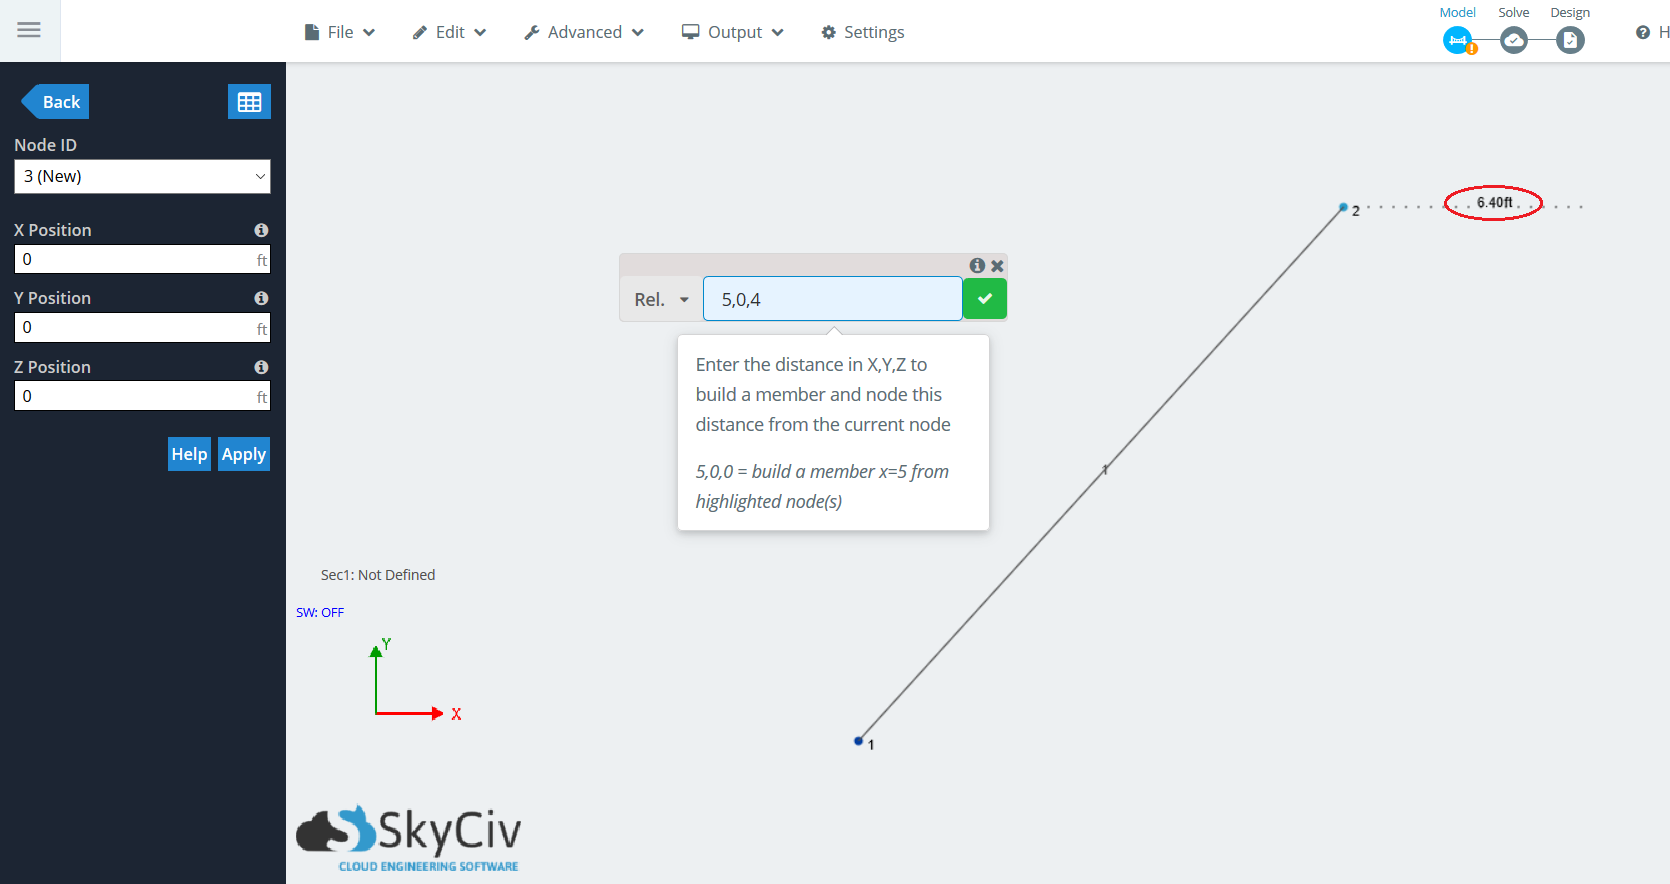
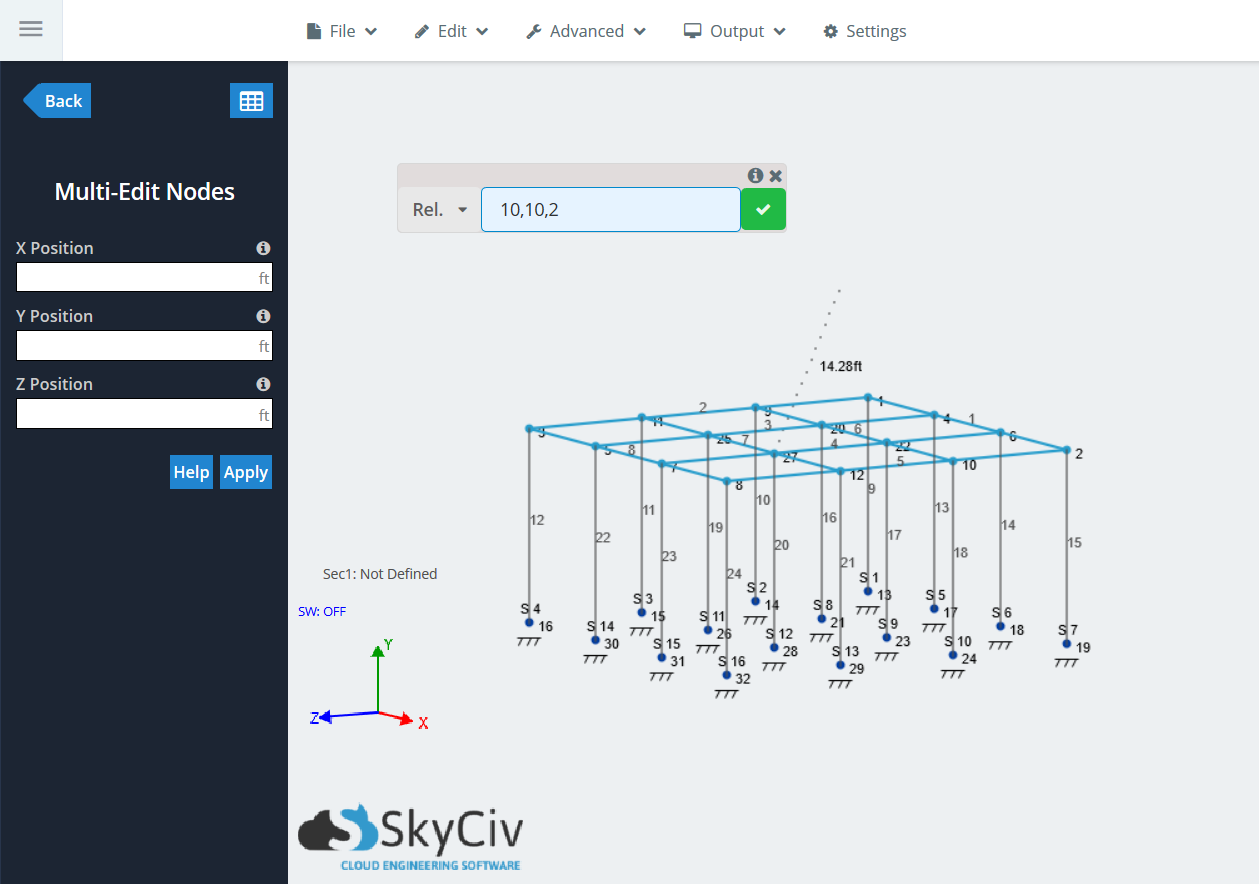
Aşağıdaki resimde not, noktalı projeksiyon çizgisi gösterilirken, üye uzunluğunu gösterecek, Kalem aracını kullanırken benzer:
Açı ve uzunluk kullanarak göreceli bir üye eklemek
Bu yöntem, kullanıcıların hızlı açılı bir üye için bir üye uzunluğu ve açısı girmesini sağlar. 2B boşlukta modellenirken yararlıdır ve oluşturmak istediğiniz üyenin açısını ve uzunluğunu bilirsiniz.. Açıyı yataydan girerek seçilen bir düğümden bir üye oluşturabilirsiniz (Saat yönünün tersine gitmek) ve üyenin uzunluğu.
Çünkü 3D alanda bir düğüm oluşturmak için kullanılabilecek sonsuz sayıda uçak var, Kullanıcılar bu yöntemi üç küresel eksenli düzlemden biriyle kullanma yeteneğine sahiptir: XY, Yz, ve xz. Bu üç seçeneğin giriş alanında gösterilen iki değer (açı, uzunluk) Yataydan derecelerdeki açıya ve üyenin uzunluğuna karşılık gelir, sırasıyla.
Misal:
Diyelim ki XY düzleminde bir düğümden kaynaklanan açılı bir üye oluşturmak istersiniz. (Ö,Ö,Ö), Düğüm Söyle 1. Üyenin oturduğunu biliyorsunuz 30 Yataydan derece açısı, Bu durumda x ekseni, ve 12 Ayaklar Uzun. Düğümü seçin, ‘R basın’ getirmek için akraba üye fonksiyon. Açılır listeye tıklayın ve gidin “XY”. Yerleştir (30,12) giriş alanında, Projeksiyon yine noktalı bir çizgi olarak gösterilecek:
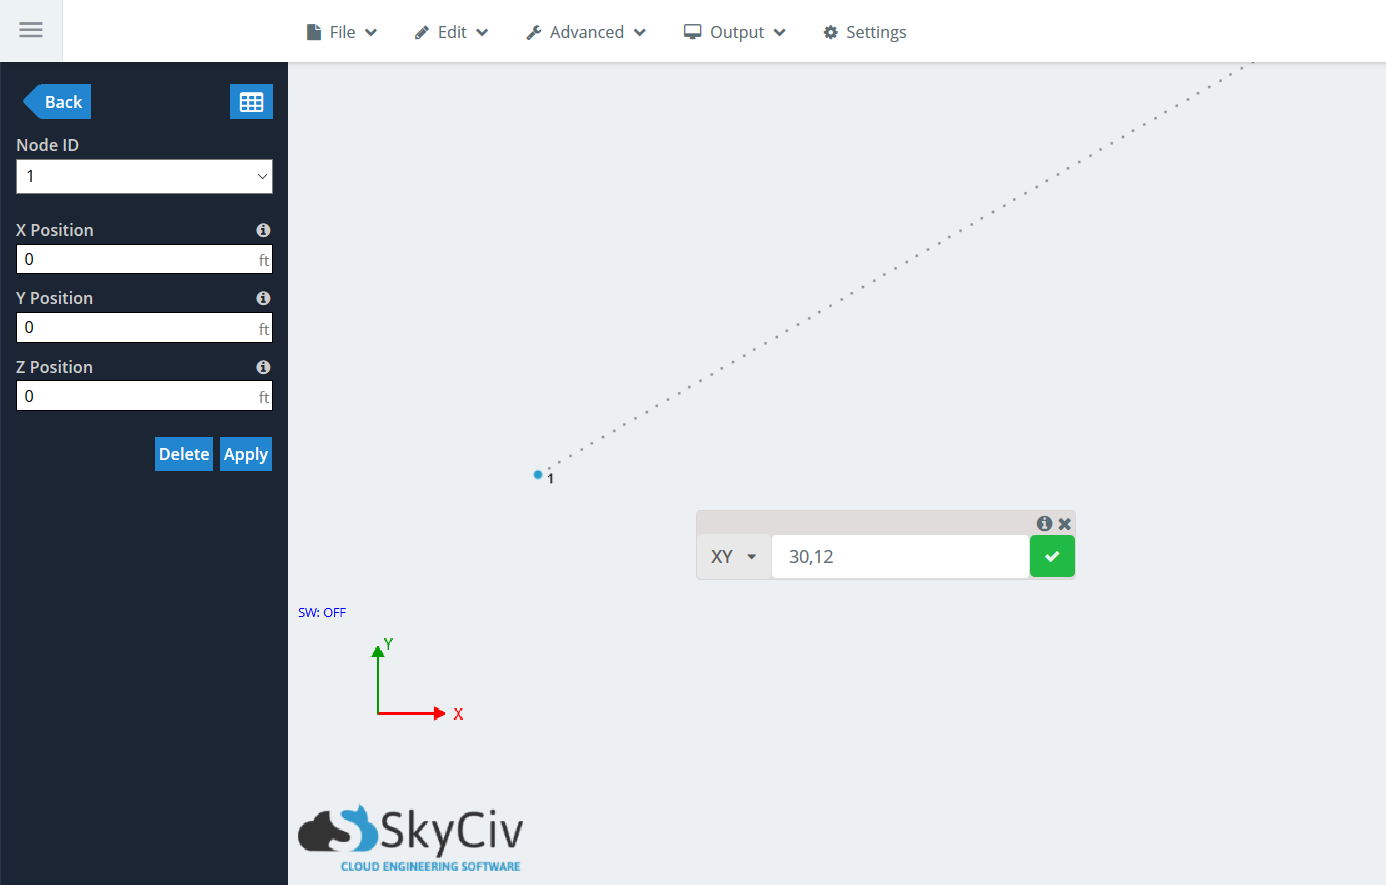
Yeşil onay işaretini tıklayın, veya vur seçin, Üyenin neslini kabul etmek. Göreceli üye penceresi, üst üste birden fazla üyeyi zincirleyebilmeniz için kalır.. Başka bir üye üretmeyi seçerseniz, Origin düğümü düğüm olacak 2, Böylece delta değerleri buna göre olacak, Düğüm Değil 1.
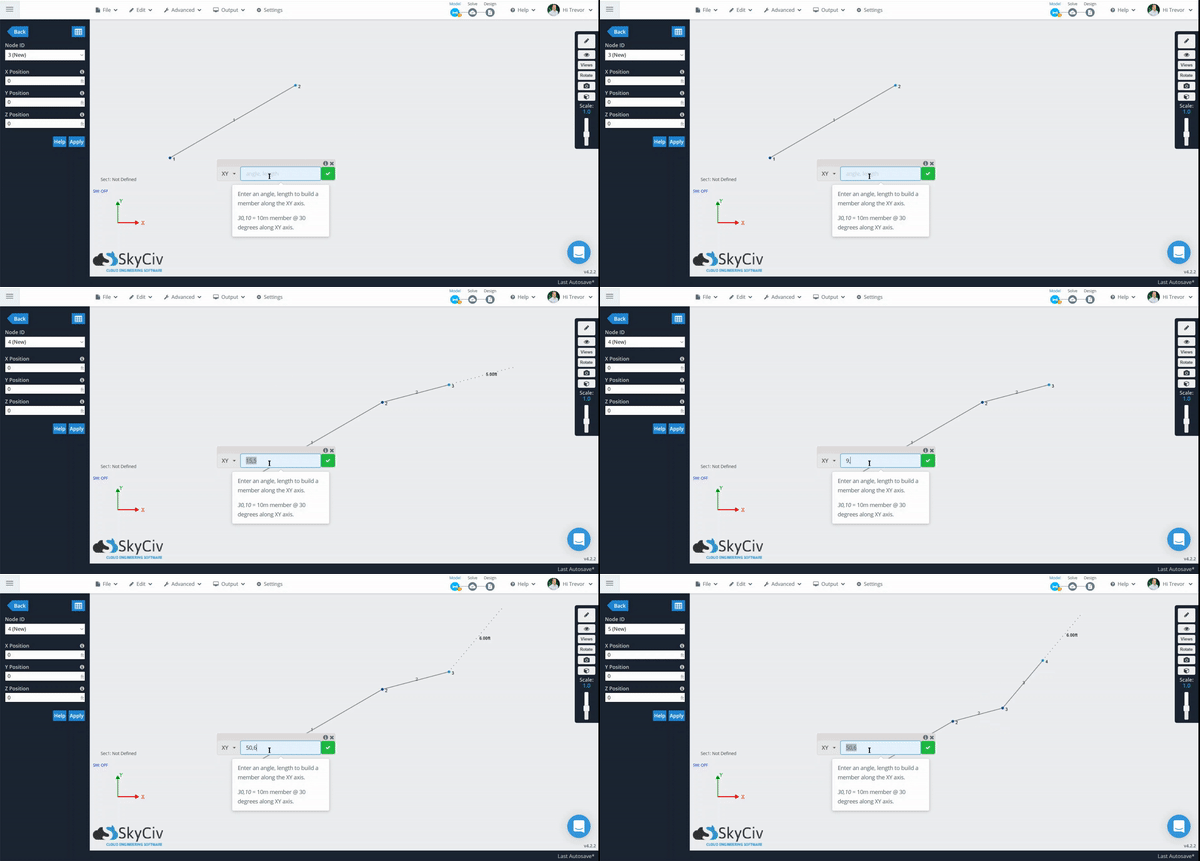
Aynı anda birden fazla göreceli üye eklemek
Aynısı akraba üye Üye işlevi yalnızca tek üyeler oluşturmak için kullanılamaz, Ama aynı anda birden fazla. İş akışı aynı, Kullanıcılar, göreceli üyeler oluşturmak istedikleri birden çok düğümü seçebilirler.. Bu düğümlerin aynı düzlemde yatması gerekmez ve projenin herhangi bir yerinde olabilir.
Misal:
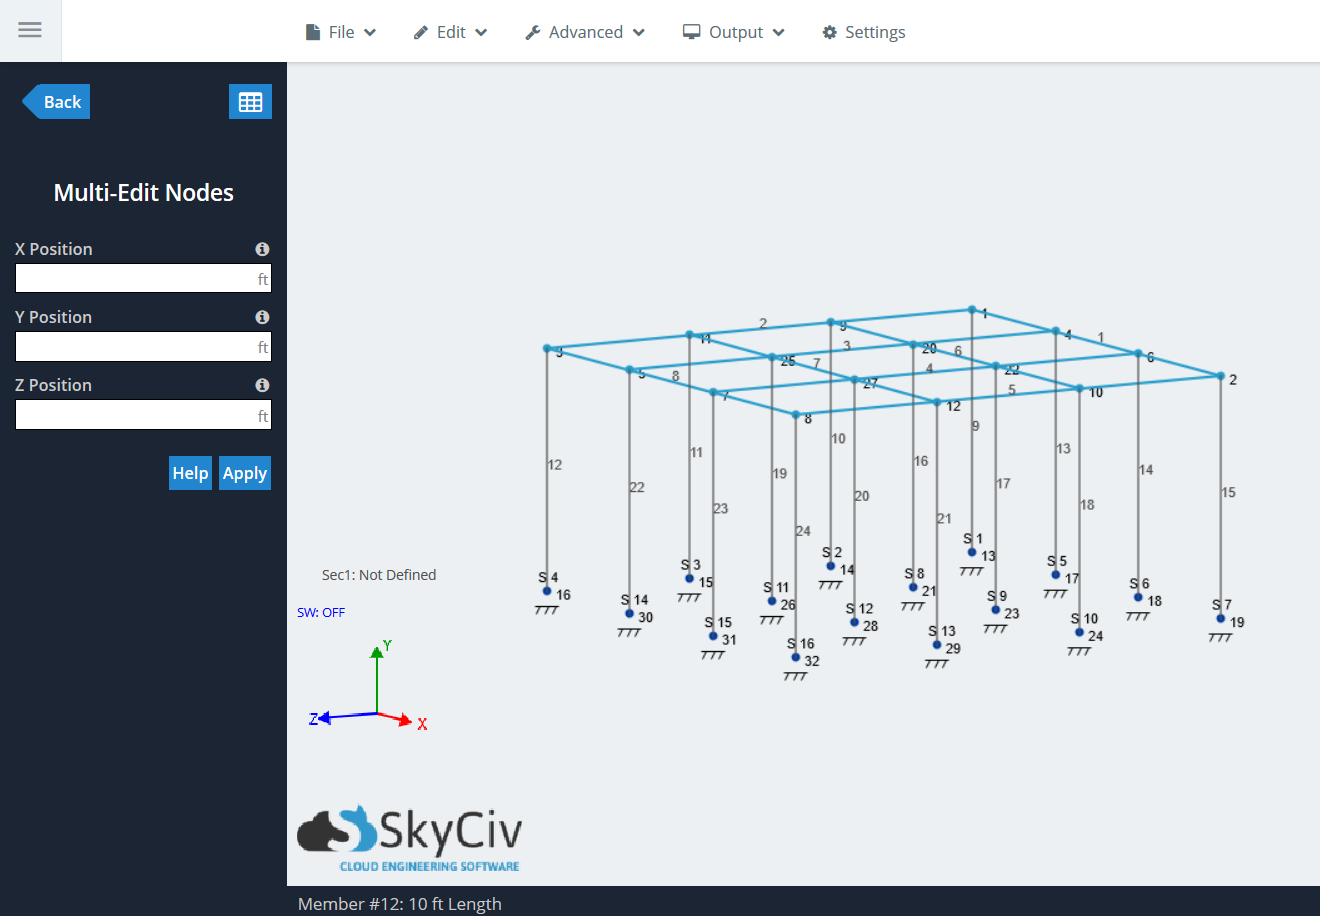
Bu örnek için, Kullanılarak çok kolay oluşturulabilen basit bir yükseltilmiş platforma bakalım Montaj Şablonları yapısal 3D içinde. Ctrl'e tıklayarak ve en üst düzey seçmek için sağdan sola sürükleyerek başlayın “zemin” düğümler ve üyeler.
Not: NS akraba üye İşlev yalnızca düğümlerden üye üretir, üyelerden değil.
Şimdi, Göreceli üyeler oluşturun “Rel.” fonksiyon. Basın “R” getirmek için akraba üye İşlev ve yazın (10,10,2) Delta değerlerimiz için. Üye uzunluğuna ek olarak üye hattını gösteren bir projeksiyon hattı olduğunu göreceksiniz.:
Üyeleri oluşturmak için yeşil onay işaretini tıklayın. İşlem sırasında seçilen her düğüm için oluşturulan bir üye ve düğüm görmelisiniz.
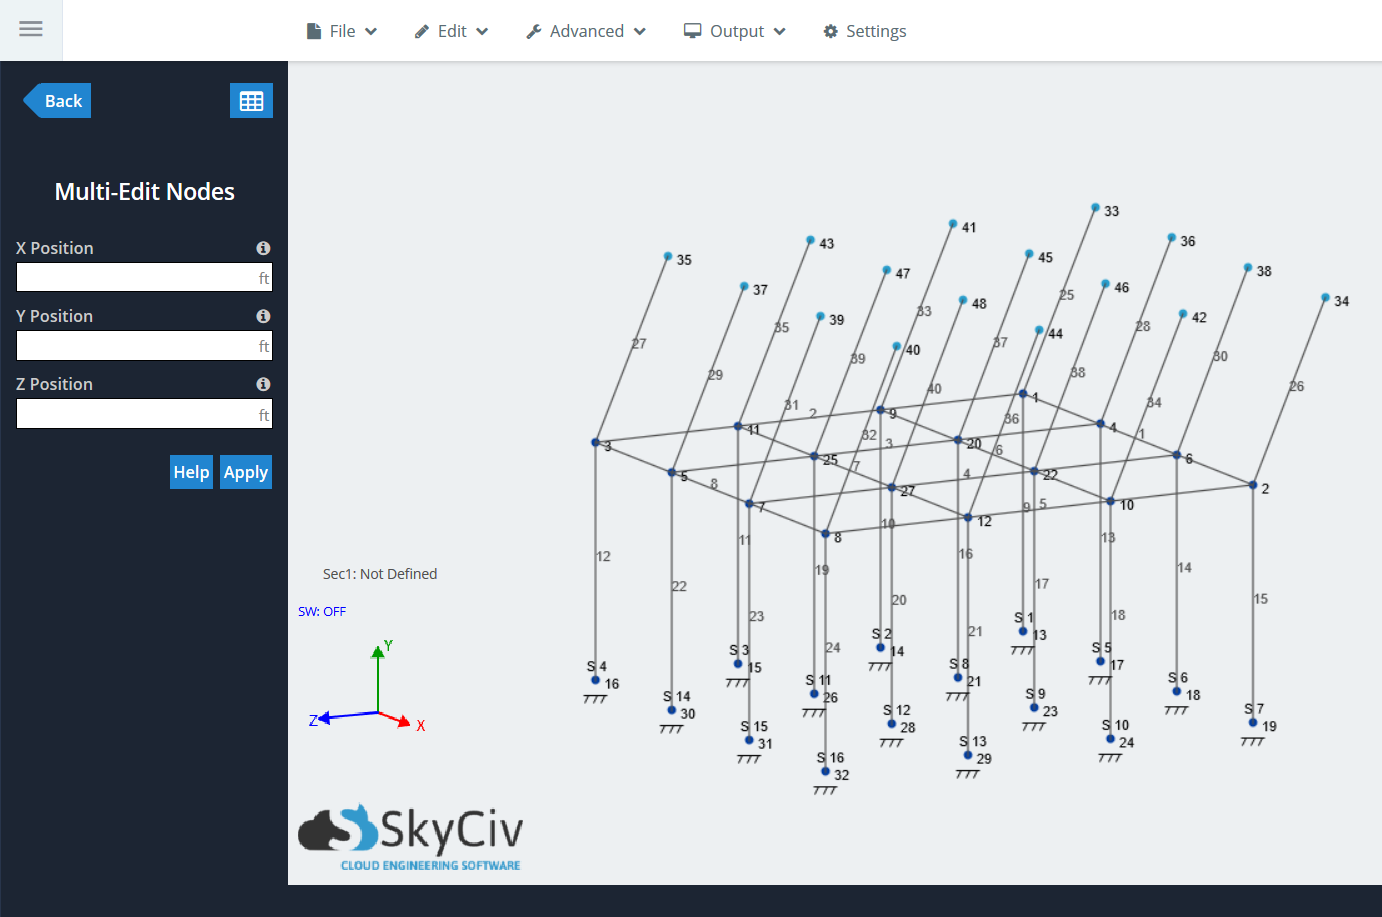
Aynı anda birden fazla göreceli üye ekleme yeteneği, kullanıcılar için neredeyse sınırsız modelleme olanakları için kapıları açar. Ardından deneyin bir proje modelliyorsunuz.
Göreceli üye işlevini kullanırken kaydırma
Göreceli üye işlevinde bulunan son yararlı işlevsellik “Vardiya”, açılır menüdeki son öğe hangisi. Bu, aynı vites değiştirme işlevini kullanmak için hızlı ve kolay bir kısayol, içinde yer alan Düzenle > Operasyonlar > Kaydırma Düğümleri. 3D alanda tek veya birden çok düğüm kaydırılabilir, ve üyelere bağlı kalacak. Benzer “Rel.” fonksiyon, Kullanıcılar her küresel eksen için projeksiyon mesafelerini girmelidir ”.
Misal:
Son örnekte aynı yükseltilmiş platformu kullanmak, aynı öğelerin seçimini tekrarlayın. “en üst kat” platformun. Basın “R” ve bul “Vardiya” açılır sürede. Eskisi ile aynı değerleri yazın: (10,10,2). Değiştirme işlevini kullanırken, Yeni bir üye oluşturulmadığı için projeksiyon hattı gösterilmeyecek:
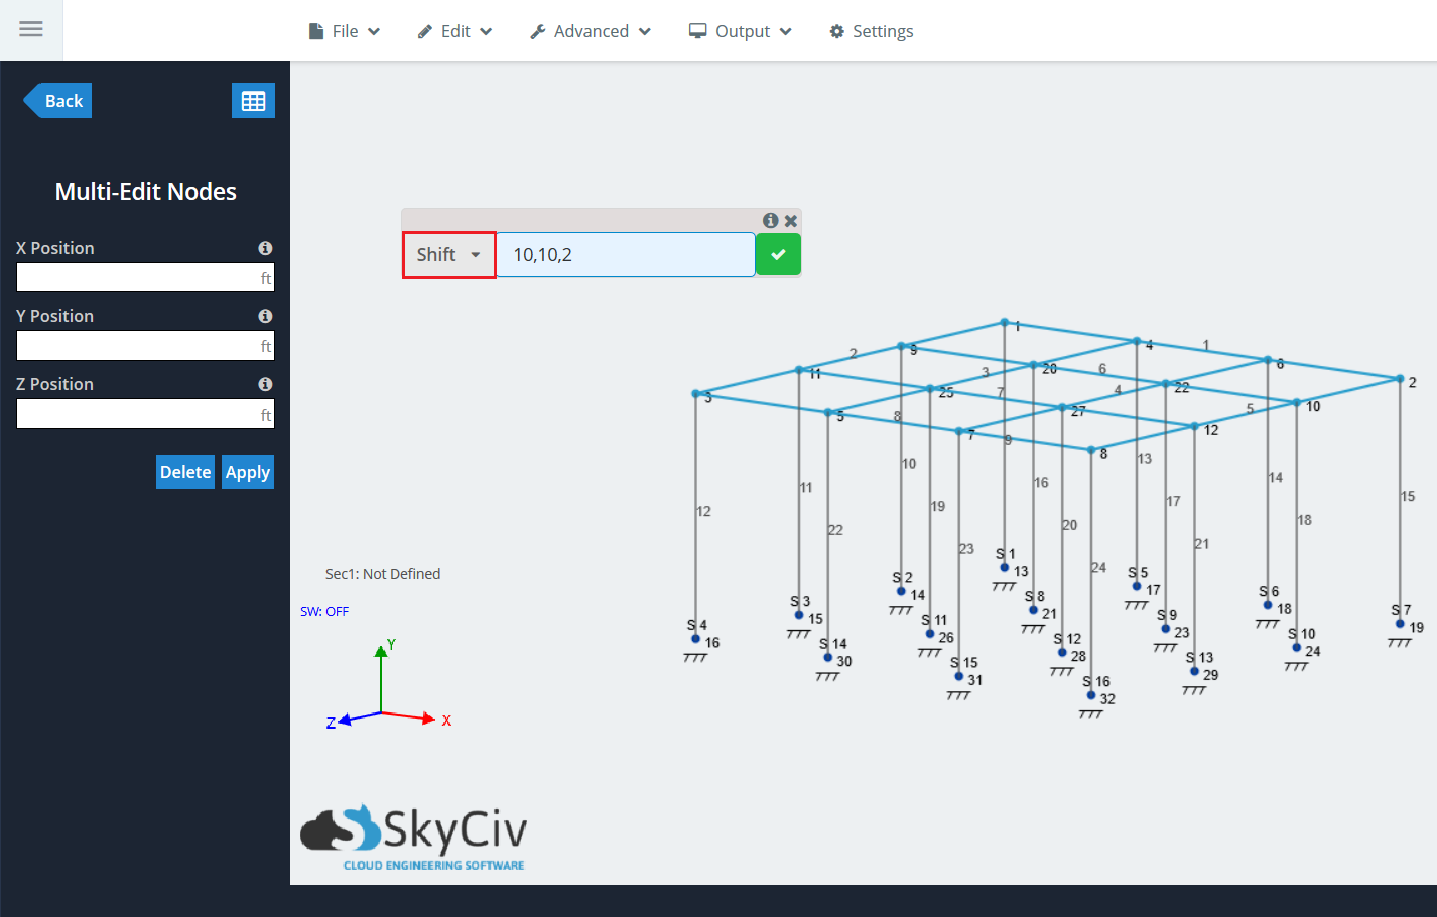
Yeşil onay işaretine tıklayın. Önceki seçilen düğümlerin tümü artık belirtilen konuma geçecek, Üyeleri de taşımak:
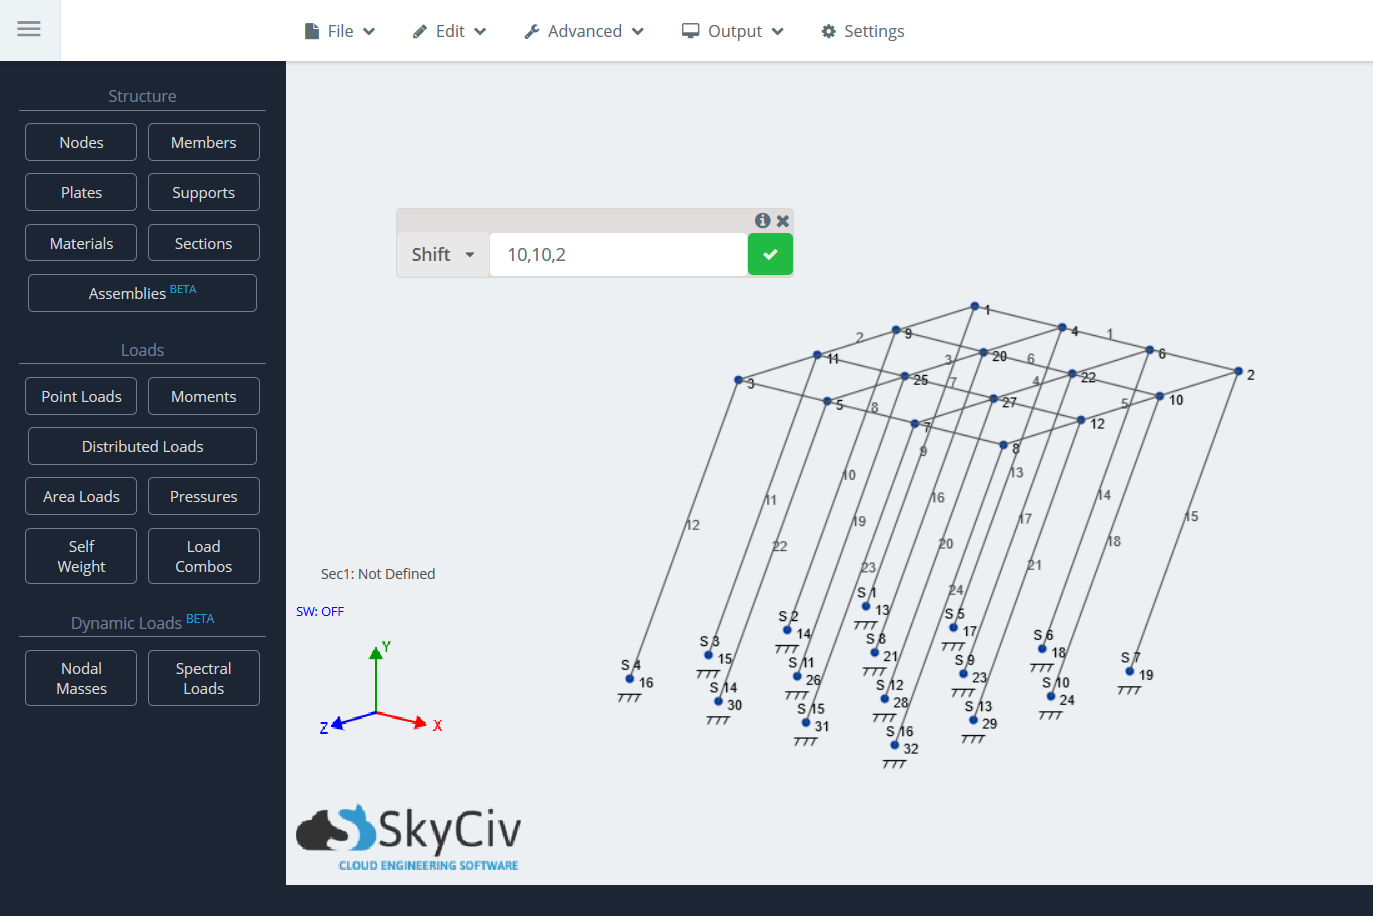
Not: Bu aynı zamanda tek düğümlerle de yapılabilir.


