
Find any modeling operation, set your own keyboard shortcuts and pin your favorite operations to the right toolbar
The Operations Toolbox is the panel on the right side of SkyCiv Structural 3D that lists every modeling operation you can run on your model: member, node, plate, load and support tools, selection tools and visibility toggles. From the toolbox you can:
- Search for an operation and run it on the current selection.
- Pin your favorite operations to the right toolbar, so they are one click away.
- Assign your own keyboard shortcuts to operations.
Opening the Operations Toolbox
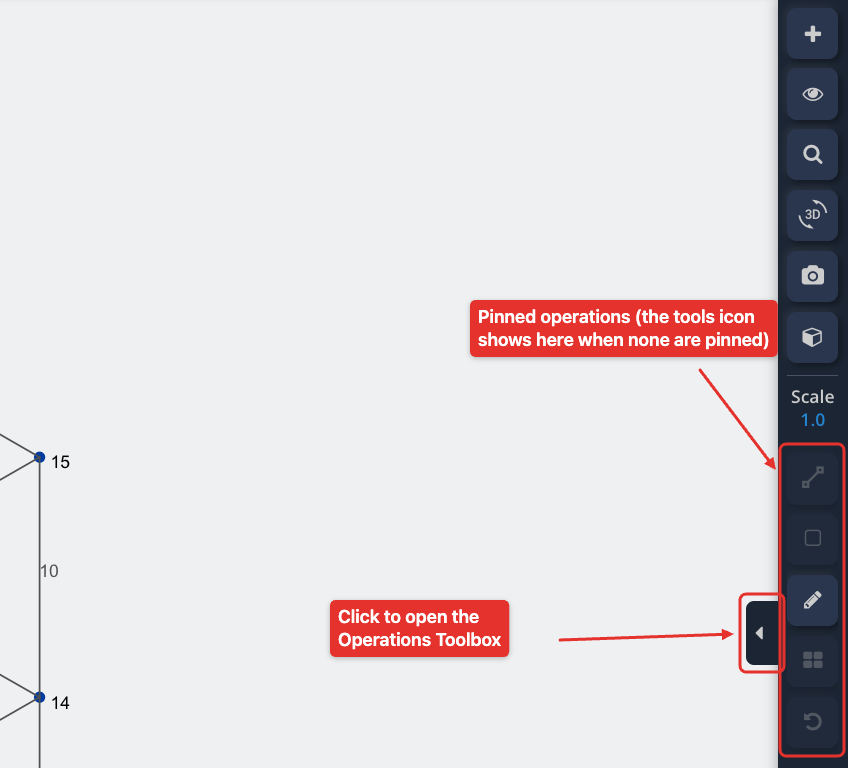
There are two ways to open the toolbox:
- Click the small arrow tab on the left edge of the right toolbar.
- If you haven’t pinned any operations yet, click the tools icon in the right toolbar.
To close it, click the arrow on the left edge of the panel. The toolbox also closes when you open certain other panels, such as the Section Builder, Version History or the Camera Roll.
The toolbox has two tabs: Operations and Shortcuts. It always opens on the Operations tab.
Operations Tab
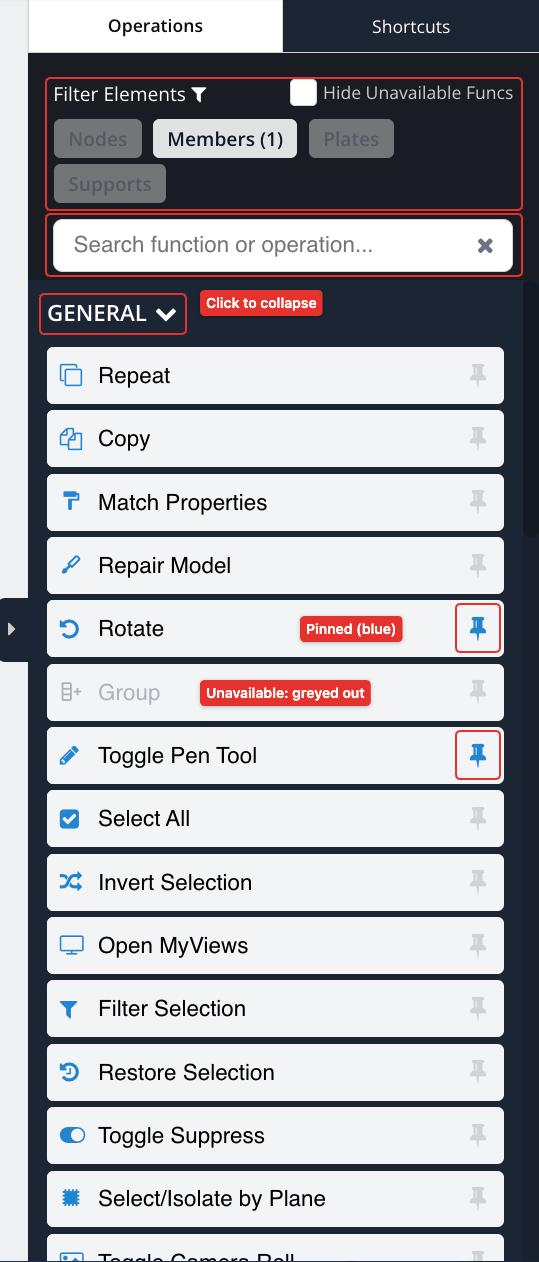
Operations depend on your selection
Most operations act on the elements selected in the model. An operation that needs a selection is greyed out until you select enough elements of the right type. Hover over an operation to see its shortcut (if it has one), a short description and what you need to select to enable it, for example Select at least 2 members to enable this operation.
Operations are grouped into categories: GENERAL, VISIBILITY, MEMBERS, NODES, PLATES, LOADS and SUPPORTS. The categories shown follow your selection:
- With nothing selected, all categories are shown.
- With members selected: MEMBERS and LOADS.
- With nodes selected: NODES, LOADS and SUPPORTS.
- With plates selected: PLATES and LOADS.
- With supports selected: SUPPORTS.
- With area loads selected: LOADS.
GENERAL and VISIBILITY are always shown. Click a category heading to collapse or expand it. The list updates as soon as you change your selection, so you can keep the toolbox open while you work.
Tick Hide Unavailable Funcs to hide the operations that can’t be used with the current selection instead of greying them out.
Filter Elements
The Nodes, Members, Plates and Supports buttons at the top of the toolbox show how many elements of each type are selected, for example Members (12). Click one to keep only that type of element in your selection. This is handy after a drag-select, when you want to work only on the members (or only on the nodes) of the selected region. Click the filter icon next to Filter Elements to open the full Filter Selection options.
Search
Type in the Search function or operation… box to find an operation by its name or description. Click the × in the box to clear the search.
Running an operation
Click an operation to run it on the current selection. Many operations open the matching form in the left panel with the selected elements already filled in. For example, Add Support opens the Supports form with the selected node IDs, and Add Member Distributed Load opens the Distributed Loads form with the selected member IDs.
Pinning Operations to the Right Toolbar
Click the pin icon to the right of any operation to pin it to the right toolbar. Pinned operations turn blue in the toolbox and appear as buttons in the right toolbar, so you can run them without opening the toolbox. You can pin an operation even when it is unavailable.
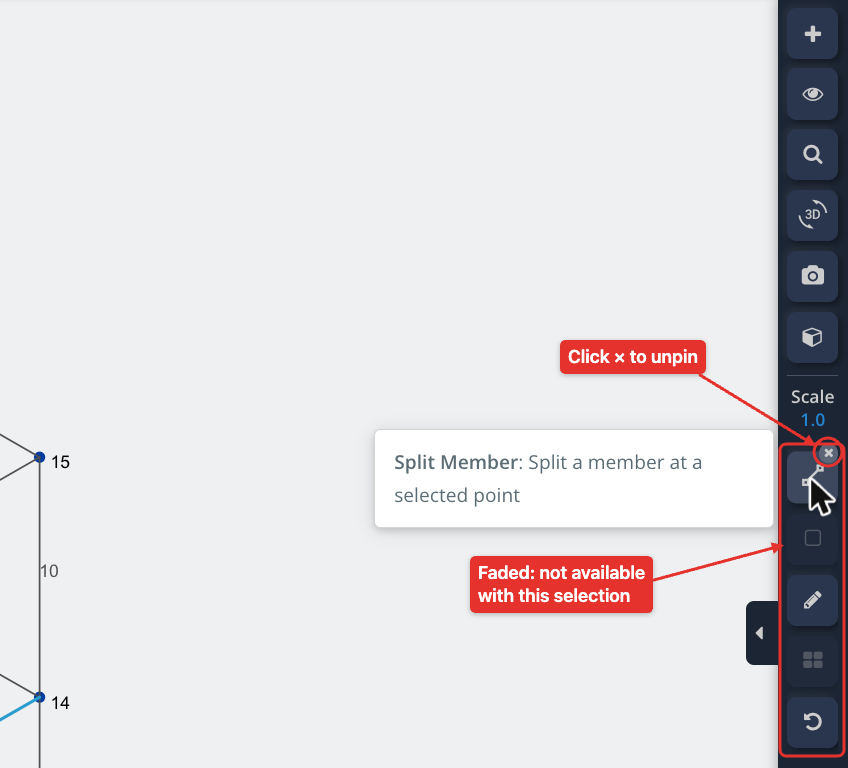
In the right toolbar:
- Hover over a pinned button to see the operation’s name, shortcut and description.
- A pinned button is faded out when the operation can’t be used with the current selection.
- To unpin a button, hover over it for a moment and click the small × that appears on it. You can also click its pin icon again in the toolbox.
Pinned operations are saved in your browser, so they stay in place the next time you open S3D on the same computer and browser.
Custom Keyboard Shortcuts (Shortcuts Tab)
The Shortcuts tab lets you assign your own keyboard shortcuts to the operations in the toolbox.
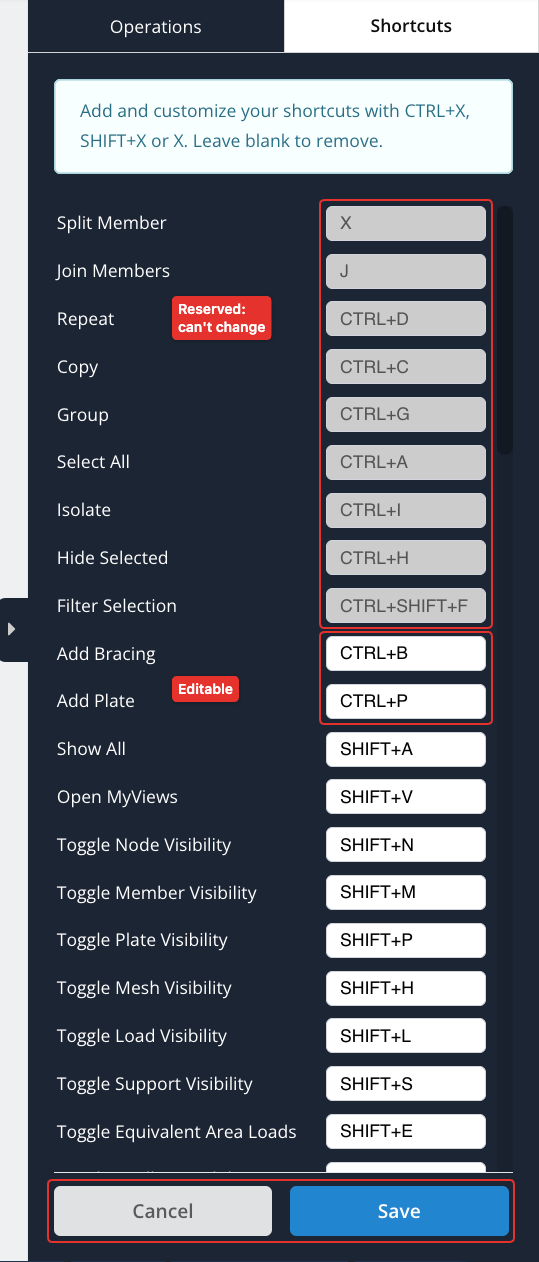
Each operation has a shortcut box next to its name. The list shows the operations that use a reserved system shortcut first (these are greyed out and can’t be changed), then the operations that have a shortcut, then the rest.
To set your shortcuts:
- Type a shortcut in the box next to an operation, in one of these formats: CTRL+X, SHIFT+X or X, where X is a single letter or number.
- Leave a box blank to remove its shortcut.
- Click Save, or press Enter in any of the boxes. Click Cancel to go back to the Operations tab.
Your shortcuts are saved to your SkyCiv user profile and take effect as soon as you save them. On Mac, use ⌘ instead of Ctrl.
A shortcut can’t be saved if:
- It isn’t in one of the formats above.
- It is assigned to two operations.
- It is reserved by the system, for example Ctrl + C (Copy), Ctrl + V (Paste), Ctrl + Z (Undo), Ctrl + S (Save File), Ctrl + Enter (Solve), Ctrl + 1 to Ctrl + 4 (views), the single keys that open the left panel forms (N, M, E, U, P, D), X (Split Member) or J (Join Members). See Keyboard and Mouse Controls for the built-in shortcuts.
If there is a problem, a message at the top of the tab explains it and the box is outlined. None of the changes are saved until you fix it.
Shortcuts only work while you are working in the model, not while you are typing in an input box.
Default shortcuts
These shortcuts are set by default. You can change or remove them in the Shortcuts tab:
| Operation | Shortcut |
|---|---|
| Toggle Gridline Visibility | Shift + G |
| Toggle Support Visibility | Shift + S |
| Toggle Load Visibility | Shift + L |
| Toggle Node Visibility | Shift + N |
| Toggle Member Visibility | Shift + M |
| Toggle Plate Visibility | Shift + P |
| Toggle Mesh Visibility | Shift + H |
| Toggle Mesh Node Visibility | Shift + K |
| Toggle Equivalent Area Loads | Shift + E |
| Toggle Color Loading | Shift + C |
| Toggle Local Axis Visibility | Shift + X |
| Toggle 3D Members | Shift + D |
| Show All | Shift + A |
| Open MyViews | Shift + V |
| Add Plate | Ctrl + P |
| Add Bracing | Ctrl + B |
List of Operations
The operations in the toolbox, by category, with the selection each one needs.
General
| Operation | What it does | Selection needed |
|---|---|---|
| Repeat (Ctrl + D) | Repeat the highlighted part of your structure | At least 1 element |
| Copy (Ctrl + C) | Copy the selected elements (hold Shift to set the reference node) | At least 1 element |
| Match Properties | Copy the properties of one element to other elements | Exactly 1 member, plate or support |
| Repair Model | Automatically find and fix issues in your model (see Repair Model) | None |
| Rotate | Rotate the highlighted part of your structure | At least 1 element |
| Group (Ctrl + G) | Group the selected elements | At least 2 elements |
| Toggle Pen Tool | Switch the mouse between the default tool and the pen (draw) tool | None |
| Select All (Ctrl + A) | Select all elements | None |
| Invert Selection | Invert the current selection | None |
| Open MyViews | Save custom views of your model to return to at any time | None |
| Filter Selection (Ctrl + Shift + F) | Filter the current selection | At least 1 element |
| Restore Selection | Restore the previous selection | None |
| Toggle Suppress | Toggle the suppression of the selected elements | At least 1 element |
| Select/Isolate by Plane | Select or isolate elements by defining a cutting plane | At least 1 element |
| Toggle Camera Roll | Open or close the camera roll of screenshots | None |
| Switch Y-Z Axis | Swap the Y and Z axes of your model | None |
Members
| Operation | What it does | Selection needed |
|---|---|---|
| Remove Overlapping Member | Remove overlapping members | At least 2 members |
| Change Member Length | Change the length of the selected members | At least 1 member |
| Reverse Node Order | Reverse the order of the nodes of the selected members or plates | At least 1 member or plate |
| Split Member (X) | Split a member at a selected point | At least 1 member |
| Member Alignment Tool | Align the selected members | At least 1 member |
| Extend Members | Open the trim/extend tool on Extend | None |
| Trim Members | Open the trim/extend tool on Trim | None |
| Intersect Members | Intersect and split 2 or more members | At least 2 members |
| Join Members (J) | Join the selected members together | At least 2 members |
| Span Members | Add evenly spaced members between the selected members (you enter the number of spacings) | At least 2 members |
| Connect Node to Member | Connect the selected nodes to the selected member | Nodes and a member |
Nodes
| Operation | What it does | Selection needed |
|---|---|---|
| Add Relative Member | Add a member relative to the selected nodes | At least 1 node |
| Add Relative Node | Add a node relative to the selected nodes | At least 1 node |
| Merge Close Nodes | Merge nodes that are close together | At least 2 nodes |
| Move Nodes | Shift the selected nodes by an offset | At least 1 node |
| Add Bracing | Add bracing between the selected nodes | At least 4 nodes |
| Add Rigid Diaphragm | Add a rigid diaphragm between the selected nodes (they must lie in a horizontal plane) | At least 3 nodes |
| Add Curved Member | Add a curved member using the selected nodes | At least 2 nodes |
| Center of Gravity | Add a center of gravity to the selected nodes | At least 3 nodes |
| Measure Tool | Measure distances between elements | At least 2 nodes |
Supports
| Operation | What it does | Selection needed |
|---|---|---|
| Add Support | Add supports to the selected nodes. Nodes that already have a support are removed from the list, with a message. If all of them have one, their supports are selected for editing. | At least 1 node |
| Add Settlement | Add a settlement to the selected nodes | At least 1 node |
| Add Inclined Support | Add an inclined support to the selected nodes | At least 1 node |
Plates
| Operation | What it does | Selection needed |
|---|---|---|
| Add Plate | Add a plate using the selected nodes | At least 3 nodes |
| Mesh Plate(s) | Mesh the selected plates | At least 1 plate |
| Unmesh Plate | Remove the mesh of the selected plates | At least 1 plate |
| Auto Mesh Model | Automatically mesh the model | At least 1 plate |
| Surface Spring Support | Add a surface spring support to plates | At least 1 plate |
| Align Plates | Align the selected plates | At least 2 plates |
| Re-Align Meshed Plates | Re-align the mesh of the selected plates | At least 1 plate |
| Reverse Plate Normal Axis | Reverse the normal axis of the selected plates | At least 1 plate |
| Add Plate Opening | Add a hole to the selected plate (unmesh it first) | At least 1 plate |
| Plate Diaphragm Nodes | Manage the diaphragm nodes of the selected plate (unmesh it first) | At least 1 plate |
| Merge Plates | Merge the selected plates | At least 2 plates |
| Strut and Tie Builder | Convert plates to a strut and tie grillage (uses the selected plates, if any) | None |
| Plate Area | Show the area of each selected plate, and their combined area | At least 1 plate |
Loads
| Operation | What it does | Selection needed |
|---|---|---|
| Copy Loads | Copy the selected loads | At least 1 load |
| Add Member Distributed Load | Add a distributed load to the selected members | At least 1 member |
| Add Point Load | Add a point load to the selected nodes or members | At least 1 node or member |
| Add Moment | Add a moment to the selected members | At least 1 member |
| Add Area Load | Add an area load to the selected nodes (the first 4 are used) | At least 3 nodes |
| Change Area Load Loading Direction | Change the column/beam direction or loading direction of the selected area loads | At least 1 area load |
| Add Pressure | Add a pressure to the selected plates | At least 1 plate |
| Add Thermal Load | Add a thermal load to the selected members | At least 1 member |
| Add Prestress Load | Add a prestress load to the selected members | At least 1 member |
| Add Nodal Mass | Add a mass to the selected nodes | At least 1 node |
| Sum Loads | Sum the selected distributed loads, point loads, area loads and pressures | At least 1 load |
Visibility
| Operation | What it does | Selection needed |
|---|---|---|
| Isolate (Ctrl + I) | Hide all except the selected elements | At least 1 element |
| Hide Selected (Ctrl + H) | Hide the selected elements | At least 1 element |
| Show All | Show all hidden elements | None |
| Toggle Node / Member / Plate / Mesh / Mesh Node / Load / Support / Gridline / Local Axis Visibility | Show or hide these items in the model view | None |
| Toggle Equivalent Area Loads | Toggle the equivalent area loads of member loads | None |
| Toggle Color Loading | Switch the load colors between load case and load combination | None |
| Toggle 3D Members | Toggle the 3D display of members in the model view | None |
Visibility toggles are highlighted when they are turned on, both in the toolbox and, when pinned, in the right toolbar.

