Επιλογή βέλτιστου τμήματος για τα μοντέλα δέσμης S3D και SkyCiv
Μάθετε πώς να χρησιμοποιείτε το SkyCiv Designer για να βελτιστοποιήσετε τη χρήση του υλικού σας. Μειώστε τα μεγέθη τμημάτων, ενώ πληρούν τις απαραίτητες απαιτήσεις σχεδιαστικών προτύπων.
Σε αυτό το παράδειγμα, μειώνουμε το υλικό ενός χαλύβδινου πλαισίου κατά περίπου 20% μέσα σε λίγα λεπτά.
Επιλογή Αρχικών Ενοτήτων
Ξεκινήστε διαμορφώνοντας τη συνηθισμένη σας δομή, σήμερα θα εξετάσουμε ένα μοντέλο που διαθέτει Universal Beam για τις δοκούς, Τμήματα HSS για τις στήλες και τμήματα ίσης γωνίας για τη στήριξη. Μπορείτε να ξεκινήσετε σχεδόν με όποια τμήματα θέλετε, Ωστόσο, συνήθως συνιστούμε να επιλέξετε μια ενότητα που πιστεύετε ότι θα λειτουργήσει καλύτερα. Εδώ είναι το μοντέλο που θα βελτιστοποιήσουμε:
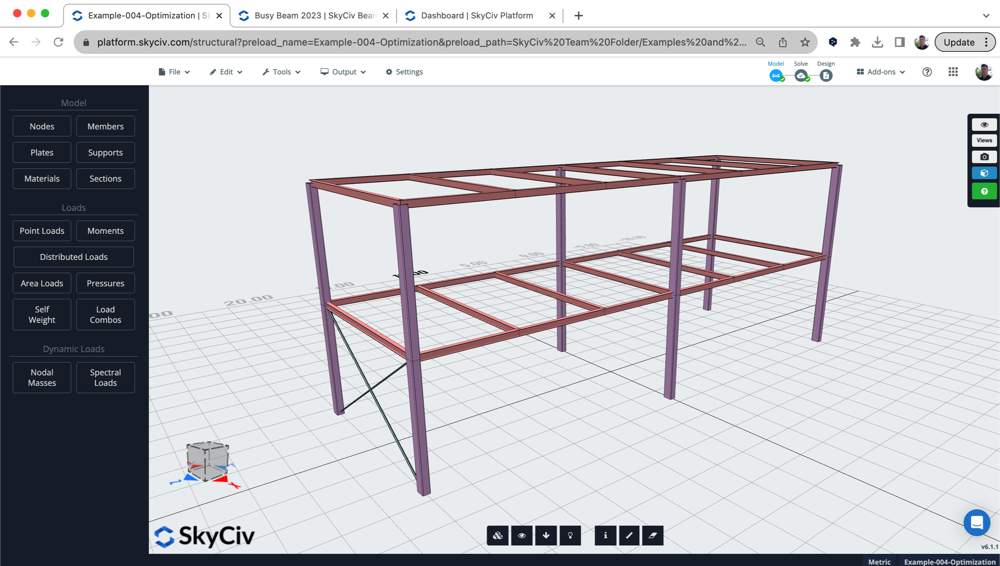
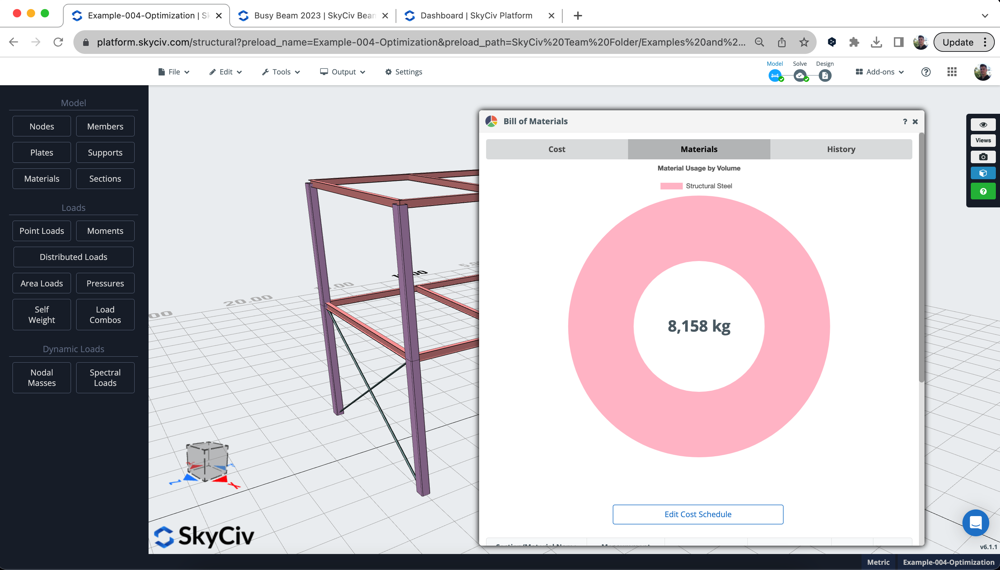
Το μοντέλο είχε συνδυασμούς φορτίου, φορτία ζωντανών/νεκρών/άνεμων και τα κατάλληλα συστήματα συγκράτησης έχουν ήδη ρυθμιστεί. Θέλαμε επίσης να δούμε την αρχική χρήση υλικού αυτού του σχεδίου. Χρησιμοποιούμε το Εφαρμογή Bill of Materials για τον υπολογισμό της ποσότητας του υλικού που χρησιμοποιήθηκε στον αρχικό σχεδιασμό:
Αξιολογήστε τα αποτελέσματα σχεδίασης + Ορίστε τις Ρυθμίσεις για Βελτιστοποίηση
Συνήθως είναι καλή ιδέα να ελέγξετε πού βρίσκεται το σχέδιο αρχικά εκτελώντας τον έλεγχο σχεδίασης για το μοντέλο. Σε αυτό το παράδειγμα, θα χρησιμοποιήσουμε Ευρωκώδικας για τον έλεγχο σχεδιασμού χάλυβα, αλλά μπορείτε εξίσου εύκολα να εκτελέσετε τον έλεγχο σχεδίασης για τα ακόλουθα:
- Ατσάλι – AISC, CSA, ΟΠΩΣ ΚΑΙ, BS, ΕΙΝΑΙ
- Ξυλεία – NDS, AS1720
- Κρύος χάλυβας – AISI, Η προεπιλεγμένη τιμή είναι 1. Μπορεί να τροποποιηθεί
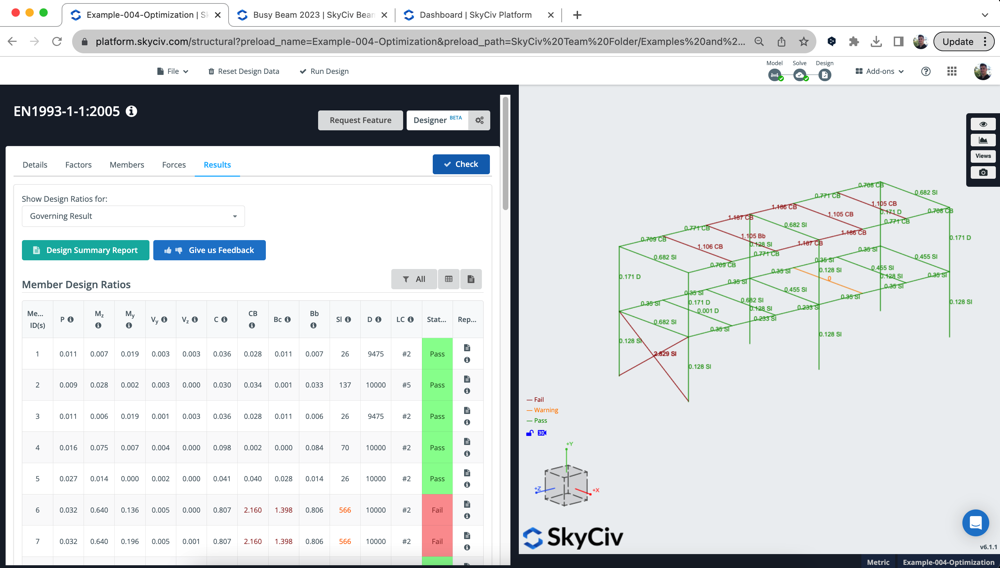
Μετά την εξέταση των αποτελεσμάτων, μπορούσαμε να δούμε το εξής:
- Universal Beams: Απέτυχαν, αλλά μόνο λίγο, με αναλογία χρησιμότητας περίπου 110%. Θέλουμε να τα βελτιστοποιήσουμε για να τα πετύχουμε
- Στήλες HSS: περνούσαν όλοι, αλλά πολύ χαμηλή χρησιμότητα (23%) έτσι αισθανθήκαμε ότι μπορούσαμε να βελτιστοποιήσουμε και να μειώσουμε το υλικό που χρησιμοποιείται εδώ
- Bracing μέλη: όλα αυτά τα τμήματα EA απέτυχαν, με χρησιμότητα περίπου 300%. Θέλουμε να βρούμε το βέλτιστο τμήμα που ξεπέρασε τις απαιτήσεις σχεδιασμού
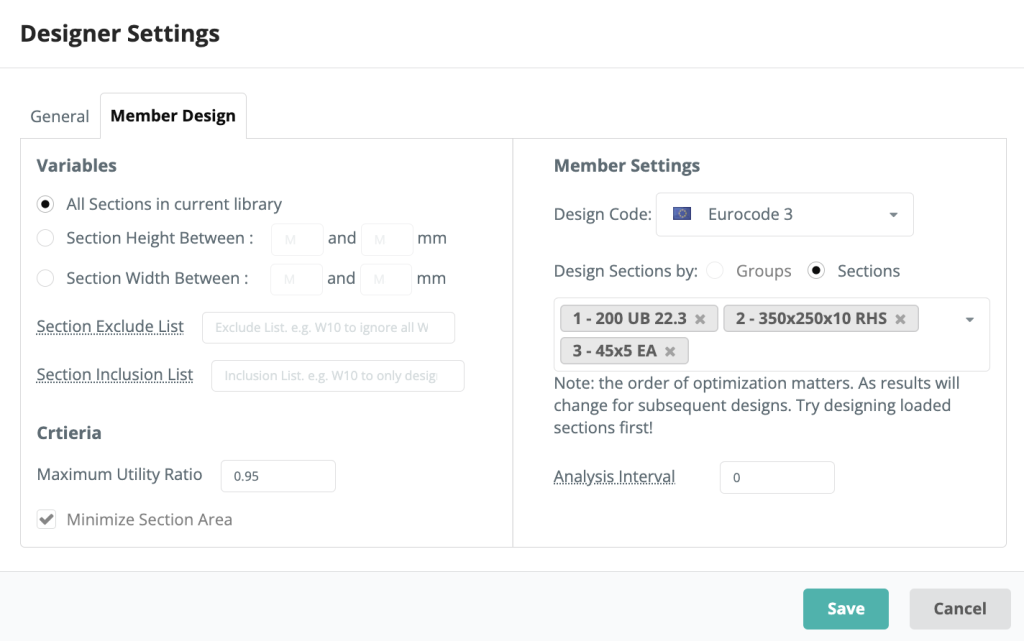
Αναλόγως, θέλαμε να εκτελέσουμε ένα Optimization χρησιμοποιώντας το Designer με τις ακόλουθες ρυθμίσεις. Θέλουμε να τα σχεδιάσουμε όλα 3 τμήματα, με το διάστημα ανάλυσης ρυθμισμένο σε 0 (που σημαίνει ότι η ανάλυση δεν θα επαναληφθεί μετά τη δοκιμή κάθε ενότητας):
Επανεξέταση των αποτελεσμάτων του σχεδιαστή
Μόλις τρέξει ο σχεδιαστής, λαμβάνουμε το παρακάτω αναδυόμενο παράθυρο – που δείχνει τα βέλτιστα τμήματα που επιλέχθηκαν με μια ματιά:
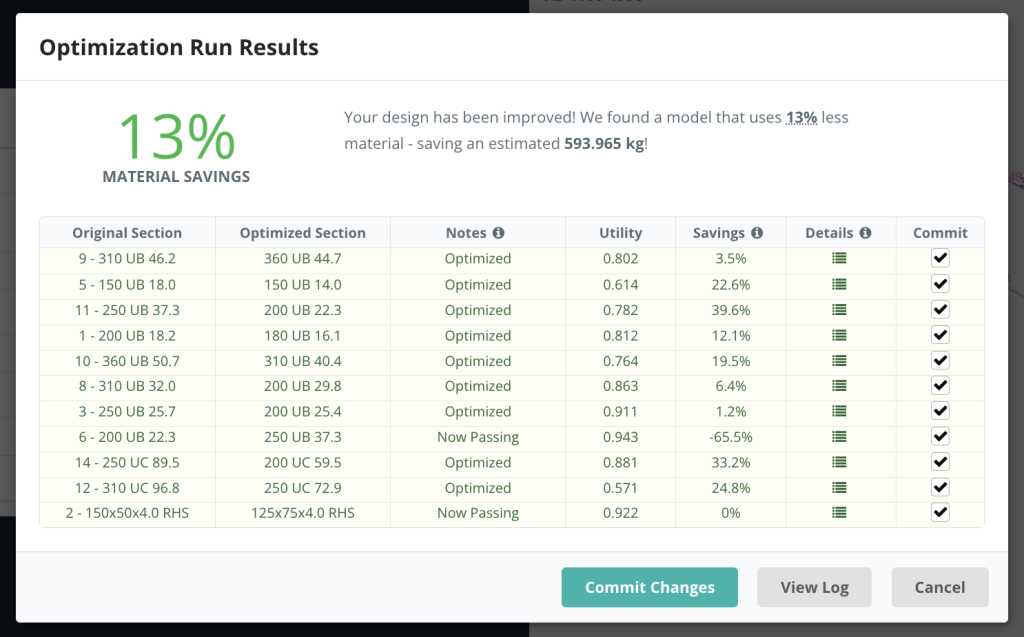
Σημείωση: Το παραπάνω στιγμιότυπο οθόνης δείχνει την πιο ενημερωμένη διεπαφή χρήστη. Τα αποτελέσματα προέρχονται από διαφορετικό μοντέλο και δεν ταιριάζουν με αυτά σε αυτό το σεμινάριο
Ο Σχεδιαστής μπόρεσε να βρει βατά αποτελέσματα για όλες τις ενότητες. Εδώ ήταν τα αποτελέσματα:
- Ενότητα 1 ήταν ελαφρώς αυξημένη, βρήκε μια εφαρμόσιμη λύση στο 94.9% χρησιμότητα
- Ενότητα 2 η κατάσχεση τμήματος μειώθηκε δραστικά, και μπορεί να βρει ένα λειτουργικό τμήμα στο 88.6% χρησιμότητα
- Ενότητα 3 προηγουμένως αποτύγχανε, και τώρα περνά κάτω από ένα μεγαλύτερο τμήμα αλλά βελτιστοποιημένο στο 83.2%
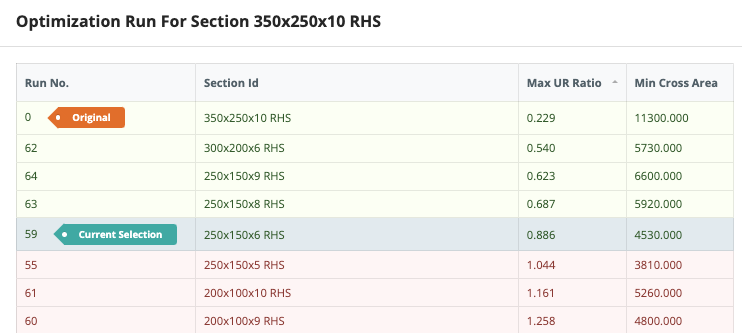
Μπορούμε επίσης να ελέγξουμε όλες τις εκτελέσεις για κάθε ενότητα κάνοντας κλικ στο Επαναλήψεις εικόνισμα. Αυτό θα εμφανίσει περισσότερες πληροφορίες για όλες τις ενότητες που δοκιμάστηκαν. Για παράδειγμα, κοιτάζοντας την ενότητα 2 παραπάνω μπορούμε να δούμε ότι ήταν μόνο στο παρελθόν 22.9% που χρησιμοποιείται, και δεν είναι σε 88.6%:
Δέσμευση τμημάτων που προτείνονται από τον σχεδιαστή
Μόλις είστε ικανοποιημένοι με τις προτεινόμενες ενότητες, Κάντε κλικ Δεσμεύστε Αλλαγές. Στη συνέχεια, το λογισμικό θα επιλύσει ξανά το μοντέλο και θα ελέγξει ξανά τις ενότητες. Στο βίντεο μας, θα δείτε τα αποτελέσματα να μην ταιριάζουν με το Designer for Section 1. Αυτό συμβαίνει επειδή το διάστημα ανάλυσης ορίστηκε σε 0 – εννοώντας τα αποτελέσματα της ανάλυσης (ιδιαίτερα εκτροπή) δεν ενημερώθηκε κατά τη διαδικασία βελτιστοποίησης.
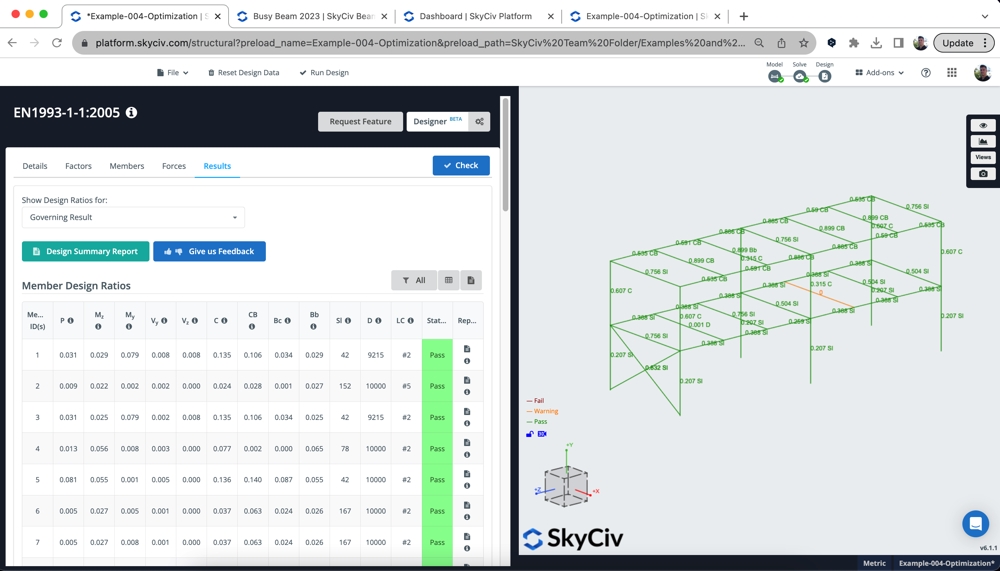
Έτσι, ξανατρέξαμε το Σχεδιαστής – αυτή τη φορά μόνο Τμήμα 1 και με το διάστημα ανάλυσης ρυθμισμένο σε 1. Αφού πραγματοποιήσετε ξανά τις αλλαγές, έχουμε ένα πλήρως σχεδιασμένο μοντέλο με όλα τα τμήματα βελτιστοποιημένα σε αυτό το πρότυπο σχεδιασμού:
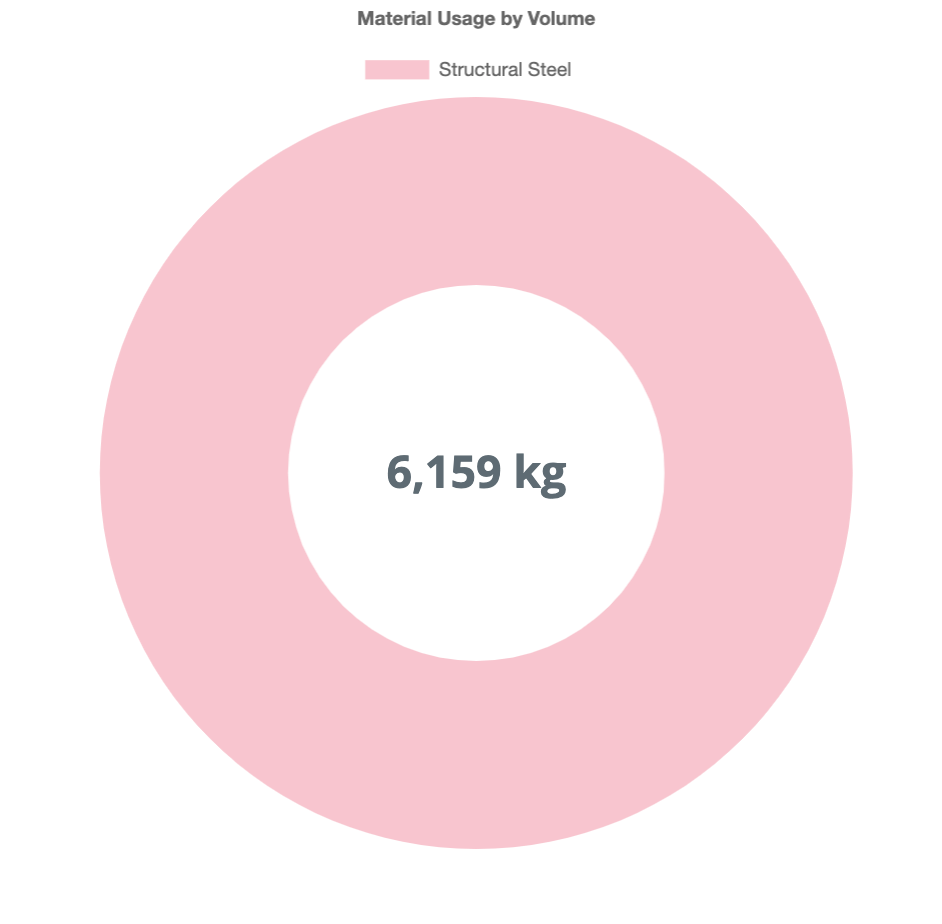
Μπορούμε επίσης τώρα να ελέγξουμε την εξοικονόμηση κόστους χρησιμοποιώντας την εφαρμογή Bill of Materials που χρησιμοποιήθηκε στο πρώτο βήμα, που δείχνει ότι έχουμε μειώσει το δομικό μοντέλο κατά περίπου 2.000 κιλά – με αποτέλεσμα σχεδόν 25% λιγότερο υλικό.
Βελτιστοποίηση με χρήση SkyCiv Beam
Μπορούμε επίσης να βελτιστοποιήσουμε τις μονές δοκούς, χρησιμοποιώντας το προϊόν SkyCiv Beam. Σε συνδυασμό με τον παραπάνω σχεδιαστή, είμαστε σε θέση να λάβουμε γρήγορα και απλά αποτελέσματα για τη βέλτιστη ενότητα. Μπορούμε να το κάνουμε αυτό μέσα 3 απλά βήματα:
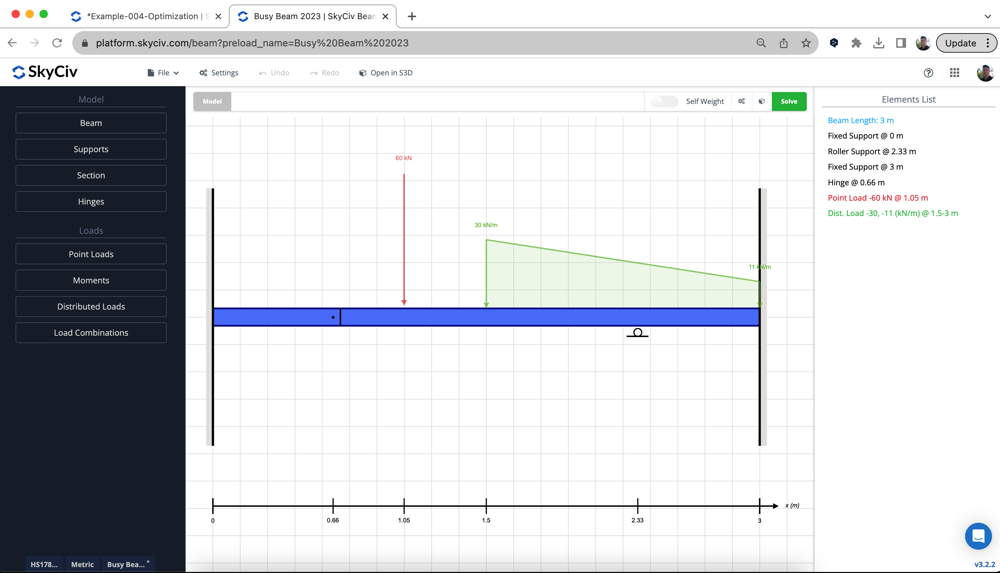
1. Φτιάξε το Μοντέλο σου – χτίστε το μοντέλο σας με τον ίδιο τρόπο που κάνετε πάντα, Σε αυτή την περίπτωση χρησιμοποιήσαμε μια καναδική ενότητα HSS:
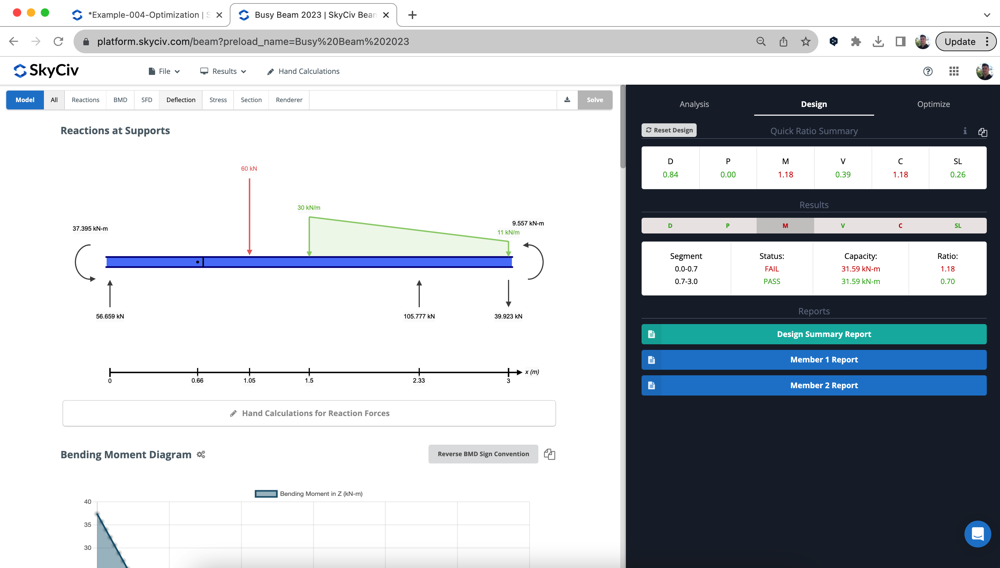
2. Ελέγξτε τα αρχικά αποτελέσματα – τρέξτε Σχεδιασμός (σύμφωνα με το CSA S16 σε αυτό το παράδειγμα) για να δούμε πού βρίσκεται αρχικά το σχέδιό μας. Στο παρακάτω παράδειγμα, το τμήμα αποτυγχάνει κατά περίπου 20%:
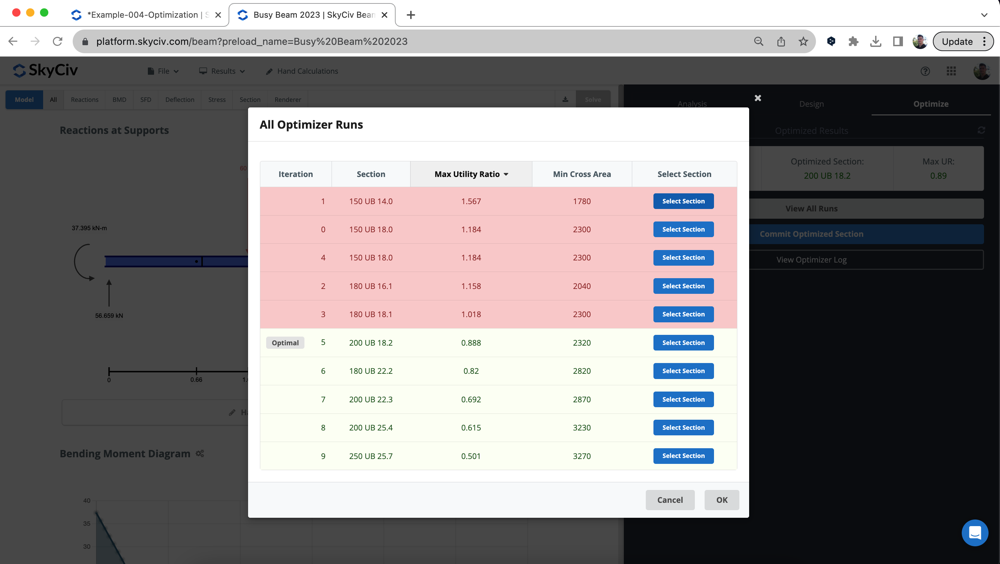
3. Εκτελέστε το Designer – εκτελέστε το Σχεδιαστή κάτω από Βελτιστοποίηση της με τις επιθυμητές ενότητες και ελέγξτε τα αποτελέσματά σας. Η βέλτιστη ενότητα θα έχει ήδη επιλεγεί, έτοιμος να αφοσιωθείς στο μοντέλο σου:
Συχνές ερωτήσεις
Εδώ έχουμε δύο συστάσεις:
- Μεγάλα μοντέλα – Ορίστε το διάστημα ανάλυσης σε 0 – αυτό θα τρέξει πιο γρήγορα και θα επιστρέψει αρκετά κοντινά αποτελέσματα. Ωστόσο, μπορεί να υπάρχει αναντιστοιχία αποτελεσμάτων, οπότε μπορεί να απαιτηθεί μια δεύτερη επανάληψη για μια ενότητα
- Μικρότερα μοντέλα – Ορίστε το διάστημα ανάλυσης σε 1 – Με αυτόν τον τρόπο έχετε τα πιο ακριβή αποτελέσματα αφού εκτελούμε ξανά τον λύτη μεταξύ κάθε διατομής
- Μεσαίου μεγέθους – ρυθμίστε το διάστημα ανάλυσης t0 5 – Αυτό θα εξισορροπήσει την ανάγκη για ακρίβεια και ταχύτητα.
Ο Σχεδιαστής υποστηρίζει όλες τις ενότητες σχεδιασμού μελών στο S3D, συμπεριλαμβανομένου:
- Ατσάλι – AISC, CSA, ΟΠΩΣ ΚΑΙ, BS, ΕΙΝΑΙ
- Ξυλεία – NDS, AS1720
- Κρύος χάλυβας – AISI, Η προεπιλεγμένη τιμή είναι 1. Μπορεί να τροποποιηθεί
Για το SkyCiv Beam, Ολα τα παραπανω, εκτός από τις μονάδες ανέμου, υποστηρίζονται.


